Map and location description - M1 | Korlasz Family Tomb BG: Siege of Dragonspear Guide
Last update: 11 May 2016
Key points of Baldur's Gate: Siege of Dragonspear - M1 Korlasz Family Tomb
Important areas on the map
Locked doors or chests
Traps
Important characters (allies, quest givers, merchants, potential team members etc.)
Dangerous enemies (main bosses, mini-bosses, stronger types of monsters etc.)
Important areas on the map
Starting area
You begin the game here. You may talk to Imoen and the Flaming Fist healer. All of the allies will be following the player's team through the entire dungeon.
There's a tomb exit here. Don't use it until you've located Korlasz (19).
Destroyed bridge
You can't use it. You have to reach the untouched eastern bridge.
Tomb - Ammon
Ammon resides here. You can attack and kill her (she'll summon monsters for help) or you can receive a "Tome of Great Value" side quest from her. It's about finding the cobalt moss. It's in the western crypt (18).
Sarevok's followers
You must defeat a group of enemies here. The northern door is closed and it leads to a crypt (05). You can use your thief's skills or you can find a key (06).
Tomb - Fanegonorom
You must open a locked door to get here - use your thief or find a key.
Fanegonorom (a mummy) resides here. You can attack and kill him or you can unlock "The Mummy's Orders" side quest.
Armory
You will encounter a group of enemies here led by Porios. You can defeat them in combat or you can convince them to surrender. You can obtain a tomb key here (05).
The armory contains a lot of weapons, armors and ammunition.
Stairs
You can use them to travel between the upper and lower level of the tomb.
Big room
You must defeat a large group of skeletons here.
Library
You'll find books, notes and scrolls here.
Tomb
A large group of zombies must be defeated here. There are a lot of traps in the area.
Beetle lair
You must defeat a large group of fire beetles and magma mephits here. You can collect a fragment of a wooden staff after the battle - it's needed for "The Shattered Staff" side quest (16).
Tomb
You must defeat a group of shadows here.
Big room
After you've defeated the monsters you can use a rope to return to the upper level of the tomb (14).
Rope
You can use the rope to travel between the upper and lower level of the tomb.
After you've used the rope for the first time you can unlock the northern door (18).
Small armory
You must defeat a group of burning skeletons. You can collect various melee and ranged weapons after the battle.
Grave - Restless spirit
When you try to open the grave a Restless spirit will appear. You can attack it and destroy it or you can agree to help in order to receive "The Shattered Staff" side quest. The quest is about finding two pieces of the mage's staff - they're in the beetle's lair (11) and in the large room with an altar where Korlasz resides (19).
Mechanism
Mercenaries are stationed here - kill them or convince them to leave. Once they're gone use the mechanism to open a large gate (16).
Tomb
You can get here using a rope on the lower level (13). Defeat the skeletons and take cobalt moss from one of the graves - it's needed to complete the "Tome of Great Value" side quest (03).
Altar
You'll meet Korlasz here and you must defeat her as a part of a main quest. Once you've won the battle you can kill her or take her alive.
One of the locked chests (use a thief to disarm a trap!) contains a fragment of the mage's staff needed to complete "The Shattered Staff" side quest (16).
Korlasz's private chamber
The most precious treasures are stored in a locked crate protected by a trap (scrolls, 3000 gold and other things).
Burned-out torch
You can take it and go to the room with the purple flames (21). Once you've lit the torch return it to where you've found it. As a result a secret room will unlock (22) - "Sarevok's Secret" side quest.
Purple flame
You may show up with a burned-out torch from the western room (21). Once you've lit the torch return it to unlock a secret chamber (23).
Entrance to the secret chamber
You can explore this room after you've lit the purple torch (21). This chamber contains two chests with valuable items (monsters will show up after you'll open one of them) and a page from Sarevok's notes. Picking it up will unlock the "Sarevok's Secret" side quest.
General information about the Korlasz Family Tomb
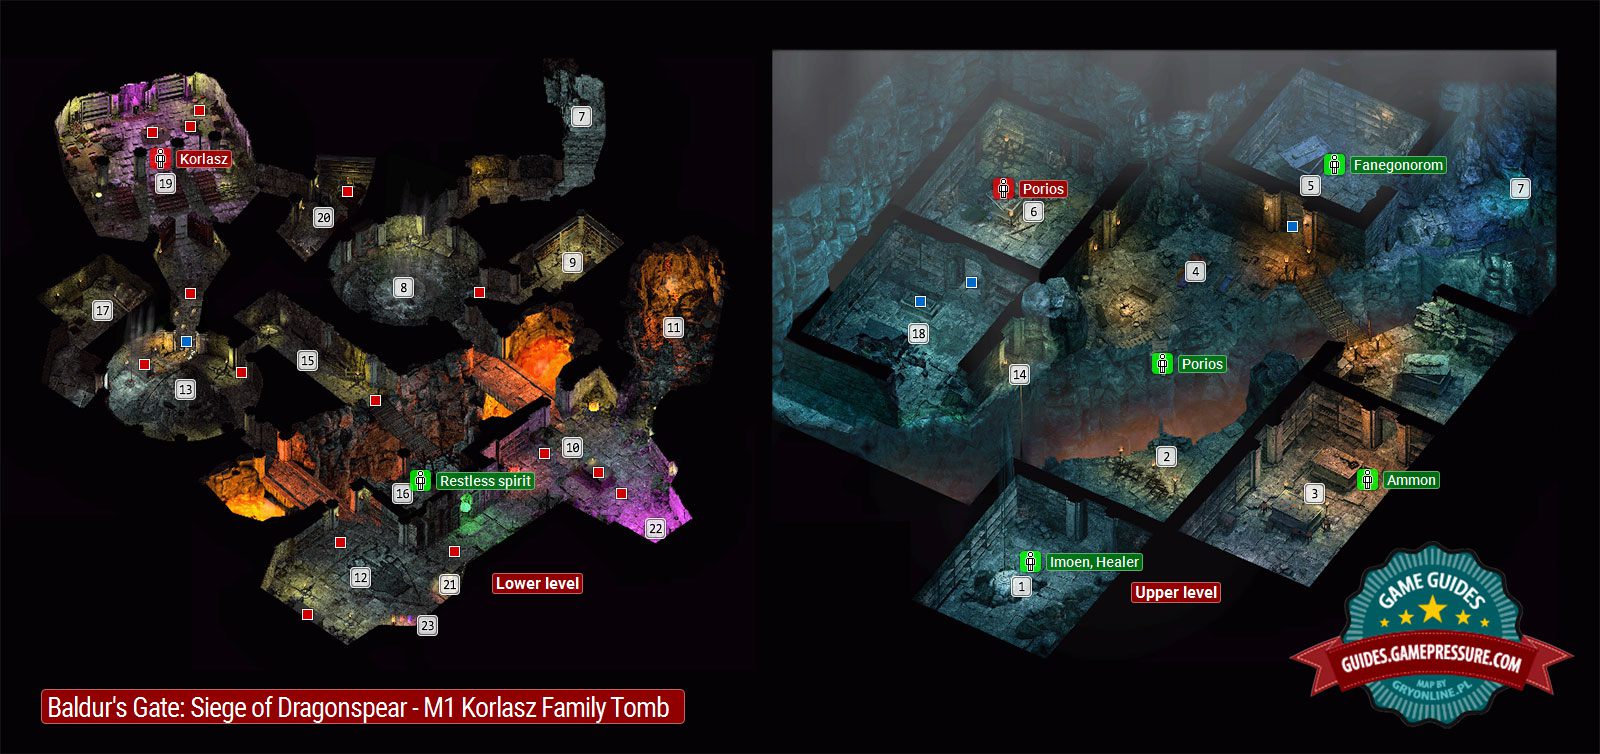
The above map presents the Korlasz Family Tomb, which you must explore right after the beginning of the Siege of Dragonspear expansion. It's a two-story location of moderate size, in which you can encounter Saverok's underlings, as well as various types of monsters. Your main goal during the visit in the tomb is to locate and capture the sorcerer named Korlasz, who can be found in the large hall at the bottom level of the location (M1,19). Don't force your way there, as you can complete various side activities while exploring the tomb. Aside from that, there are numerous traps scattered around the bottom level of the tomb, which can damage severely the party if you're not careful.
Most important places in the Korlasz Family Tomb
1. Starting location
By default, you will find a number of friendly characters here. Those are, above all else, Imoen, with whom you can speak about venturing into the tomb, as well as the Flaming Fist Healer. After interacting with the latter one, you can pay for healing, purchase potions and scrolls, and ask a series of questions about the methods of dealing with various undead creatures. You have to get back here during the final moments of your journey in the tomb (provided, that you won't decide to leave the location as soon as the battle with Korlasz ends).
Note - the allies mentioned above will follow the party while you are exploring the tomb. Thanks to that, you won't have to get back all the way to the starting location when, for instance, you need the services of the healer. Additionally, you can drag those characters into combat, by luring the monsters to the locations they are currently at.
3. Crypt - Ammon
Here you will meet Ammon, and you will learn, that the woman needs help with finishing her experiment. You can either offer her your services and unlock the Tome of Great Value side quest, or attack her. In the latter case she will summon a number of creatures to her aid.
5. Crypt - Fanegonorom
You can access the crypt by using thieving skills, or by finding the key lying in the area (M1,6). Here you will meet a mummy called Fanegonorom, from which you can get The Mummy's Orders side quest. Alternatively, you can attack and kill the mummy on the spot.
6. Armory
Exploring this room is optional. Inside you will find a mage called Porios, together with his guard. You can attack the enemies, or convince them to lay down their arms and surrender to the members of the Flaming Fist. You can acquire the key to the crypt with the mummy (M1,5) inside the armory. Additionally, there are numerous weapons and ammo in the room.
13. Large Hall
Inside of this place you will find, above all else, the rope, which can be used as an alternative method of traveling between the floors of the tomb. There's a closed gate here as well, which can be open with the mechanism located in the western room (M1,17). There's a group of mercenaries inside, who can be killed, or convinced to surrender.
16. Grave - Restless Spirit
After exploring the tomb, a Restless Spirit will appear. The best approach is to offer the help and unlock a side quest called The Shattered Staff. If you, however, prefer to attack the ghost, be prepared, as the enemy will summon a number of bats to aid him in combat.
19. Altar
This is the location at which you can find Korlasz, who must be defeated as a part of the main storyline of the expansion. After you've taken enough of her health, you can decide whether to finish her off, or to spare and capture her alive.
23. Entrance to the secret chamber
The room is very well hidden. In order to get inside, you must pick up the torch (M1,21) and go with it to the east, the room with the purple flame (M1,22). Then you must use the flame to light it up and put it back from where you have taken it. In the secret chamber you can most of all find a note collecting which will unlock the Sarevok's Secret side quest. In addition to that, there are two locked chests in the room - use a thief to open them. Opening one of them will trigger some monsters to appear.
A list of quests unlocked in the Korlasz Family Tomb
Finding Korlasz (main) - you will be given this quest automatically at the beginning of the game. Korlasz can be found in the large hall on the lower level of the tomb (M1,19), which is why you must travel through the entire tomb to get to her.
Tome of Great Value (side quest) - you must meet with Ammon on the upper level of the tomb (M1,3) and offer her the help in finding the moss cobalt. This ingredient can be found in a grave, in one of the western rooms (M1,18).
The Mummy's Orders (side quest) - you must speak with the mummy called Fanegonorom, which can be found in one of the rooms on the upper floor of the crypt (M1,5). This quest is closely related to the main one, as it requires you to kill Korlasz and her underlings (M1,19).
The Shattered Staff (side quest) - you must get to the grave of the Restless Spirit, located on the bottom level of the tomb (M1,16), speak with it and offer your help in getting back the fragments of a magical staff. You can find them in the beetle's lair (M1,11), and in the locked chest, in the room in which Korlasz can be found (M1,19).
Sarevok's Secret (side quest) - You must gain access to the secret chamber (M1,23) by collecting the torch (M1,21) and going with it to the purple room (M1,22). Then you must deliver the torch back from where you took it. After entering the secret room, search for Sarevok's note.

