Mission 7 - Eye of the Hurricane - p. 1 AA II: OA Guide
Last update: 11 May 2016
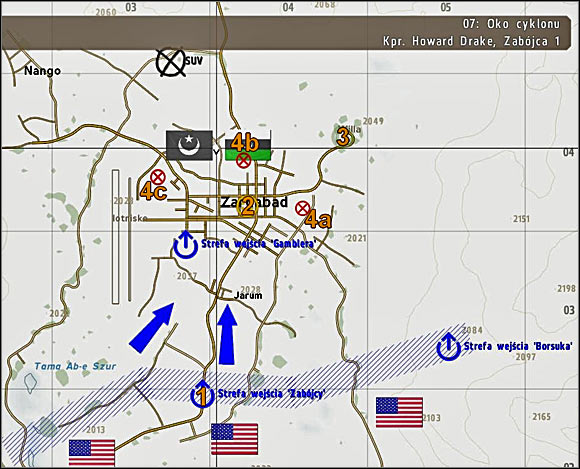
 | Date and place: Saturday, June 2, 2012, 6:00, the surroudings of Zargabad. Mission: A squad of mechanized infantry under the command of corporal Howard Drake, codename "Assassin-1" (1) has a task of eliminating colonel Muhhamad R. Aziz who is hiding in his villa (3) to the NE of the town and guarded by elite Takistani soldiers. |
The military intelligence says that this primary Takistani bad guy is going to escape from the town using his helicopter for this purpose. Obviously the CIA is wrong again - Aziz is going to escape, that's right, but he'll try to do this in his black SUV (Sport Utility Vehicle). You have also one more task - to destroy SCUD launchers (4a, 4b and 4c) which Aziz disposed in the town and which he uses to threat other Takistani... ekhm... metropolises. During this mission you'll also have an occasion to free the hostages (2) from a downed C-130 Hercules. They're being kept in the Palace, a building located in the centre of Zargabad. Traditionally, you have to avoid civilian casualties when conducting your military actions.
Support: there's a battery of mortars at your disposal, available by standard procedures (the 8 key).
Proposed equipment: A multi-role recoilless rifle MAAWS may prove its usefulness in this scenario - your squad is capable to take max. 2 pieces of this weapon and I'd suggest putting one of them on your shoulder. I was choosing for myself also SCAR-L Mk 16 assault rifle with attached grenade launcher and two sights mounted on this weapon - ACOG (for taking the bad guys down from a distance) and a miniature collimator (for close combat situations). This is very universal weapon: you may switch between available sights at any moment if you need to do this. Obviously, on the battlefield there may be also useful M249 SAW with optical sight and a sniper rifle SCAR-H Mk 17 may be a good option too - these are weapons for your subordinates, of course.
Successive objectives in this scenario:
- Save the hostages (2)
- Eliminate Aziz (3)
- Destroy SCUD launchers (4a, 4b, 4c)
![[1] - Mission 7 - Eye of the Hurricane - p. 1 - Operation Arrowhead - ArmA II: Operation Arrowhead - Game Guide and Walkthrough](/armaiioperationarrowhead/gfx/word/-1596879546.jpg) [1]
| ![[2] - Mission 7 - Eye of the Hurricane - p. 1 - Operation Arrowhead - ArmA II: Operation Arrowhead - Game Guide and Walkthrough](/armaiioperationarrowhead/gfx/word/-1596879531.jpg) [2]
|
After starting this mission you'll notice an abandoned Infantry Fighting Vehicle M2 Bradley parking in front of you at the place where Assassin-1 (1) starts this scenario. Now, if you want to perform all of your actions on foot, then I may only assure you that you won't be able to complete your tasks here. So I'd suggest hopping with the whole squad into this IFV (#1). One of your subordinates wears a helmet which is typical for American tankists so he can, for example, take a driver's seat in this Bradley. Furthermore, you may order your medic, for example, as a very precious soldier, to take a seat of a gunner. Then hop into this IFV as a commander and order the rest of your soldiers to get inside as passengers. In this way you'll be capable to use these better armed soldiers (with squad automatic weapon, sniper rifle, AT launcher, etc.) after ordering them to disembark (if there's a need to do this), as ordinary infantry, to cover your IFV in urban terrain, for example. De facto you shouldn't order them to disembark in this scenario not even once if you care about completing all the objectives. You'll be the only person who will disembark from your IFV several times. You should also notice immediately that your unit isn't the only unit which operates in this scenario and there are other American IFVs, tanks and gunships attacking Zargabad. Well, this is quite a nice battle... You'll be on the horns of a dilemma probably when still embarking your IFV. That's because the HQ sends via the radio the information that they know now where the hostages (2) are being held and asks if you want to save these poor civilians, or you still want to hunt for Aziz. This first option doesn't exclude the second one and SCUD launchers may also wait a while, so I'd propose freeing the hostages (2) first.
In order to save these hostages who are being kept in the Palace in the centre of Zargabad (2) you have to act fairly quickly. My tactic of saving their lives was relying on driving my Bradley to the Palace as fast as possible and even on getting with my IFV right under the doors of the Palace. Probably it's best to drive IFV by yourself, by taking the seat of a driver (#2), because AI likes to snake (as usual in this game's serie). I played this scenario couple of times and my IFV wasn't even once destroyed when I was driving through the city to the Palace (2), so it's not a suicidal action as it seems.
![[3] - Mission 7 - Eye of the Hurricane - p. 1 - Operation Arrowhead - ArmA II: Operation Arrowhead - Game Guide and Walkthrough](/armaiioperationarrowhead/gfx/word/-1596879515.jpg) [3]
| ![[4] - Mission 7 - Eye of the Hurricane - p. 1 - Operation Arrowhead - ArmA II: Operation Arrowhead - Game Guide and Walkthrough](/armaiioperationarrowhead/gfx/word/-1596879500.jpg) [4]
|
But if you see enemy vehicle in your sights (and there are several tanks T-55, T-72 and IFVs in the town) then you should quickly switch to the gunner's seat this time and personally destroy these armoured targets using Bradley's guided anti-tank missiles - TOWs (#3). That's because the gunner controlled by AI may have problems with this task. Pay attention that you must guide TOW missile until it hits the target. Takistani soldiers are also good targets for Bradley's 25mm cannon, this time, or for coaxial machine gun, especially if they carry with themselves very dangerous AT rocket launchers (RPGs). Don't pursue other soldiers if they're escaping into city streets - there's no time for this. When you're closing to the town's centre you'll surely see the Palace (2) - it's hard to miss it, it's very big. If you have a clean, not obscured line of fire then you can use Bradley's coaxial machine gun (but only this weapon!) to fire at the soldiers who are occupying the walls surrounding the Palace. But watch at what you fire, because the hostages (2) are being held exactly on the roof of the Palace! It's not worth to disembark from your IFV and play as sniper even if you have a sniper rifle.
Get with your Bradley right under the doors leading to the Palace (2) (even AI can do this!) - I was entering there through the gate situated on the east (#4). Park your vehicle near the entrance to the building, switch to gunner's seat and turn Bradley's turret in order to clean the walls and the courtyard of hostiles. This time you can use your cannon without killing the prisoners. You can disembark from a Bradley (but alone, your squad stays inside the vehicle) only when the area is cleared of the enemies - cautiously enter the building, the Palace (2).
![[5] - Mission 7 - Eye of the Hurricane - p. 1 - Operation Arrowhead - ArmA II: Operation Arrowhead - Game Guide and Walkthrough](/armaiioperationarrowhead/gfx/word/-1596879484.jpg) [5]
| ![[6] - Mission 7 - Eye of the Hurricane - p. 1 - Operation Arrowhead - ArmA II: Operation Arrowhead - Game Guide and Walkthrough](/armaiioperationarrowhead/gfx/word/-1596879468.jpg) [6]
|
Be very careful when entering this building and eliminate Takistani soldiers hiding near the entrances (they should be at this one located far and also on the sides of the entrance you're entering the building!). Kill also enemy soldiers who are crouching on the galleries above the entrances (#5) - there should be three opponents on these balconies, if my memory works fine.
Kill all these bad guys by cautiously walking upstairs and scouting around (#6). There are two ladders which lead to the roof of the Palace: it's safest to use the one which is situated - I don't want to lie now - on the southern wall of the Palace (2). When climbing up the second ladder you may be shot by the bad guy who is guarding the hostages.
![[7] - Mission 7 - Eye of the Hurricane - p. 1 - Operation Arrowhead - ArmA II: Operation Arrowhead - Game Guide and Walkthrough](/armaiioperationarrowhead/gfx/word/-1596879453.jpg) [7]
| ![[8] - Mission 7 - Eye of the Hurricane - p. 1 - Operation Arrowhead - ArmA II: Operation Arrowhead - Game Guide and Walkthrough](/armaiioperationarrowhead/gfx/word/-1596879437.jpg) [8]
|
When you're on the roof quickly draw out your weapon and kill both soldiers guarding the hostages (2) who are sitting under the wall - watch out and don't shot accidentally at these prisoners! (#7) The task of saving the hostages should be completed now. But if you want to complete this objective and find the prisoners still alive you must get to the Palace (2) really quickly: I was able to do this within approx. 5 minutes. Freed prisoners will then stand up and your job here is done - there should be another unit which will care about the hostages now.
It's time to eliminate Aziz now - he is hiding in his villa (3) located to the NE from the Zargabad. Go downstairs and return to your IFV. After getting with this Bradley outside the Palace (2) you'll probably have to fight against some armoured enemy vehicles which are patrolling the streets of Zargabad. Unfortunately you can count on these Allied units (Abrams tanks, Apache gunships, etc), because it seems that they are commanded by a band of idiots... Destroy all enemy vehicles like IFVs and tanks using your guided TOW missiles. Bradley's 25mm cannon isn't able to do anything to enemy tanks and even if its AP rounds are able to harm enemy IFVs it will take too much time - the time you simply don't have. There are short distances of firing in this urban terrain so fire your rockets after aiming at target's tracks or even lower, at the silhouette of the target (#8). Otherwise you may easily miss a shot. Pay attention also that you can fire in a short time interval only two rockets, one after one, from your Bradley's TOW launcher and the loading of the next rockets will take some time. So it's not a bad idea then to hide your IFV somewhere or at least to move out of sight of the hostiles. There should be several, two or three tanks, which may stand a threat to you now.