Hateno Tower | Shrines in Zelda Breath of the Wild Zelda Breath of the Wild guide, walkthrough
Last update: 18 June 2019
Myahm Agana Shrine
Chaas Qeta Shrine
Dow Na'eh Shrine
Kam Urog Shrine
Mezza Lo Shrine
Tahno O'ah Shrine
Jitan Sa'mi Shrine
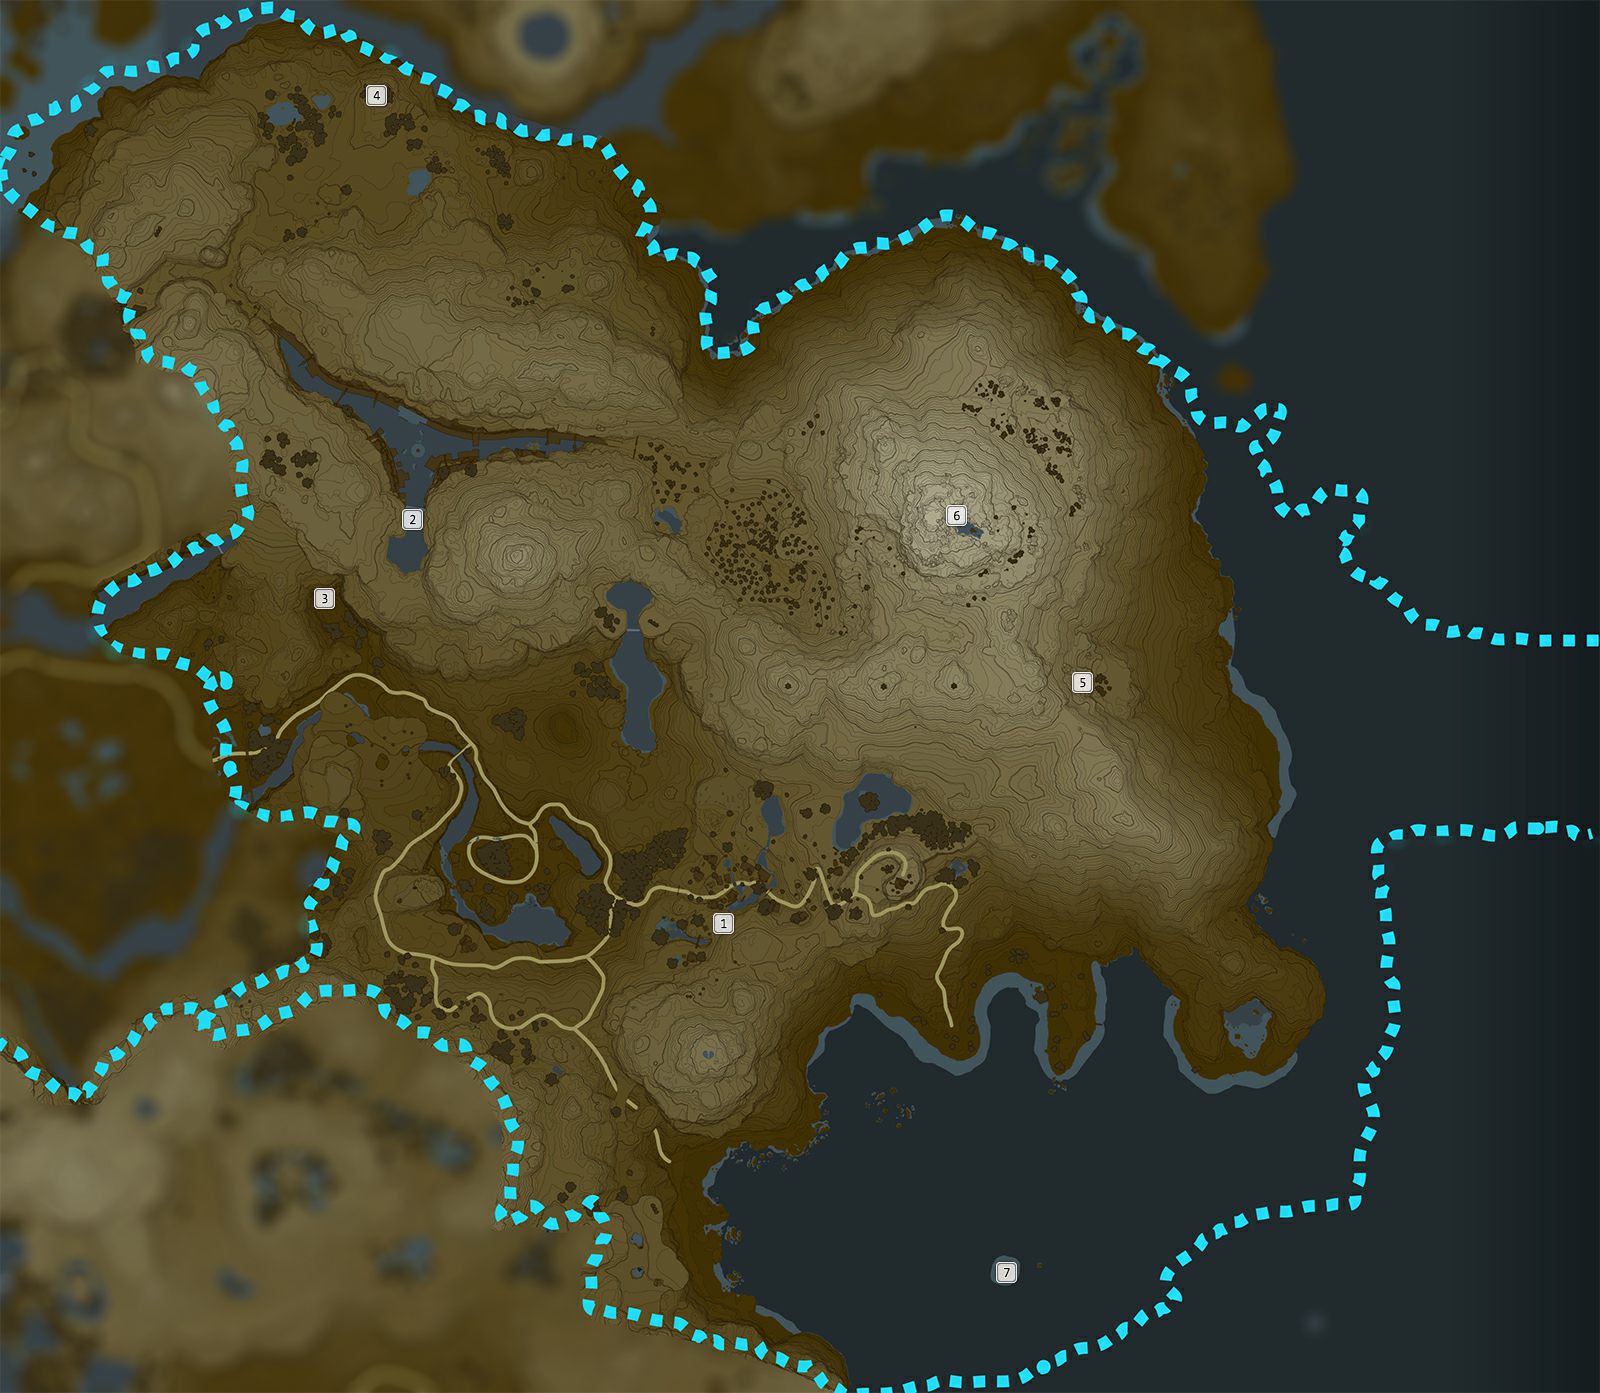
Hateno Tower is a location in The Legend of Zelda: Breath of the Wild with 7 Shrines. Below you can find a detailed walkthrough of each Shrine. Their location has been marked on the map.
- Myahm Agana Shrine
- Dow Na'eh Shrine
- Kam Urog Shrine
- Mezza Lo Shrine
- Tahno O'ah Shrine
- Jitan Sa'mi Shrine
- Chaas Qeta Shrine
Myahm Agana Shrine

Your task is to use the controller to set a set of movable platforms. Turn right to face the stairs and activate the pedestal. Rotate the next platform - you'll find a chest containing a Phrenic Bow. Simply jump down to the path below to return to the pedestal. You'll need to direct the orb to the ramp in order to for it to land in the hole. You can skip the labyrinth by turning the ramp - the ball will fall to the plain side. Simply direct the ball to the path to unlock the Spirit Orb.
Dow Na'eh Shrine

The entrance to the shrine is located in a cave beneath the waterfall. If you've made it to the cave, use Magnesis Rune to fish out a crate that contains an Opal. The elevator platform contains a new crate containing gold, while the elevation on your left contains a crate with a Zora Sword.

Your next objective is to use the Magnesis Rune to carry all crates to the central field. Then, use the rune to carry the unlocked block to the elevator and pick-up a new Spirit Orb.
Kam Urog Shrine

You'll need to complete a Shrine Quest before you can enter. Talk with Calip - your task is to find a cursed statue and destroy it. The eyes of the cursed statues gleam in the dark. Shoot them to unlock the entrance to the temple.

You'll have to get past a set of rotating platforms. Follow the long platform with cogwheels and wait for the stairs. Jump on them and ascend to the end of the staircase to pick-up the Spirit Orb.
Mezza Lo Shrine

Talk with Kass, the playing bird to Begin the Shrine Quest. Your task is to tame a stag. Make your way to the nearby forest and tame a stag same way you would tame a horse, then return to Kass.

Hit the crystal to move the elevation which can be attached to other platforms. Visit the chest on your left to pick-up the Thunderblade. If you've made it to the chest, shoot an arrow at the crystal and use Magnesis Rune to carry the empty chest to the switch. Continue by using the Stasis Rune on the laser.
Tahno O'ah Shrine

Destroy the weakened wall to access the shrine. This time, simply follow the stairs. Open the crate to find Climbing Boots, and continue to pick-up the Spirit Orb.
Jitan Sa'mi Shrine

The pre-requisites to this stage are quite complicated. Begin by approaching the statue located at the foot of the mountain. Shoot the dragon's eye with your bow and proceed the same with the remaining eyes which are planted along its silhouette. If you're having problems with finding the eyes, use the Paraglider and the airflows that will keep you in the air. Finish up by firing at the dragon and dive in to pick-up Naydra's Scale which has been dropped by the dragon.

Make your way inside to pick-up the Frostspear from the chest and climb the stairs to get the Spirit Orb.
Chaas Qeta Shrine

You'll be pitted against a Guardian Scout who has three weapons at his disposal. Consider postponing the encounter and revisiting the temple in the later stages of the game, as the fight itself is very difficult. Defeating the Scout rewards you with Guardian Spear ++, Ancient Battle Axe ++ and Guardian Sword ++. Pick-up the Climbing Gear and Spirit Orb from the chest.

