
Upper Blackrock Spire WoW: Warlords of Draenor Guide
Last update: 11 May 2016
The last of the presented dungeons is the Upper Blackrock Spire. Right next to Everbloom, it is the longest of instances that you visit. In here, you fight six bosses, where one of them is optional.
You start in a fortress cut in a rock - Blackrock Mountain. This complex has been built ages ago by the members of the Dark Iron clan. As of now, the fortress is being occupied by the forces of the Iron Horde, who plan to build a weapon of mass destruction within the mountain. Your mission is to prevent that from happening.
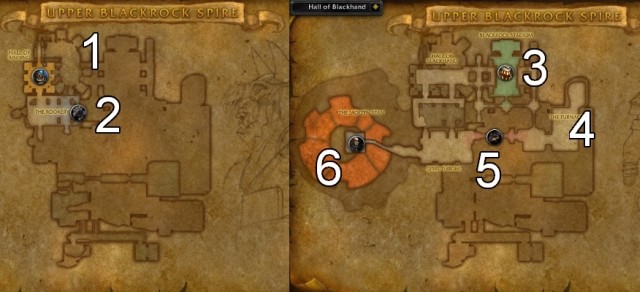
1. Orebender Gor'ashan

Your first objective is to eliminate several groups of enemies in the room around the starting chamber. You should not have any problems here. After you defeat the last one, a door will swing open in front of you, behind which, there is your first major opponent - Gor'ashan.

Gor'ashan is one of the easier opponents. You only make sure that you do not take too much damage. The opponent himself is standing in the middle of the arena on a platform, throughout the entire battle. This is the platform that you should be standing on, throughout the majority of the battle, too. This way, you will avoid taking damage from the orb of energy circling around below. You can note, straight away, that at the walls of the room, there are spherical cages. Gor'ashan will occasionally use [Power Conduit], which makes one of the cages transfer energy to Gor'ashan. Each cage makes the opponent take 14% damage less and , after some time, he will be able to use [Thunder Cacophony], which may claim 30k of health points from each party member.

To prevent him from doing that, you need to jump off the platform, dash up to that cage and right-click on it. At the same time, you need to be very careful because there is the [Electric Pulse] circling around the cage which damages you for around 25k health points per second. You need to time your drop from the platform well. This will provide you with enough time to deactivate the cage. You'd better do it one-by-one and return onto the platform each time because, you may take damage from the orb of energy, otherwise.
2. Kyrak

Directly after the battle with Gor'ashan you encounter another opponent - Kyrak. The fight is not too complicated. First, you need to kill two of his guards, who may make fighting the boss more complicated. You need to watch out for [Eruption] that Kyrak uses, and which may deal 60k damage to you, if you are not careful enough.
Kyrak, basically, uses three abilities. The most dangerous one is the [Debilitating Fixation] where Kyrak locks on one of the characters and deals 12,5k damage per second. You can interrupt casting this ability with an appropriate spell. When Kyrak's health level drops below 50%, he starts using the [Rejuvenating Serum], which restores up to 16% of his health points within 12 seconds. Also this ability can be interrupted. The battle itself should not be too long, the most important thing is to kill Kyrak's guards first, and him himself later on.
3. Commander Tharbek

Another boss battle is preceded by three waves of opponents summoned by him. Each time, they appear behind the closed grate in one of the walls. Only after you deal with all of the enemies, you will be allowed to face Tharbek.
Tharbek's attacks are based on AoE, to a large extent. First, you need to avoid the [Incinerating Breath], which deals 25k damage per second, as well as [Noxious Spit], which forms a pool of acid that damages you for 25k health, per each 1,5 seconds of being affected by the pool. It is worth remembering that Tharbek himself deals lots of damage in melee so, your healer should keep an eye on the tank's health.
4. Son of the Beast (the optional boss)

This is an optional opponent. He is staying in one of the side rooms of the fortress. You do not receive any reward for killing him and the boss is a reference to the earlier dungeon, i.e. the Blackrock Spire. During the battle, you need to watch out for the [Fiery Charge], where the boss charges towards a randomly selected party member, as well as the [Terrifying Roar], which makes your character keep escaping for 5 seconds.
5. Ragewing the Untamed

Before the final battle, you are to cross the bridge guarded by a huge dragon. The majority of the battle boils down to avoiding the AoE attacks and dealing as much damage as possible. The battle itself can be divided into three phases.
In phase one, Ragewing will mainly use the [Engulfing Fire] where he breathes fire. The opponent starts in one spot and describe an arch with the flames. If you are not staying within the flames, it is easy to avoid.
When the opponent's health drops below 70%, he starts flying high above the bridge and using [Fire Storm], which is a series of fireballs that you need to escape from.
During this last phase, Ragewind lands on the bridge and mainly uses the [Magma spit]. It is a fire projectile that, apart from dealing damage, forms a circle of magma that deals damage to those who stand in it.
6. Warlord Zaela

The last battle in this instance is against Warlord Zaela. Also in this case, the battle has been divided into three phases. In the first one, you will be able to attack the boss directly. Still, you need to watch out for the frequent [Black Iron Cyclone], which is cast on a randomly selected party member. If you stay within the range of such a cyclone, you take 45k damage per 1,5 seconds.
When Zaela's health level drops below 60%, he mounts a dragon and circles around, above you, for 40 seconds. Then, his minions enter the battle and you need to deal with them in the first place. Occasionally, Zaela attacks you from above with the [Burning Breath]. In such a case, you need to get away from the burning area.

After 40 seconds, Zaela returns to the platform, regardless of whether you have dealt with the rest of the opponents, or not. The type of her attacks does not change, but the wyvern that used to circle around above you, keeps landing the [Burning Breath]. The rest of the battle should not surprise you in any way and if you avoid the flames effectively, the battle ends after several minutes.