Formation PES5 Guide
Last update: 11 May 2016
The formation isn't the most important thing necessary for luck (i.e. to achieve success). Of course it is capable to decide of the success of the game but also can be insistent, no through bad arrangements, but through opponent being pain in the ass who delights working out your formation and stops the game over and over in order to arrange next, comical strategy. And therefore I appeal to you: if you think that you will be favorites in the game arrange some offensive strategy and try to play with it through the whole match. The culture of playing requires it from us a little bit. I tested all formations and strategies - really, each of them is capable to manage with the opponent without any problem. Experience and the review of the field is the key here. We will obtain interesting effects even playing with the 3-2-5 system.
Team work
Let's back to Team work attribute. It is so important that it isn't possible to skip it and in order to understand every aspects of the formation it is necessary to take advantage of it skillfully. I will base the example on the 4-4-2 formation. If I choose the other one it will be marked. Team work is often mistaken with Positioning and Playmaking although they are based on similar principles.
- We play with the positional attack. We play ball between: CMF, CF, RB (side defenders go out often in 4-4-2 to help), RMF. If RMF has the ball and he isn't able to center from the wing because the opponent is locking him, then RB/CMF/CF if it has high Team work than it will run for the position behind RMF, good to center. RMF is passing to the nearest player then, the one who left for the position.
- Counter-attack: OMF/CMF is running for the goal, he is in the vicinity 40 of meter in front of the goal; attackers are trying hard to go for the position to giving the shot. The attacker with the high attribute will be looking for places where defenders are absent; either will run to the wing in order for centering the ball.
- Players with the high attribute are filling in positions well: if they are attacking your goal and the one defender stayed somewhere in the front that CMF will fill in the line of defense.
- Positional: central halfbacks are playing the ball between themselves; if attackers and wingers have the high attribute they are able to exchange positions.
- Players with the high attribute are running more on the pitch, it can be checked after the full time in score properties of the player.
Team work is causing some confusion on the PITCH but it is bringing measurable effects in case of good mastery of the situation by the player. And one more: notice that it doesn't have to be quite necessary to gain success. It is worth too check which team have the average value of the attribute, and if they are playing well.
Zones
They're five of fields under the surname of the player. One of them is always marked. It means the shifting zone in the formation. The more red it is the further formation is moved. If we are playing it for the right goal the most red zone will mean: players are moved to offensive. It is being operated with: L1 + R1 (offensively) / R2 (defensively). It is possible to check it in the time of performing the throw-in. More about this option is in the further part.

Formation's behavior
Starting the match you probably noticed on the radar, that players, which don't possess the ball at a given moment, are more concentrated (contrary to players which possess the ball) on the pitch's width to the center or moved to the ball direction. It is obvious thing. Let us do math: the pitch has an average of 70 meters of the width, with 4 defenders we have zone of 18 meters for every defender. If the defense is located on the width of the penalty field it will result in 10 meters for the player. You don't have to be anxious about centers then, since there are yet wing halfback. After all we are defending the goal rather than wings, thickening the field only will help us.

If our player gets the red card his place won't be replaced with somebody else in the formation. We have to do it manually.
Players' form
Word about the form. It is presented in the form of arrows. The more upwards the better. If they are pointed up, some attributes grew (although it can't be seen in the window) and the weaker player with such a form can be really good. It's contrary with arrows down. The horizontal arrow is pointing the normal value of attributes (that is the player is such what his attributes point to). It is worth testing it in Match Mode -> Exhibition where we are able to choose the suitable form. The player with the weak form is shooting poorly penalties and is losing fast his stamina.

For the red arrow values are changing from 6 to 12 units of the attribute. For gray from 6 to 12. Near the yellow cross (light minor injury) the value will fall down from 18 for 32.
Dealing with pitch's pictogram
In every submenu of the formation we are able to view players' (L1/R1, on the right-hand side from surnames):
- the position and the number,
- stamina and form (extremely important thing), if we marked the Cumulated Fatigue option it is the belt under stamina which marks fatigue with many matches,
- cards,
- executors of constant fragments of the game.

Additionally (L2/R2, pitch's pictogram):
- player's position
- player's number and position
- level of the involvement in the offensive game
- level of the involvement in the defensive game (the bigger arrow the better)

Substitutions
We are making substitutions here. This strange hexagon is able to help us within comparisons. ATT - the attack, TEC - the technique, STA - stamina, DEF - the defense, POW - strength of the shot, SPD - speed. We can see the dissimilarities also on the attributes screen. We are making substitutions with X. If we have made the substitution already but it wasn't yet performed we are able to cancel it proceeding same way we did the substitution.
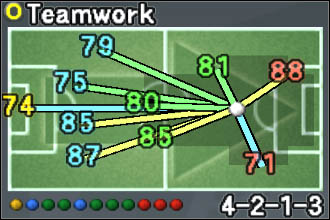
On this screen we are able also to see cooperation of players with the Team Work attribute. Pressing once we will see attribute values referring to players of the same team. Pressing the second time we will see lines with colors corresponding to values of cooperation. Shifting after players' surnames with we will notice dark field appearing on the pitch's pictogram - it is pointing the best positions (Position in the review of attributes L2/R2) for players. It is possible to see players also from the substitute's bench.
Set formation
Change | We will set the formation here. Default is team's default formation. |
Position Edit | We are able to arrange the player's exact position here in the formation. |
Select role | We are able to arrange more exact positions in relationship with the formation. The side defender is able to be CB or L/R B, CMF can act as DMF or OMF etc. |
Automatic sort | The computer is arranging players automatically to the formation according to their abilities. |
Auto-sort opp. team | Opportunity of an automatic arrangement of opposite team's player's in the first line-up based on their current form. |
Team
Attack/Defense | It is about zones, I was writing about at the beginning. Manual - means that we will be arranging manually; Auto-defense - the computer will be arranging defensively; Normal - balanced arrangements; Auto-attack - formation advanced to the front more often. |
Defense system | Normal - every defender without assigned covering will be covering the player who will enter to the defense zone. Sweeper - we are choosing the player who will be acting as the sweeper, that is he will be filling in lack in covering, usually covers nobody. Line defense - players are trying to line of defense always being complete, Mark settings aren't working. |
Team strategy | Back Line - the line of defense will go out far away to the front. Zone Press - a few players will be using pressing. Offside Trap - the defense will try to offside. Counter Attack - players will be lining up with the face forward not paying attention to the place of the ball on the pitch. But - means that tactics will be executed aggressively but condition will be falling fast. B - means that tactics will be executed restrainedly. C - means that tactics will be executed without bigger amounts of strength. |
List settings | All above-mentioned options from the menu Team are located here. |
Strategy
Manual | During the match L2 + O,X,/,[] turn on/turn off strategies. The strategy arranged by the player is located under every button. |
Semi-Auto | The computer is matching the strategy for the player during the match, but we are able to turn on the single one from arranged earlier with R2. |
Formation A/B | Formation arrangements A/B. |
Copy to... A/B | Current arrangements will be copied do A/B. |
No strategy | We are playing without the strategy. |
Normal | We are playing "normally", arrangements are balanced. |
Right Side Attack | More players will be gathered on the right side of the pitch. |
Left Side Attack | More players will be gathered on the left side of the pitch. |
Opposite Side Attack | If we are running with the ball on the right flank players will be trying to gather on the other side of the pitch. |
Change Sides | Left is passing to the right and vice versa, only halfbacks and attackers, excellent for disorientation of opponent. |
CB Overlap | The defender or "free player" is helping us additionally during the attack in attack line (we choose the player). |
Zone Press | Stronger pressing, remark: defenders (also and other players in the formation) are running to the player possessing the ball in opposite team in order to take it away and in the same time they are capable to be more easily outplayed, and then "gaps" in the line of defense are created, which are very easy to be used. |
Counter Attack | Attackers and offensive halfbacks during defensive actions are staying in the front, they aren't moving back to the defense. |
Offside Trap | Moving over the line of defense to the front of about 5-10 meters for two seconds, executed wrongly results in serious consequences. |
Formation A/B | We are arranging formations for ourselves on the higher menu and during the match we can change it, it isn't working when Semi-Auto strategy is on. |
Individual
Attack | We are arranging here whether the player during the attack (during possessing the ball by the team) is supposed to go out far away and to which direction or to move back rather. |
Defence | How much the player is supposed to become involved into defensive actions (High/Normal/Low). |
Mark settings | How to cover players: Zone mark - covering with the zone, players are trying to be in the one line. Covering - the player is trying that ball will not to go through his line of the play; he isn't concentrating especially on watching or for covering the zone. Man mark - individual covering, player is covering opposite player (Normal/Aggressive). |
Edit position | We are able to arrange the player's exact position here in the formation |
Select role | We are able to arrange more exact positions in relationship with the formation. The side defender is able to be CB or L/R B, CMF can act as DMF or OMF etc. |
Kicker/Capitan
Select kicker | Executors of constant fragments of the game: FK: L - from 30, R - to 30 meters to the goal CK: L - on left, R - on the right side of the goal. PK - executor of penalties. |
Select capitan | We are choosing team's captain. Option without any importance on course of the match. |
Quick setting
We have prebuilt strategies here. It will be enough merely to choose the formation and something from this menu. I am advising to watch well pitch pictogram (attack/defense/position in the formation) at the choice of the arrangement.
Stock
Saving or loading the formation.