Pacemaker part 2: Map - Tunnel 3 Unmechanical Guide
Last update: 11 May 2016
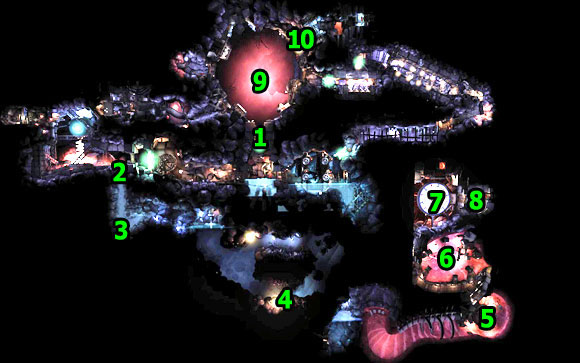
MAP - TUNNEL 3

![Once you get back from mines, take the shiny sphere and place it in the third gripper in center of the location [#9] - Pacemaker part 2: Map - Tunnel 3 - Walkthrough - Unmechanical - Game Guide and Walkthrough](/unmechanical/gfx/word/1553594421.jpg)
Once you get back from mines, take the shiny sphere and place it in the third gripper in center of the location [#9]. Time to get fourth, last sphere. Since you have a swimsuit you can go to the only place where it can be usable. So head to the tunnel [#1] leading to the place, where you were throwing objects to water in order to raise its level [#2].
![Fly into water and go to the very bottom [#3] - Pacemaker part 2: Map - Tunnel 3 - Walkthrough - Unmechanical - Game Guide and Walkthrough](/unmechanical/gfx/word/1553594437.jpg)
Fly into water and go to the very bottom [#3]. You should find objects dropped there. Important: it would be good to take one of stones with you, so you won't have to get back here.
![Stay at the bottom all the time, until you reach the tunnel [#4] with button next to it - Pacemaker part 2: Map - Tunnel 3 - Walkthrough - Unmechanical - Game Guide and Walkthrough](/unmechanical/gfx/word/1553594453.jpg)
Stay at the bottom all the time, until you reach the tunnel [#4] with button next to it. The manhole opens only when the button is pressed, so place the stone you took from previous location on it and then fly into the tunnel.
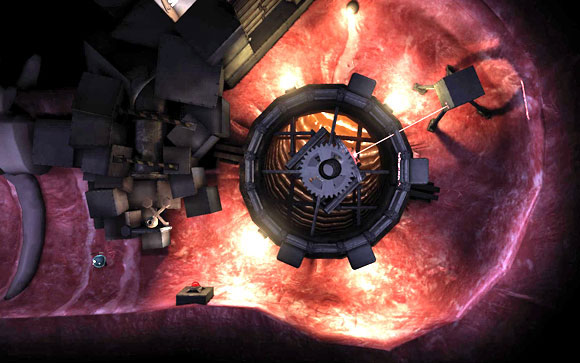
Move further. Fly up from the tunnel. You should find yourself in some kind of guts. Ultimately you should reach the next puzzle [#5] with revolving laser. The piston releases the bomb. Your task is to get the bomb and reach the gate with nearby organ. You have to damage it. Watch out for the laser, because if it touches the bomb, the bomb will explode. If you fail to get there in one attempt, you should consider hiding behind the metal box in the right upper corner (at two o'clock more or less). Try to fly with them bomb in a moment when laser passes you by.
![The next puzzle has three phases and it depends on your skill a little [#6] - Pacemaker part 2: Map - Tunnel 3 - Walkthrough - Unmechanical - Game Guide and Walkthrough](/unmechanical/gfx/word/1553594484.jpg)
The next puzzle has three phases and it depends on your skill a little [#6]. First take a bomb and throw it to one of channels marked on the above screen. Once the bomb start to fall quickly cut the laser beam so the bomb can reach the next tunnel. You have to determine correct height - it can't be done too low!
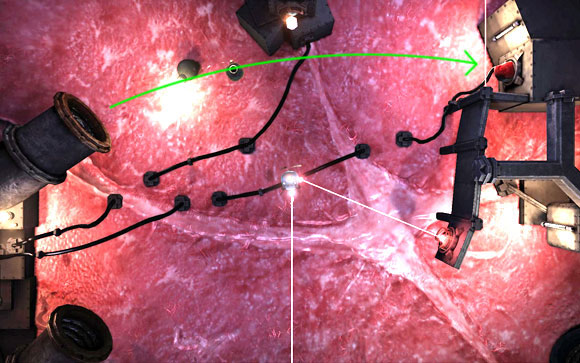
Once the bomb flies over you, quickly fly to the place where two laser beams intersect, so the bomb can reach the organ.

Once the bomb explodes, go to the gate. It is open only for limited time.
![Before you get the last shiny sphere, it is time for more difficult puzzle [#7] - Pacemaker part 2: Map - Tunnel 3 - Walkthrough - Unmechanical - Game Guide and Walkthrough](/unmechanical/gfx/word/1553594531.jpg)
Before you get the last shiny sphere, it is time for more difficult puzzle [#7]. And once again, there is more than one solution. Initial arrangement of colors is shown on the above screen.

The task is to arrange colored textures that two parts in direct contact have different colors. On the screen above you can see one of possible solution. Below you'll find description on how many times you should switch particular part (from the initial arrangement of colors!) to get the above solution:
B: 1
D: 2
F: 1
G: 3
I: 1
J: 3
K: 2
L: 1
M: 3

Once the gate is open, move further. Use the piston [#8] to get the shiny sphere from the gripper and then fly with it into the open channel.
![Place the sphere in the fourth, last Pacemaker's gripper [#9] - Pacemaker part 2: Map - Tunnel 3 - Walkthrough - Unmechanical - Game Guide and Walkthrough](/unmechanical/gfx/word/1553594578.jpg)
Place the sphere in the fourth, last Pacemaker's gripper [#9]. After a moment shiny spheres without shield will appear. You have to arrange them in such way, that they are in range of generators which power their bulbs. A correct arrangement of the spheres is shown on the above screen.
![A massive gate [#10] should be opened now, thus allowing you to get to the next location - Pacemaker part 2: Map - Tunnel 3 - Walkthrough - Unmechanical - Game Guide and Walkthrough](/unmechanical/gfx/word/1553594593.jpg)
A massive gate [#10] should be opened now, thus allowing you to get to the next location. Use the piston to open the manhole.