
Uncharted 4: Chapter 11 Hidden in Plain Sight - walkthrough Uncharted 4 Guide
This page of the Uncharted 4 guide has a walkthrough for chapter 11 – Hidden in Plain Sight (the Founders' Wheel puzzle, clock tower climb).
Last update: 27 January 2022
This page of the Uncharted 4: A Thief's End guide has a walkthrough for chapter 11 - Hidden in Plain Sight. You will learn, e.g. how to go through the marketplace in King's Bay, how to climb the clock tower, how to solve the Founders' Wheel puzzle, how to escape from the town, how to catch Sam, and run away from the armored vehicle.
- Chapter 11 information
- Cross the bazaar
- Reach the main hall in the clock tower
- Make it over to the top of the clock tower
- Find the secret chamber
- Founders' Wheel - the first and the second set of seals
- Solution to the puzzle with the Founder's Wheel - the third set of seals
- Solution to the puzzle with Founders' Wheel - the fourth set of seals
- Escape the town
- Catch up with Sam
- Avoid the armored vehicle
Chapter 11 information
The eleventh chapter has been divided into several parts that are significantly different from each other. The beginning of the chapter is mainly about exploration, first of the town and then of the huge clock tower. After they reach the secret chamber, Nate and Sully will have to solve a quite complicated puzzle Founders' Wheel. The final part of the chapter, on the other hand, is a series of cases and shooting during the escape from King's Bay.
Note - during this chapter, you will have the opportunity to unlock several unique trophies. This walkthrough mentions where they can be found, but to learn more, you will have to consult the chapter devoted to trophies.
Cross the bazaar

After the chapter starts, come down the stairs to the bazaar. Take the first turn to the left and after you squeeze through the people at the bazaar, go towards the alley on the left shown in the screenshot. At the end of the alley, there is the first Treasure (Earthenware Mug). Return to the bazaar and explore its right side. You should come across an "interactive stand" where the owner has put a rare artifact on display. Interact with it to start negotiations. You cannot affect the course of the conversation, so keep pressing the Triangle as soon as the icon appears on the screen. Nate will buy the artifact, thanks to which you obtain another Treasure ("Antique" Compass).

You can now go deeper into the bazaar. Your character should be stopped by women selling apples. It is a good idea to buy one. Go a bit ahead and note that there is a min with lemur on his shoulder, sitting on the left. Play with the lemur and walk away slowly. The animal should catch up with Nate, jump onto his shoulder and steal the apple, thanks to which you obtain a hidden trophy - Don't Feed the Animals. Take several steps ahead and talk to Sully about pets and you will have completed an optional conversation. You can now continue across the bazaar.
Reach the main hall in the clock tower

Your destination is the large clock tower and unfortunately, the main entrance is inaccessible. Therefore, go right where Sully will note the opened window. Approach the corner on the right and move left. Jump towards cornices. Finally, grab on to the ledge above and reach the window. After you get inside the clock tower, examine the symbol on the floor and explore the neighboring rooms. Inside one of them, there is another Treasure (Nephrite and Jade Bowl). After that, climb the stairs into the main hall.
Make it over to the top of the clock tower

Place the coin in the central mechanism and watch another cutscene. Your climb to the top of the clock tower has been divided into two parts. The primary goal of the first phase is to reach mechanisms that activate the smaller bells. It is important in which order you activate them and to find out about the order, use Nate's journal- you have to activate bells in the following order Scorpio, Aquarius, Leo and Taurus. First of all, go to the partly destroyed spiral stairs and use your grappling hook to get to the ledge above.

Jump over to the neighboring ledge and onto the large weight. Reach its upper part and jump towards the neighboring ledge. Climb onto the top element of the ledge and jump towards the weight. It will start to go down again. Take advantage of the fact that the weight on the left started moving up. Jump over onto it, at the last possible moment, and jump towards the projecting plank quickly. Do not worry if you do not make it, because you can keep jumping from weight to weight until you succeed.

Face the large cogs and start climbing over them. Move right and take a jump across one of the openings of the largest cog (the one that is set perpendicularly to Nate). After several moments, you will reach a ledge with a mechanism with Leo sign on it. Since it is not the first one that you have to activate, you have to ignore it for now. Climb over the nearby cogs again. This way, you will get to the Scorpio mechanism shown in the screenshot. You have to interact with the turning wheel to start the first small bell. You will watch a short cutscene, which shows that a fragment of the floor, next to Sully, has moved.

Turn your attention to the cogs on the left. Both of them rotate downwards and this means that you cannot stay for longer on any of them, because Nate will fall down. After you reach the left-most cog, start climbing over it and wait for the pendulum on the left to appear within a short distance of you. Jump towards it, move to the very top, lean back and jump after you will get sufficiently close to the ledge.

You are now close to the Taurus mechanism and, since this is the last one on the list, you have to ignore it. Turn left and find a ladder of a kind, thanks to which you can get to a ledge below. This way, you will reach the Aquarius mechanism shown in the above screenshot. You can activate the second one of the bells, thanks to interacting with the turning wheel.

Ignore the cogs to higher levels of the tower and, instead, stand on the projecting wooden beam shown in the above screenshot. Wait for the possibility to jump onto the big cog. After Nate grabs on to the weight, move as far to the left as possible. Jump to the ledge on the left.

Wait for the weight to start moving up, jump towards it at the last possible moment and right after you grab onto it, jump towards the ledge on the left. You can now climb onto the ledge where there is the Leo mechanism shown in the above screenshot. Activate the third bell.

The last thing to do now is reach the Taurus mechanism. You have to climb over the nearby rotating cogs again. First, you will get to Scorpio mechanism this way. You do not need to reactivate it. Grab on to the cogs and jump towards the pendulum. Wait for it to come closer to the new ledge and jump towards it. You can now activate the fourth bell, shown in the above screenshot. You will watch a longer cutscene and this will mean that you have progressed to the second phase of the climb.

Your main goal in this part of the climb is to reach the largest bell in the clock tower that you have just seen in the cutscene. Take the stairs that lowered near the ledge that Nate is on. After you climb up, turn back and use the grappling hook on the grappling point above. Jump towards the neighboring ledge. Climb onto the large lever. After you hang down from it, you will temporarily halt the huge cogs on the left. Climb up them and reach the ledge high above.


Jump out of the window for a moment and see the clock on the right. You have to make the minute hand move to the vicinity of the tenth-fifteenth minute (to the far right). Return into the tower, hang down from the bottom cog (screenshot 1) and remain in that position until the minute hand gets where you want it (screenshot 2). After that, leave the tower again, start jumping towards the ledges and use both of the clock's hands of the clock to get to the right.

Keep moving to the right and, after you come close to the corner, use your grappling hook on the grappling point above. Reach the tainted-glass window and climb upwards. After a while, you will reach a larger balcony, where there is the main bell. Ignore it for now and take a look around for interactive ledges on the walls of the tower, thanks to which you can carry on with the climb. Climb onto the balustrade and walk carefully over the wooden beams. On one of the balconies here, there is another Treasure (Ivory Handle Dagger).
Note - if you want to obtain hidden trophy I Can See My House From Here!, you have to reach the very top of the clock tower. Fortunately, the last phase of the climb is not too challenging.

Return to the balcony with the large bell. Try to interact with the turning wheel here. You will fail. Move to the left and jump towards the big clock. Lean the analog stick up, thanks to which Nate will start to swing. Do not release the stick until the bell starts ringing. The entire bell structure will start to collapse in a moment and you will have to react quickly to hat is going on. After Nate starts sliding down, be prepared to jump towards the pendulum. A moment later, start to climb over the rotating cog. Finally, use the grappling hook (L1), before Nate slams against the ground
Find the secret chamber

Start with examining the spot where the big bell fell. This is because you can find here the last Treasure of this chapter (Brass Globe Hand Warmer). You can now go towards the rubble. With Sully's help, Nate will open a passage to the next location. Climb down the stairs and open the door to the chamber with the Founders Wheel. You will have to solve a quite complicated puzzle here.
Founders' Wheel - the first and the second set of seals
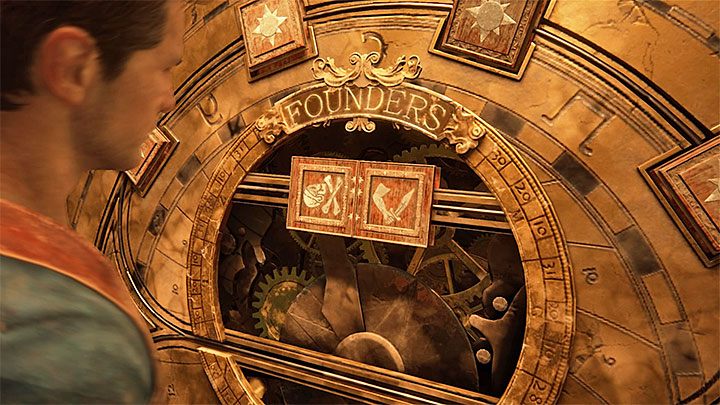
Approach the wheel and see the first two seals. The one on the left represents Avery, and the one on the right - Tew. You have to turn the left seal to the left, by pressing L1 and the right one to the right, by pressing R1, The mechanism will reset and three more seals will appear. You can now walk away from the wheel (Circle), because you will be unable to solve the puzzle before you analyze its rules.
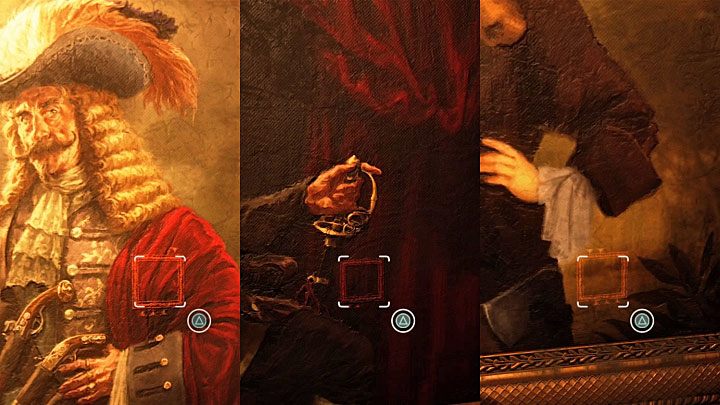
Note that this has opened a passage into a side chamber. Go there and examine the three paintings hanging there - of Adam Baldridge's, Christopher Condent's and of Anne Bonny's. You have to approach each one of the paintings and take a closer look at them (hold down L2). The plan is that you have to find a symbol on each of the paintings and press Triangle. The hidden symbols have been shown in the above screenshot.

Nate will open his journal now, where you can see drawings of seals and black triangles on their edges. The solution to this puzzle is to rotate the individual drawings in such a way, so as to make the rows triangles neighbor each other. Rotate the middle drawing (Bonny) to the right (R1) and put it away (Circle). Select the objet on the left (Baldridge) and rotate it to the left (L1). Finally, select the object on the right (Condent) and rotate it to the right (R1). The result should be like what you can see in the above screenshot.
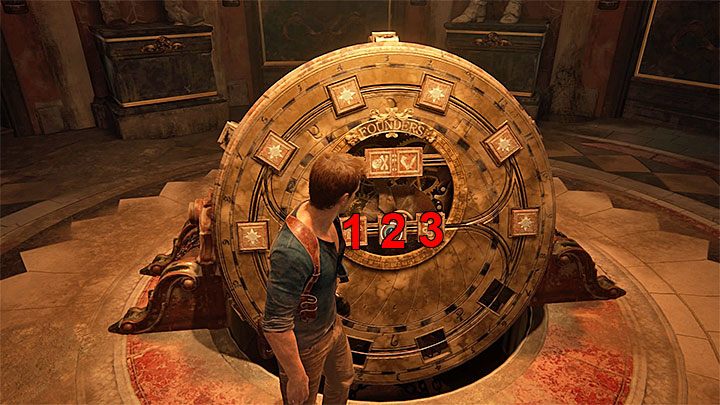
Return to the Founder's Wheel and repeat the steps that you have take in the case of the journal. Turn left symbol 1 in the above screenshot (L1), turn right symbol 2 (R1) and turn right symbol 3 (R1).
Solution to the puzzle with the Founder's Wheel - the third set of seals

IF you have done everything properly, the wheel will "accept" the combination and new symbols will appear. Nate will not be able to recognize them and will send photos of them to Sam, Wait for Sully to make a phone call and decides that the symbols should be sent to Sam. Wait until Sully gives you the phone. It is a good idea to seize this opportunity to obtain a hidden trophy Glamour Shot. First, take a photo of Sully's (rotate the view to the right). Then, take photos of the new seals.
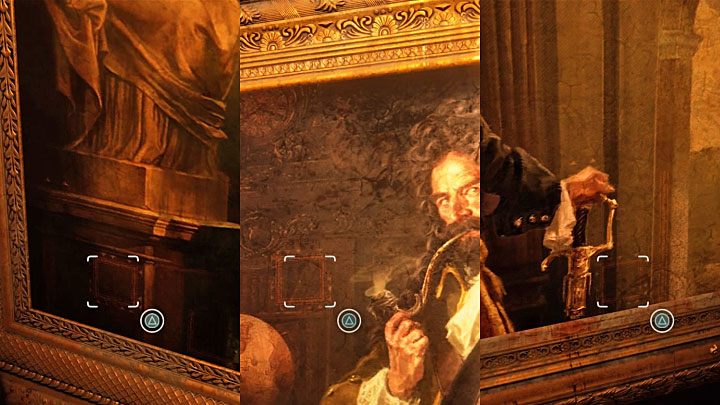
Do not wait for Sam to call you and go into the new chamber. After you get there, approach the tipped painting on the right and press Triangle to hang it back up on the wall. Then, examine the painting to find the symbols shown in the above screenshot. After you have found three of them, you will receive a phone all. Take it and listen to the conversation with Sam (start searching for the symbols again).
After you have opened all of them, access Nate's journal. Rotate the first object (Nate)to the right (R1), the second one (Farrell) to the left (L1), and rotate the third one (Mayes) to the right twice (R1, R1). You can now return to the Founders Wheel and repeat the sequence. Rotate symbol 1 the above screenshot to the right (R1), rotate symbol 2 to the left (L1) and rotate symbol 3 twice to the right (R1, R1).
Solution to the puzzle with Founders' Wheel - the fourth set of seals
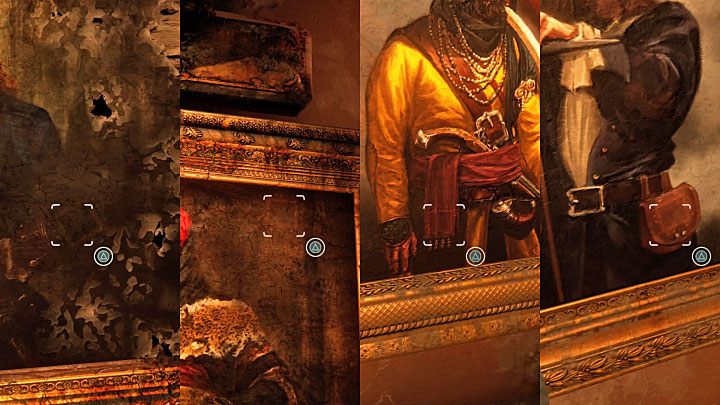
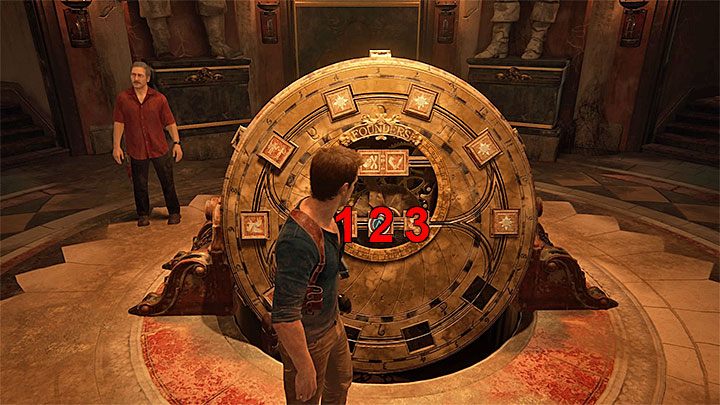
There are four new symbols that appear on the Founders' Wheel. Just like earlier, you have to photograph them first. Go to the last chamber that you have not yet explored, where there are four paintings on the walls. Note that two of them are impossible to be identified with their labels - this will make solving this puzzle a little bit more demanding. Start by finding the symbols shown in the above screenshot and, in the meantime, read the text from Sam.
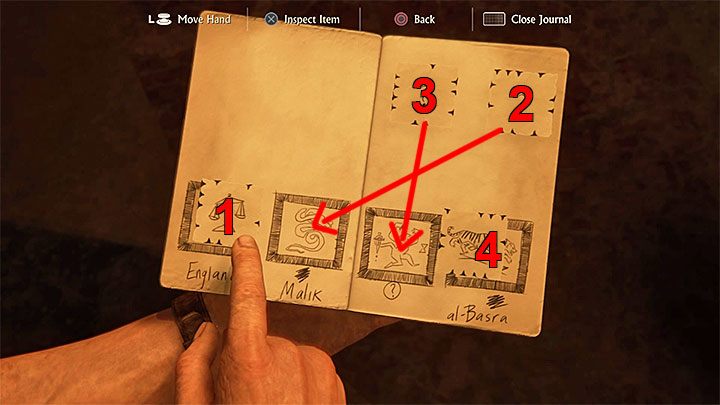
Access Sam's Journal. This time, it is not going to be as easy to figure out the correct combination. Start by rotating element 1 (the screenshot) twice to the right (R1, R1). Pick up question mark 2, move it to the second slot Malik), rotate it left (L1) and release it. Select question mark 3, move it over to slot 3 (the only one without a caption),rotate it twice to the right (R1, R1) and release it. Finally, select element 4 (al-Basra) and rotate it right (R1).
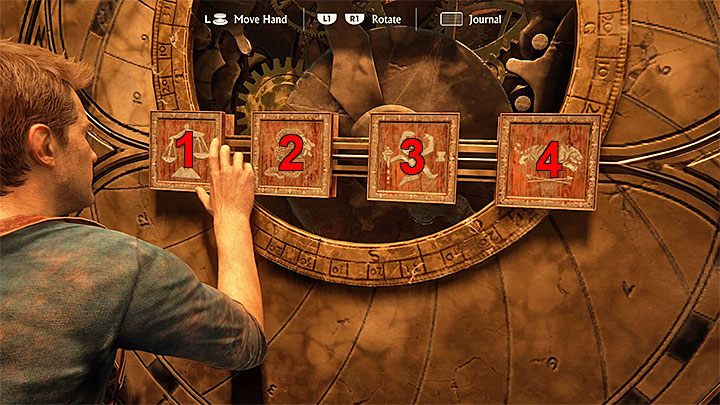
You can now return to the Founders' Wheel and interact with the seals. Rotate symbol 1 in the above screenshot to the right twice (R1, R1), rotate symbol 2 left (L1), rotate symbol 3 twice to the right (R1, R1) and rotate symbol 4 once to the right (R1).
As a result, Founders' Wheel will transform in a way. This is nearly the end - you still have to photo the three round elements that have appeared on its horizontal surface. This will result in a cutscene.
Escape the town

Follow Sully. After a while, you will reach exit door and it is a good idea to keep your eyes open here, because you can obtain a hidden trophy here Glamour Shot. To obtain it, you cannot move the pad in any way (also looking around, using the right analog stick is forbidden), up until the next cutscene starts playing. After you regain your control over Nate, remain still for 30 more seconds. Only after you receive the trophy, an you start squeezing between people. Soon, opponents will arrive and a fight will ensue. Attack the opponents while hidden behind stands and move to the left, or right, whenever necessary. It is a good moment to obtain a better weapon, e.g. a Kalashnikov

After you make sufficient progress to the front, an enemy armored vehicle with a mounted machinegun will arrive. For the next several minutes you will be pestered by the crew of the vehicle. Do not attempt to fight back because you cannot destroy the vehicle, even after you use grenades. Instead, rely on covers and avoid remaining covered up for longer behind objects that can be easily destroyed (e.g. wooden crates). Keep eliminating the regular opponents and head towards the building on the right, at the corner of the street (the one with green door and fragments of elevation), into which a group of opponents will disappear.

After you come close to the entrance of the building, deal quickly with the rest of the opponents that may be staying inside. After you walk inside, keep to the right wall and use the pillars you pass by for cover. The armored vehicle will soon ram into the building across one of the walls. React to this quickly and dash towards the stairs to the upper floor. Climb onto the staircase and go up. Here, walk out into the balcony, but watch out for two mercenaries that will be trying to jump you there.

After you have eliminated all of the mercenaries, go left. Ignore shots fired by the armored vehicle and start jumping over rooftops (from left to right, in turns). You have to reach the parking lot where you have started in this chapter. You find there the jeep that you have been using in the previous chapter and now you will use for escape.

While driving, do not pay too much attention to your route, because it is quite linear, in spite of what may seem. Usually, you have to follow the camera. The only exception are situations, in which an armored vehicle appears out of a sudden in your way. You then have to determine a quick reroute then and, e.g. take a turn into a side alley or ram into a fence. Try to locate this type of vehicles and shortcuts as quickly as possible. This is especially important if you are playing on a higher level of difficulty because the machinegun fire can quickly drain Nate's health.

Things will get complicated after you reach a small market place, because Nate and Sully will determined that the route is blocked off. Quickly, swerve to the right, cross one of the buildings and drive towards the wide staircase shown in the above screenshot. You can continue driving down. After a while, you will drive into a construction site and this is where you have to turn right. Then, take the path to a small elevation next to one of the excavator. In the final part of the chase, use the jeep to jump over the rooftops of buildings and head towards the white tower.
Catch up with Sam

You will watch a short cutscene of Sam escaping the pursuers on a bike. Follow the linear route, where you first drive along the highway and then continue, more or less, alongside it. Do not attempt to drive out into the highway too early because you will fail. Instead, continue off-road up until the moment that you reach a wooden pier. Prepare to use the grappling hook and grab on to the arm above. From now on, only try to lean left or right to avoid colliding with obstacles.

Soon, a more advanced chase after Sam will start. In the course of it, Nate will be initially dragged over a muddy area. From now one, you have to be more careful (especially at higher difficulty levels) because Nate an easily die after he is targeted by the enemy, if you do not act fast. Start shooting at the enemy jeeps and bikes that appear near the truck. Each time, try to target tires of the enemy vehicles, because they will be eliminated from the chase easier, this way.

After a while, you will get under the fire from an enemy in the back of the truck that you are being dragged after. Shoot him and start dragging yourself towards the truck. Jump inside and collect weapons and ammo there. Hide behind the cover and start shooting at the enemy vehicles. Target not only tires but also men with guns in the enemy vehicles. This is so, because their fire may cause the tarpaulin to fall off and expose you to the enemy fire.

You do not have to stay in the back of the truck throughout the entire chase. After it suffers enough damage, you can jump over to the neighboring truck. Keep firing at the enemy, but watch out for men that may try to reach you. Later, you will get the opportunity to jump over to the enemy jeeps. In this case, keep pressing the Square button to eliminate the passenger in melee and then the driver. After you have taken the jeep over, apart from avoiding obstacles, also try to push the enemy bikes off the road, which will eliminate them from the chase.

In the final part of the chase, some of the enemies may be trying to jump over onto your jeep. In such situations, collide with e.g. the more fragile fences to shake them off. Thanks to this, you will avoid additional melee fights. Keep getting closer to Sam's motorcycle. After you get close enough, the game will start a cutscene.
Avoid the armored vehicle

Soon, an accident will take place and after you regain control, pressing Triangle and then move towards the passenger door (lean the left analog stick in the proper directions). As soon as Nate opens the door, shoot two opponents. What is left is "only" the last phase of this chapter, i.e. escaping the armored vehicle while on the bike. During this scene, keep firing at the engine of the car. This will prevent the driver from ramming into you. Soon, your fire will end in destruction of the enemy vehicle and this chapter will end.