Uncharted 4: Chapter 10 The Twelve Towers - walkthrough Uncharted 4 Guide
This page of the Uncharted 4 guide has a walkthrough for chapter 10 – The Twelve Towers (exploration of Madagascar in a jeep, lowering the bridge).
Last update: 27 January 2022
This page of the Uncharted 4: A Thief's End guide has a walkthrough for chapter 10 - The Twelve Towers. You will learn, e.g. what attractions and secrets await you on this open map in Madagascar, how to drive the jeep, how to defeat mercenaries, lower the drawbridge and explore the large tower.
- Chapter 10 information
- Driving the jeep - part 1
- Encountering mercenaries in the tower
- Driving the jeep - part 2
- Exploring the main area of the map - Madagascar map
- Getting to the drawbridge
- Lowering the drawbridge
- Getting to the bigger tower
- Exploring the tower
- Eliminating enemies in the tower
Chapter 10 information
In this chapter, Nate, Sam and Sully will have to explore a large area with a jeep. The path to the volcano is not a direct one, but the game usually allows to investigate each discovered location. There are a lot of secrets to be found: fifteen treasures, four entries and two notes. Furthermore, Nate will be able to have two optional conversations.
Remember - you can destroy cairns in this chapter (they are related to Not a Cairn in the World trophy). If you want to learn more about their locations (screenshot + detailed information of all the sixteen cairns), go to the part of the guide devoted to trophies.
Driving the jeep - part 1
You can start by destroying the first cairn (hit it with your vehicle). Continue your journey till you reach the ruins presented in the screenshot. Get out of your car and head up to investigate the ruins. Climb to its highest elevation and find your first treasure (Sawasa Ware Tobacco Box). Get back to the jeep.
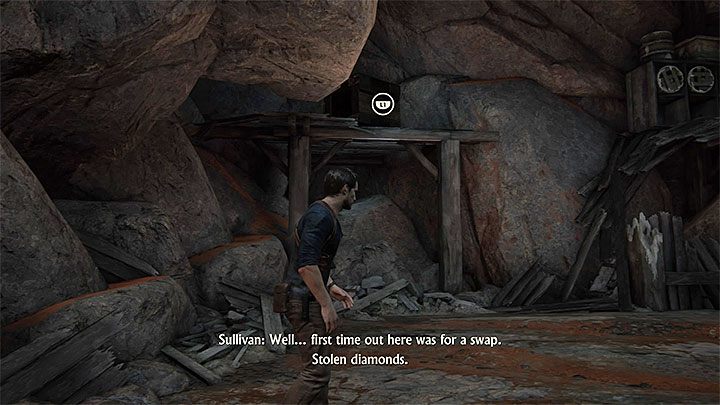
You will get to a larger location with a waterfall on the left. Destroy the second cairn and head to the waterfall. Enter a large cave behind it. Leave your allies here and explore the rest of the cave by yourself. There is interactive container on the upper left shelf presented in the screenshot. Grab it with your grappling hook, pull it down and push towards the right stone shelf. Climb it and collect the second treasure (Eroded Flintlock Pistol). There is a note from the diary next to it. Get back to the jeep and leave the cave.

Head towards a wooden bridge, located opposite the place where you started to explore the waterfall. Drive under the bridge and find the third cairn. Choose the right path. Avoid mud or your jeep will get stuck. Instead, drive through rocks or gravel. Get to the very top and locate forth cairn on the left, and drive carefully through an unstable bridge.

The fifth cairn is right behind the bridge. Hit it and carefully drive up the nearby hill (remember to avoid mud). The right part of the path is covered in mud, so steer to the left. You will have to drive your vehicle through large rocks and destroy the sixth cairn. Continue your journey through the rough terrain. Soon, you will reach the seventh cairn.

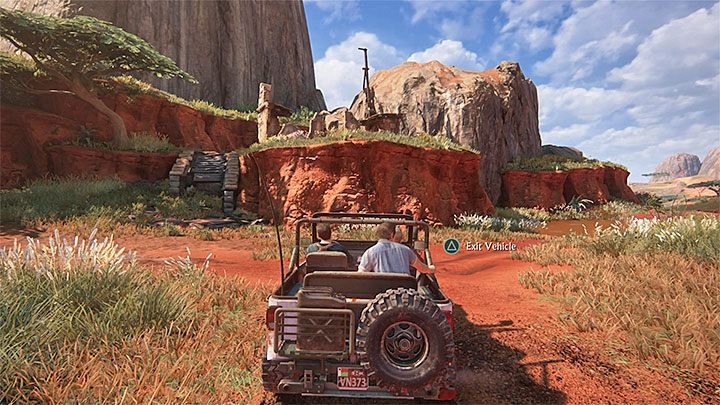
Stop your car when you get to new ruins, get out of it and investigate the ruined building. Investigate the sign on the ground - it's the first entry to the journal. Remain in the building and climb higher. There is a treasure (Mughal Ivory Powder Flask). Leave the ruins and head for the nearby hill. Approach the tree, investigate it, and listen to Nate's comment.

Get back to your vehicle, approach its front bumper and press Triangle to interact with the winch. When you pull out the rope, get back to the tree (use stairs again). Walk around the tree and attach the rope (see screenshot). Return to your jeep. Get inside and use the pedal. Your vehicle will be hoisted. Detach the rope and continue your journey.

Get to the new location and head left. Search the eight cairn located on the rocks. There is a ruined building not far from here. Get out of your vehicle and search the ruins for another treasure (Parchment Scroll). Drive along the main road. Reach the location presented in the screenshot and destroy ninth cairn. Leave your car and look around the dark area between the rocks. There is a treasure (Ancient Fertility Idol). Get back to your jeep and soon you will get to a nearby tower, which is surrounded by mercenaries.
Encountering mercenaries in the tower

Don't try to run your foes over with your vehicle (unless you play on the easiest difficulty level), or get to the wooden bridge behind the tower. Take a moment to plan your next move and take out at least some of the enemies silently. You should drive to the tower from the right and stop at high grass presented in the screenshot. Leave your vehicle and sneak till you reach the upper right shelf where the first sharpshooter is located. Kill him when others are looking in another direction, and pick up (if you want to) his sniper rifle - Mazur LDR.

It is recommended that you get to the tower and climb to the top. On further floors, look for weapons and grenades, and eliminate single watchmen. At least one of them will have a RPG. Furthermore, there is another sniper at the very top of the tower, so you should kill him too.

Clear the tower and decide what you want to do next: you can get back downstairs and silently eliminate further opponents, or attack them right away with your sniper rifle and RPG. Unfortunately, shooting at mercenaries from the tower is not such a good idea when you play on higher difficulty levels, as they will throw grenades at you, and can shoot you down with one of their RPGs (you can resolve the problem by moving between floors, or waiting till Sam and Sully distract your foes).

Regardless of your decision, that more mercenaries can be called (but not necessarily) for help, and if that happens, expect them near the wooden bridge. You shouldn't wait for them to get near the ruins. On the other hand, you can use your RPG to destroy the truck (when it stops by the bridge), or the sniper rifle to take down enemies that will run across the bridge (it's the only passage that they can use to get to you).
Driving the jeep - part 2

Once the battle is over, you should pick up weapons and ammo, and look around the area. Locate the detonator presented in the screenshot. Use it to destroy the door at the tower. Get inside and investigate a new symbol on the ground to second entry in the journal. Find your jeep (lower button of the axis) and return to it.

Head towards the previously mentioned bridge. Unfortunately, you won't succeed in crossing it (it will partially collapse). Drive your car to the untouched part of the bridge and use the winch. Approach one of the stanchions, attach the rope, get back to your vehicle and use reverse gear. Press the pedal till you break the stanchion completely. You will create a ramp that will grant you access to the further part of the map.

On your way, look for the tenth cairn, and another ruined building. Leave your vehicle and make your way to the upper part of the ruins where you will find treasure (Pocket Celestial Map). Get back to your jeep and move along.
Exploring the main area of the map - Madagascar map


There are many treasures to be found in this area. Furthermore, you can also encounter some mercenaries. The screenshot presents the area, which includes:
1: Start - the place where you start.
2: Building - a single building with a treasure in it.
3: Well - access it to find a treasure and a note.
4: Building - located on a small hill that you can get to via narrow path. You will a treasure here.
5: Ruins - get there via narrow tunnel. You will encounter some enemies and a treasure.
6: Ruins - some more opponents and another treasure.
7: Exit - get here to continue your journey to the drawbridge. You can do it right away (ignore locations 2-6) or once you explore the entire map.

You will start in location 1 and the eleventh cairn can be found here. Destroy it and move left towards location 2 (see screenshot). Stop your vehicle next to the wall of the presented building, climb the bonnet and jump towards an interactive edge. Climb the roof and use your pistol to destroy explosive crates from a safe distance. This will grant you access to inner part of the building. Jump inside, get to the main room and collect treasure (English Ale Bottle).
Remember - there is a Flintlock pistol next to the treasure. You can collect it if you missed it in one of the previous chapters and you want to unlock the trophy associated with using all the weapons that you come across in the game.

Get back to the car and head right from the starting point. Your objective is the well - location 3. Stop your vehicle by the well, get out of it and interact with the winch. Use the rope to jump inside.

You will get to a small cave. Head right, but stick to the edge, not to attach the rope to one of the pillars. You want to tie it to the pillar that will have the winch symbol above it. Tie the rope and wait for Sully to use reverse, and thus collapse the pillar. This will let you use the wooden log, turn right and jump towards an interactive edge. There is a treasure (Pewter Letter Cylinder) in the upper cubby. Return down, but before you leave the cave, look around for a skeleton. Next to it there is the second note from the journal.


Get back to the jeep and head towards location 4. It's situated on the left from the starting point. A narrow and curvy path will take you to the hill, and its starting point is presented in picture 1. Stick to the rocks and steep scarps on the left, and you will get to your objective in no time (picture 2). Destroy the twelfth cairn and explore the building. Collect another treasure (Mughal Box).

Carefully drive down the hill and head for ruins in location 5; they are situated further to the right from the starting point. On your way, look around to locate the thirteenth cairn. Your objective is presented in the screenshot - it's a tunnel that is located right under a white tower that you can't access at the moment. Go through the tunnel and stop your vehicle when you reach the new area. You will encounter some enemies here.

If you want to explore the ruins, you will have to deal with the mercenaries first. They are well-equipped, so you should try to eliminate at least some of them silently. Sneak up to your enemy from the right side. Kill a single foe that you will come across and another one that will guard the nearby roof. Use ruined buildings and walls to take cover. Shoot at explosive barrels whenever enemies place themselves around them. Win the battle, find the well and destroy barrels to access it. Treasure (English Musket Bandolier) is in a small room.

Location 6 is the last remaining optional location (see screenshot), and it is situated further to the left from the starting point (behind a lonely house on a hill that you investigated before). You will encounter some more enemies but you can easily take them down (use high grass to hide). Kill them, find a detonator and use it to access a new part of the ruins. There, you will find a treasure (Antique Tea Tin).

When you make sure that you explored the main part of the area, head to location 7, the path to a drawbridge. The path is presented in the screenshot. You can also find the fourteenth cairn, next to it.
Getting to the drawbridge

You will reach a small tower that you have seen from the bottom before. Destroy the fifteenth cairn on the left. Park your jeep near the tower, get out and use Triangle to unlock the third entry in the journal. Approach the tower and wait till two optional conversations are available - the former with Sam and the latter with Sully. Climb the top of the tower and collect treasure (Scottish Two Pence Coin). Get back to your vehicle and continue your journey towards the drawbridge.
Lowering the drawbridge

Park your car as you please and head to the right tower. Investigate the symbol on the ground and unlock the forth entry in the journal. Get to the back of tower, locate an interactive edge and start climbing the tower. Reach the top and push a crate hanging from the crane.
Once the crate lands near the mechanism of the drawbridge, push it towards the broken stairs and climb it to reach the upper mechanism, responsible for the drawbridge.

Unfortunately, mercenaries will appear as soon as you try to lower the drawbridge. Throw grenades at opponents that won't have enough time to get out of the truck. Leave the "viewpoint" if you don't want to be a sitting duck. You don't have to make your stand by the drawbridge, and may as well go back to the abyss occupied by foes. Keep close to your allies, don't let enemies flank you, and beware of heavy-armored mercenaries.

Once you deal with enough enemies, another truck will arrive not far from the first one. Once again, you can use grenades or RPG to kill foes before they even leave the vehicle. Watch out for a mercenary with China Lake GL, as he can kill you on spot. Win the battle, collect this rare weapon (if you want to), and lower the drawbridge.
Getting to the bigger tower

Get back to your jeep and cross the drawbridge. Drive up the hill, avoid mud and destroy the sixteenth cairn. Soon, you will reach a place where a steep scarp will prevent you from continuing your journey. Leave your car, interact with the winch and head up. Tie the rope to a tree and try to reach the top. Prepare for a sudden twist. As soon as Nate lands on the jeep, move left and only then start to pull up. Get back to the driver's seat and wait for the action to end.

Charge and use the nearby ramp to land on a bridge that will directly take you to the tower. Exit the car and use the stairs to reach the top. The main entrance is locked, so use turn left and investigate the right corner to treasure (Scottish Snuff Mull). Locate a barricaded entrance and ask Sam to help you break it down (start pressing Square).
Exploring the tower

Reach the first room and use Sam's help to push a bookcase on the right. You will find a weak wall. Now find an explosive barrel, place it by the weak wall and shoot at it. Use the unlocked passage that will take you to the locked gate that can be opened with the left winder.

Enter a new room but don't follow Sam just yet; there are two secrets to be found. The first treasure (Brass and Ivory Tankard) is hidden behind the crate on the left. The other treasure (Muff Pistol) is in one of the right crates - use grenades or firearms to open it. Now you can go downstairs. Follow the path and squeeze through the rocks to access the main chamber. A cut scene will be displayed.
Eliminating enemies in the tower

The final battle in this chapter will be a tough one. Not only will the mercenaries attack, and thus prevent you from hiding, but there also is little place to take cover. If you took the China Lake GL, as suggested, fire at your enemies, before they have enough time to regroup. Look to your left and right and don't let armored enemies with shotguns get too close (use explosives or aim for the head).

Another group of foes will appear after some time, and one of the mercenaries will have a grenade launcher. He ought to stay in the position presented in the screenshot, thus killing him is a priority. Once the fight is over, meet with Sam and check his photo to end the chapter.