Uncharted 1: The Search for El Dorado part 2 - Chapter 2 walkthrough Uncharted Drakes Fortune guide, walkthrough
Last update: 15 April 2020
This page of our guide to Uncharted: Drake's Fortune contains a detailed description of the second part of Chapter 2 - The Search for El Dorado. In this part you continue to explore the ruins and solve many new puzzles. The protagonists will also have to face a stage where they have to escape from a collapsing structure.
 | 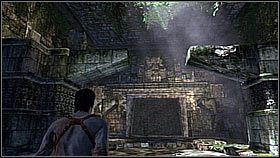 |
To allow Sully to descend, the main hero shot the explosive barrels hidden behind the pile of stones. [1] This revealed the ladder. Sullivan went downstairs and ran to lit another lantern. This led to the closing of doors behind us and the opening of new ones. We got into the next room with a few rocky ledges and a bridge. Nathan checked the diary and examined the four signs on the tiles on the ground. [2]
 |  |
Now the 4 big buttons had to be activated in the right order. The first was marked with a square cog. To get to it, all you had to do was climb up the rock ledge on the opposite side of the room, in the right-hand corner. [1] Nathan activated it (Triangle) and the first of the columns has emerged from the ground. [2]
 |  |
The next button to activate was the one marked with a human figure. To reach it, Nathan had to grab the edge of a fissure in the wall next to the first button and move left to get to the other ledge with the second button (marked with a spider), which would come in handy later. [1] From this ledge Nathan had to jump on a devastated column - Nate grabbed the edge and got to the other side of it, and then jumped on a part of the broken bridge. [2]
 |  |
He activated a button on the bridge. The next in line was a block marked with a spider - the one which our hero has passed a moment ago. All you had to do was jump back on the overstressed column, bypass it while hanging on the edge and get to the opposite area. [1] The last object that had to be activated was located on the second half of the bridge. Nate once again came back to the first half of the bridge and then jumped off to the next half. There he activated a button decorated with a not very satisfied face. [2] It was also possible to get to the bridge by moving through the rocky ledges located on its side walls.
 |  |
Nate jumped off the bridge, trying not to fall into the now-opened chasm. The hero descended to it carefully by using a ladder. [1] Then Nate had to jump over the rocky shelves to the left - the middle one started to collapse while he was hanging on it, but he agilely managed to jump further and not to fall down. [2]
 |  |
There was a strange block in the new room. The hero moved it towards the entrance, so the tank underneath has filled up with extra water. [1] Nate jumped into the water. In fact, there's only one place you could actually get out of the water. Here, Drake sensed another pot of gold at the end of the rainbow - just after leaving the water he moved ahead holding on to the right wall and just a few yards away from the reservoir, in an alley, he discovered a Silver Lama. [2]
 |  |
Drake set off on his way - this time he had to climb a number of well-lit ledges. At first, he jumped over the rocky shelves and then he jump onto the rocks on the right. [1] From there he had to make another jump and grab the edge in order to get to the rope which led upwards. [2]
 |  |
To open the path for Sullivan, the hero had to blow up some explosive barrels which were lying near the hole. The two heroes continued the journey together and collaborated to open the door which required them to pull two mechanisms simultaneously. [1] Behind the door there was a wooden scaffold. Courageous Drake decided to try it out and as soon as he walked a few meters, the structure began to collapse. The hero started to run away (towards the camera) - on the way he had to jump over the chasm, bounce to the right and make another long jump in the end. [2]
 |  |
After such an exciting scene Nate remained unmoved and as soon as Sullivan joined him we have continued our journey. In the next chamber, we discovered traces of a giant statue, probably made of gold. After the examination, Nathan immediately turned around and moved towards the passageway from which we had just arrived, but suddenly he turned right. Behind the clay vase there was a skeleton that held a Golden Inca Cup. [2] We proceeded further to finally come out of the ruins.
 |  |
Outside, we have reached another part of the jungle. As soon as we left, we saw three overgrown thick pillars. [1] Nate climbed on the first one on the right (lower one) and jumped over the next ones - on the last one he found a Silver Turtle figurine. As we continued to walk towards the setting sun, we discovered... a submarine. We had to climb on two rocky ledges. On the top, Nate decided to go into the boat in search of clues. [2]