
A Breach Between Worlds - main quest | Blade Grave Tyranny Guide
Last update: 16 December 2016
This chapter contains a complete description of the gameplay in Oldwalls Breach(M22), Blade Grave Oldwalls(M23|M24|M25), and Iron Hearth(M13), which are locations associated with the main-storyline quest. Here, you will find a walkthrough for the main storyline missions which will let you complete the said quest as profitably as possible
Individual topics are described in their respective sections.
- Enter the Breach
- Searching for the keys
- Western part of the floor
- Eastern part of the floor
- Blade Grave Oldwalls - upper levels
- The Torchkey puzzle
- The Lantern Chamber
- Defeat the boss and take the artifact
- Report and finish the quest
Enter the Breach
The quest will appear in the journal once you've defeated Elia, one of the Unbroken, and thus complete the That Which Remains quest. To begin performing this mission, go to Oldwalls Breach which will appear on the map when you complete the aforementioned task. Having entered the starting location, you will encounter a unit of the Unbroken led by Gregos. They don't pose a serious threat and you should be able to eliminate them quickly.

Once the last opponent has fallen, you will be approached by a Sage who sat at the nearby fire. Promise him that you have no intention of killing him and ask what brought him to this location. He will tell you of his assumptions which enables you to take on The Stones of Elucidation quest. Moreover, he will mention that entering the ruins is only possible with the Garn Torchkey and will show you its location.
Enter the gorge in the central part of the map and head north towards the breach. You will be attacked by three of the Bane. Pay attention to health and the fire damage that they deal. When the fight is over, save the game and go to the eastern part of the location. There, you will find a corpse of the soldier whom Hieronymus mentioned. The body, which contains the key to the ruins, is guarded by five of the Bane that shouldn't pose a serious threat, though. If it turns out otherwise, try to lure out the blue ones first to make your job easier.
Having killed the last of the Bane, search the nearby bodies for the Garn Torchkey. You can also find the remaining treasures-their locations are marked on the map in the dedicated chapter of this guide. If you don't do it now, you can do it on your way back. After entering the interior of the breach, you will have to fight more of the Bane so make sure that every character has their personal supplies. If the party members are hurt, use camping supplies to rest. When you're ready, enter the interior of the breach.
Searching for the keys

Having entered Blade Grave Oldwalls - Central, you will encounter more of the Bane. Note the above picture. Passages to subsequent chambers can be unlocked with keys similar to the Garn Torchkey that you obtained in the previous location. You have to use the key on the pedestal [1] and press the button [2] which should be already active. It is also worth to pay attention to the crystals embedded into the walls [3] since some of them hide the Bane that will attack you if you approach the crystal.
The next chamber hides even more of the Bane. On the west wall of the same room, you will find a sculpture with the first fragment of the Ocean Spire rune (see the Seats of Power quest). After you've copied the pattern, head north.
![Youll walk near two elevated platforms[1] - A Breach Between Worlds - main quest | Blade Grave - Blade Grave - Tyranny Game Guide](/tyranny/gfx/word/97720040.jpg)
You'll walk near two elevated platforms[1]. Between them, there is a trap[2] that can be disarmed (Subterfuge 48 required). Approach the trap slowly because it is difficult to detect and thus can be sprung easily, and it deals serious damage.

Right behind the place indicated in the picture, there is a central room of the ruins which you see on the above image. Your task is to raise the central platform[1]. To do so, you have to find keys marked with the symbols visible in the picture and place them in the dedicated slots. The first can be found on the body you see in the picture[2]. Take the Humming Keystone and place it in the slot marked with the adequate symbol[3]. After a second, the central platform will be raised by one level. To raise it entirely, you need three other keys that can be found on the upper floor of the location.
![Having placed the Humming Keystone in the dedicated slot, the button[1] that is visible in the picture will become active-it activates the stairs[2] to the upper floor of the location - A Breach Between Worlds - main quest | Blade Grave - Blade Grave - Tyranny Game Guide](/tyranny/gfx/word/97720071.jpg)
Having placed the Humming Keystone in the dedicated slot, the button[1] that is visible in the picture will become active-it activates the stairs[2] to the upper floor of the location. Use the button and take the stairs to the eastern part of the location.
Western part of the floor
When you are on the upper level of the location, head to the first side chamber you encounter. You will find the first Stone of Elucidation that Hieronymus mentioned. For more information, go to the dedicated chapter of this guide (see First Stone).
If you're not interested in the aforementioned quest, skip this chamber and head deeper into the western part of the first floor. On your way, you will encounter traps hidden in the wall (Subterfuge 42 required). The corridor broadens right past them, and you will see a Wisp before you. The nearby crystals hide more of the Bane so either don't get close, or approach as slowly (4 +1) as to activate them separately. Once you've dealt with the enemies, you will see a staircase that leads to the western part of the ruins (Blade Grave Oldwalls - West) but don't use it just now. Instead, head to the eastern part of the floor.
Eastern part of the floor

Having entered the eastern part of the floor, go straight on. You will encounter two traps on the floor which absolutely have to be disarmed (Subterfuge 49 required). In the corridor, behind the second trap, the Bane await you. Kill them and move back to the previous corridor because ahead of you there is only a staircase that leads to the higher level of the ruins.
Activate the only button in the corridor, and the path you've just walked will close. In return, a passageway to a the nearby chamber will open.

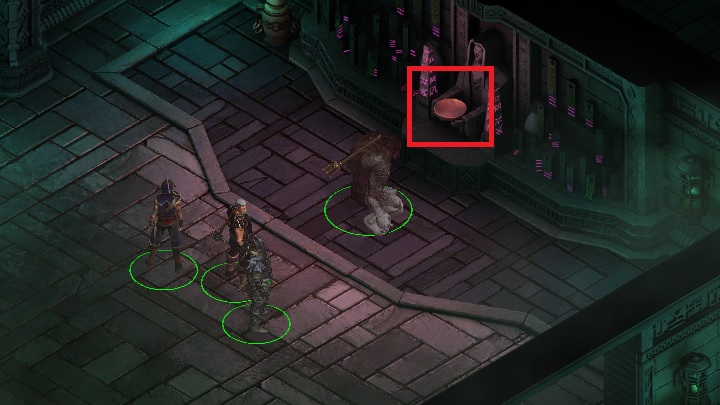
In the chamber, you will encounter more of the Bane, including a Malice. The said opponent moves relatively slow, so the best course of action is to lure the lesser Bane out of the room and eliminate them before the strongest enemy reaches you. Once you defeat your opponents, approach the pedestal[1] and interact with the Garn Torchkey with it. This should activate the button[2] marked in the picture.
The button opens the door to the neighboring chamber. Disarm the trap and search the stone stash[3] and you will find the Cold Keystone. You can go back to the central platform and put it in the corresponding slot, but it won't have any result at this stage.
Push the button in the main corridor again, and you will gain access to the staircase leading to the higher level of the eastern part of the ruins. Go to the upper floor.
Blade Grave Oldwalls - upper levels

Upon entering the target location, you will find yourself in a vast room that you can see in the above picture. In the central point of the floor, you will find a button[1] that opens a passage to the further chambers, but you have to deal with the Bane that guard it, first. Try to lure them out and not walk into the trap[2] while you're at it, because the latter deals considerable area-of-effect damage and doesn't spring just once. Instead, it incessantly emits waves that will rapidly eliminate your party. Having killed the Bane, you can disarm it (Subterfuge 49 required).
The button opens a passage to a chamber where you will find a button on the floor again. Press it and the bridge that leads deeper into the ruins will become active. There is a tough fight ahead of you because the path is blocked by several of the Bane, including two Malice. Moreover, there is a trap (Subterfuge 50 required) on the pathway, but you can safely disarm it if you get only as close as to be able to do it. Otherwise, having approached it, the Bane will start to hurt you with ranged attacks. Once you disarm the trap, try to split the party to make the battle easier.

After the fight, you can activate the bridge in the picture with the button on the floor. Thanks to this, you will unlock direct access to Blade Grave Runic Hall and be able to activate Ocean Spire if you have the necessary pattern. Apart from that, having crossed the bridge, you can head south right past it, and you will reach the Lantern Chamber where a puzzle connected to the Torchkeys awaits to be solved. At the moment, you don't have all the required items to complete it, so go back to the last battlefield and then head south.

There, you will find another chamber with a button that lets you investigate the eastern regions of the location. In the neighboring room, you will fight a tough battle with the Bane that have you vastly outnumbered. Try to lure them to the place you came from. If you're lucky, a Malice will block several Wisps in the doorway and so you will only have to pay attention to its ranged attacks. Deal with the Wisps and assault the rest of the opponents. Mind that a Malice can heal itself by dealing damage so focus most party members on it. After the fight, use the Garn Torchkey on the nearby pedestal and then open a passage with a button. In the next chamber, you will find another pedestal that hides the Ambir Torchkey. Go back to the bridge and head to the so-called Lantern Chamber.
The Torchkey puzzle

There are two strong traps in the corridor that leads to the Lantern Chamber-you can disarm them if you have 50 ranks in Subterfuge. After entering the target chamber, don't interact with the pedestals yet, instead, activate the button visible in the picture.
Thanks to this, the door in the picture will open and you will be able to continue exploration in search of another key. Be careful, though, for there is another group of ghosts behind the closed door. Make sure that the party members are in good health and dive into battle, which shouldn't be as challenging as the previous one. After the fight, activate the button on the floor to unlock a shortcut that leads to the place from which you started to explore this level of the ruins. From the same room, you have to head to the next part of the ruins (Blade Grave Oldwalls - West).
Having entered the new location, activate the button on the floor to open a passage to the further chambers. When you get close to it, you will be attacked by a group of the Bane again. You will easily notice that you are near the staircase that led to this location from the western part of the upper floor of the ruins' center. Having killed the Bane, search the body they guarded. Thanks to this, you will find another piece of evidence needed to perform the A Trial of Archons quest.
In the neighboring chamber, there is a small group of ghosts led by a Malice. Try to eliminate the latter first and you will quickly be victorious. Remember not to ignore the Wisps that accompany it because the said opponent can draw extra power from them. End the fight and take the Saphir Torchkey from the nearby pedestal. Now you have a complete set of keys which will allow you to solve the puzzle in the Lantern Chamber. However, it is best to fully explore the level you're currently in, first.
Similarly to the central part of the ruins, in this location, you can move on two levels. To make it possible, just like in the previous case, you have to activate the platforms that will adjust their shape and give you access to the higher floor.
Before you take any action in this regard, notice that the chamber where you found the Saphir Torchkey has two more exits. One is open, the other is closed. The latter leads to a chamber containing the second artifact required to complete The Stones of Elucidation quest (more details in the dedicated chapter).

Platforms will form into stairs only when you press the buttons right next to them. However, to make them active, you have to use the Saphir Torchkey on the nearby pedestals. If you use a different Torchkey, the button won't activate or the Bane will emerge from the adjacent crystals in the wall. Once entering the higher level is possible, head directly to the chest. Before you acquire the Heavy Keystone, you have to deal with several of the Bane, which shouldn't be a serious challenge by now.
Now, you should head to the Lantern Chamber to solve the puzzle, but before you do it, go to the northern part of the upper floor of the location and obtain the second charcoal rubbing of the Ocean Spire rune.
The Lantern Chamber

The puzzle requires us to set the Torchkeys in the right order. If you use a wrong item on a pedestal, you will be attacked by the Bane from the nearby crystals. Put the Torchkeys in the order shown in the above picture to stay safe.
The right configuration of the keys will unlock the door that lets us go to the western chambers on this level of the ruins. At the very entrance, you will encounter two traps (Subterfuge 44 required)-the first can be found on the floor, and the second on the wall. Having disarmed them, go to the chamber at the end of the corridor. In the stone stash, you will find the last key: the Bright Keystone. The moment you pick up the item, the Bane will emerge from the nearby crystal. There's a Malice among them, but thanks to our numerical superiority, the fight should be relatively easy. Now, you have all the items required to raise the platform in the central point of the ruins. Take any route there.
Defeat the boss and take the artifact
Attention: some lanterns require the Torchkeys that cannot be found in these ruins. Come back to the location once you've acquired other types of the interactive items and you will gain access to treasures hidden in each point.
Place the Keystones you've acquired in the right slots. Remember that the order matters-otherwise, the stone won't work. Below, you can see the right order of putting the Keystones in the slots.
- Humming Keystone
- Cold Keystone
- Heavy Keystone
- Bright Keystone
Then, press the button on the floor near the platform. It deactivates the spiritual trap and sets the Havoc free. A really difficult fight awaits you because the Havoc will be summoning lesser forms of the Bane-first, two Wisps, then, two Scourges, and finally: two Malice. Moreover, it may disappear during the battle to regenerate. Try to focus two party members on it, while the other two deal with the lesser Bane. It is important to split the team. Try to keep the biggest Bane in the central point of the hall, and send a part of your team near to the western wall of the chamber. In this way, the party members who fight the lesser Bane won't be hit by the Havoc's area-of-effect attacks.
After the fight, search the Regent's corpse and take the Steadfast Insignia. In the further stage of the quest, you have to leave the Breach, but before you do, you can go to the Blade Grave Runic Hall if you haven't done so already. Details concerning the Spire and the pattern in the runic hall can be found in the chapter dedicated to the Seats of Power quest.
Report and finish the quest
After exiting the Breach, head to the corner of the map to move to the next location. As you will notice, Sentinel Stand will be inactive on the world map so the only sensible destination at this point is Iron Hearth. Inform Graven Ashe that you've managed to reclaim the Steadfast Insignia, and Sentinel Stand will become active on the world map again. This quest is concluded, and a new mission, Making a Stand, will appear in the journal.