Trek to Yomi: Chapter 3 - walkthrough
This page of Trek to Yomi guide contains the walkthrough for chapter 3 - archers, enemies with spears, burning village, second fight with Kagerou boss.
This page of the guide to Trek to Yomi contains a walkthrough of Chapter Three. You will learn, i.a. how to walk through the burning village and the battlefield, how to defeat the archers and get your own bow, how to react to enemies with spears and how to fight the second boss fight with Kagerou.
- Follow Aiko
- Aid your people
- Fight the archer and unlock the bow
- Go through the battlefield
- Going through the burning village
- Boss - Kagerou (second fight)
Follow Aiko

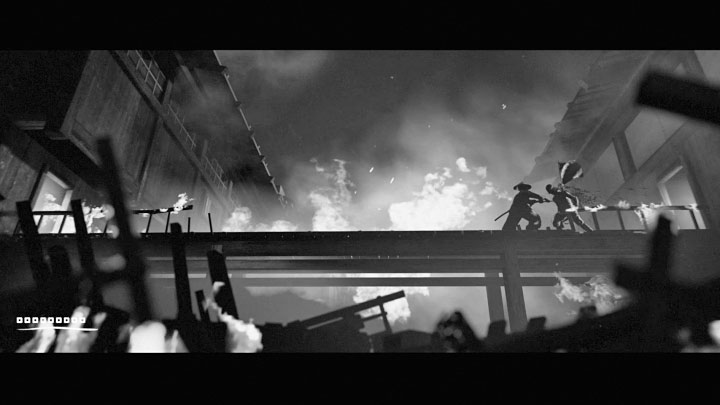
You will start the chapter next to the attacked village, and you have to enter it through the main gate. Follow the streets between the burning stalls and buildings and pick up Bo-Shurikens along the way.
The first secret of this level is next to the stall visible in the picture above - artifact - Swordsmith's Hammer.
Aid your people

Climb the wooden structure next to the burning building on the left and move to the right.
When you jump down, you will fight the bandits for the first time in this level. Remember that you can stun armored enemies with a special combo; you can also perform finishers. Keep following the linear route until you reach the first shrine.

You will reach a location where enemies will be talking to each other on the upper plank. Stand below them in the spot shown in the picture, then interact to damage the supports and cause the structure to collapse. You can optionally talk to one of the villagers next to this area.


Don't go to the nearest building immediately; instead, go as far to the right as you can. That's where you'll find Bo-Shurikens and a separate illuminated entrance. When you use it, you will enter the location shown in picture 1 and find a scroll with a new skill.
Use the stairs to reach the second floor. You will enter the corridor shown in picture 2 - there is an artifact here - Dove and a shrine (you could also reach this place from the collapsed bridge with enemies).


Go left and defeat a few enemies on your way. Once you get to the place shown in picture 1, don't go towards the central part of the room. First, examine the ladder on the right.
It will lead you to well-hidden rooms in the attic. Defeat the charging enemy on the right balcony and reach the location shown in picture 2. A Health Upgrade is hidden here.

Go back to the ladder take a few steps forward once you go back down. A large fragment of the floor will collapse, and after you land on the lower level, you will immediately have to fight the bandits again. Make sure you stun the armored enemy correctly.
When the fight is over, go left where you will find a new shrine.
Fight the archer and unlock the bow
Go upstairs. You will meet a bandit kneeling next to a crushed friend. Get rid of the enemy. You can listen to the bandit crushed by the damaged roof, or ignore him and go further right away.

You will reach the first archer. Use the following tactic during the fight:
- Throw the shuriken at the archer to stop his ranged attack, or start sprinting towards him right away.
- You have to roll during the run (example in picture 1) to avoid being hit by an arrow. You cannot block it, because then Hiroki will take damage, too.
- After you approach the archer, attack him with the katana (picture 2). However, do not underestimate the opponent, because he may try to push the hero away. The ideal tactic is to use the same moves as the ones against armored enemies, so you should stun the archer and then use a finisher.

The reward for defeating the archer will be obtaining a bow. You will be able to immediately test it in the next location (picture above). One of the uses of the bow is stealth attacks on enemies facing the other way. The bow can also be used in direct confrontations, but you must remember that:
- pulling the bowstring takes a while,
- arrows do not fly in a straight line - you have to aim higher at distant targets,
- shots can be of little use against heavily armored enemies.

Use the new shrine and collect new Bo-Shurikens. Do not choose the lower passage towards the stable, because you would have to fight bandits directly.
You can get rid of the opponents with trickery. To do this, use the ladder to reach the upper balconies. Use them to reach the mechanism presented in the picture above, thanks to which the huge structure will collapse. Take the arrows for the bow hidden on the right, use the elevator and get rid of a single enemy who probably survived the sabotage.

Go right. You will reach a location with a horse - there are a few things to do here:
- Explore the lower passage marked in the picture. It will lead you to a separate area with a scroll with a new skill.
- Interact with the cart to which the horse is harnessed. You will destroy the lower barricade.
- Take the arrows and save the game at the shrine.
Go through the battlefield
You will reach a battlefield - archers will shoot at the warriors from afar.

You don't have to worry about every arrow, although some of them can hit you. You can minimize this problem by playing more aggressively (remember that you can also use the bow now) and by trying to fight the enemies from the foreground by standing next to the covers (e.g. big boulder from the picture above).


After leaving the battlefield, you will find Bo-Shurikens and a shrine. Choose the left path from the shrine shown in the picture 1. It leads up the hill - there will be a few enemies on your way to the hut visible in the distance.
On the hill, you can replenish your ammunition and focus on the areas marked in picture 2. On the right side there is an artifact - Magatama Bead. The entrance to the building is on the left. Inside the hut, you can kill a single bandit (use a bow). You will unlock a new skill.

You can now explore the path on the right- return to the previously unlocked shrine. This way you will not miss the location below.
Go off of the main road at the first possible opportunity by choosing the lower path and reaching the area shown in the picture. Here you can:
- Pick up the Quiver Upgrade, which will allow you to carry more arrows.
- Talk to the villager.
- Pick up the artifact - Fujin Print hidden on the left.

Return to the main path and continue moving to the right. Attack the new enemies (a surprise attack from a distance is possible and recommended) and, after getting rid of them, continue moving to the new shrine.
A new secret area, shown in the picture above, is exactly to the left of the shrine. You can talk to the defending villagers here and pick up the artifact - Fishing Rod.


Go right. On the new path, you will encounter opponents on horses for the first time. You can deal with them in two ways:
- If you don't want to use up your supplies (or you just don't have them), then hold down the block button and let the enemies go past you. This should allow you to avoid getting injured in all, or at least most situations.
- If you want to deal with opponents at all costs, use the bow. Hitting a horse with an arrow should throw down and eliminate the rider.
Regardless of the chosen method, continue to the right.


After reaching the fork from chapter 1, go right first. Take Bo-Shurikens along the way and you can also use the shrine. After reaching the cemetery, on the right you will find the Stamina Upgrade shown in picture 1.
Go back to the fork and this time take the upper path towards the village. After reaching the open gate, first explore the area on the right - there is an artifact - Ugajin next to the village wall (see picture 2).
Going through the burning village

Immediately after entering the burning village, you will find the first shrine. Right after you move away from it, you will encounter new bandits.
Climb to the upper ledge, go through the rubble and locate a new secret on the left - an artifact - Bronze Mirror (picture above). You can now go right. Climb to the next shelves, take ammo and save the game at the next shrine.

Soon you will reach the location where you will encounter the first opponent with a spear. This enemy's weapon has long reach which allows them to attack effectively from a much greater distance. You have to:
- Parry one of the attacks to expose the enemy to your counterattack. You can do a few normal attacks or try to stun the opponent.
- Use ranged weapons. You can kill the opponent by using the bow or stop his attack by throwing Bo-Shuriken - in the latter case, remember to attack the enemy at least once.
As a reward for defeating this opponent, you should receive a new skill.
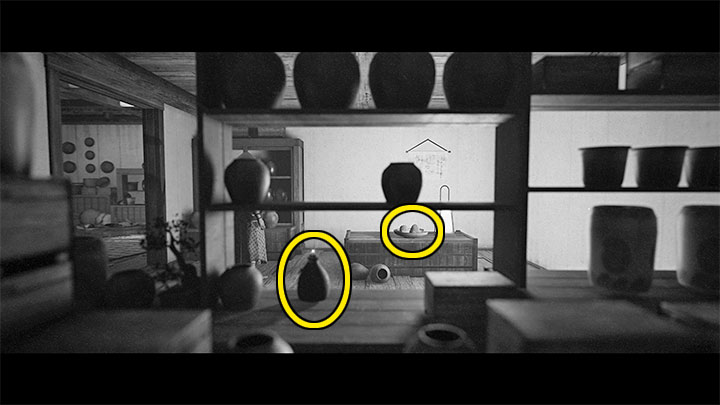
Break open the door of a new apartment building - explore the small room on the ground floor first (shown in the picture). Here you will find two objects marked in the above screenshot: artifact - Inarizushi and Stamina Upgrade.
Now, use the ladder to get to the first floor. Take the arrows, jump out the window and fight the bandits again. The path will lead you to the next shrine.

Use the ladder, go left and fight again, this time more than once - first on the roofs and then in the corridor with curtains (use the shadows to determine the position of the protagonist and the enemies). These fights will feature i.a. armored enemies, whom you should defeat using stunning combinations and finishers. Use arrows and shurikens on regular enemies.

After leaving the building, go down the stairs and talk to the wounded samurai first. First, check the area to the right. In the places marked in the picture above, you can find the Quiver Upgrade and the Health Upgrade.
Now go left. Take the wide stairs. At the top, you will find a new shrine.

Choose the path to the right of the shrine first. The location shown in the picture contains a scroll attached to the tree that unlocks a new skill.
Don't go any further to the rings, because you will encounter a large group of enemies there. Instead, use the ladder in the location of the scroll.


Take the arrows in the upper area and go right. You can do 2 important things here:
- There is an artifact in the place shown in picture 1 (near the ladder) - Moon Flask.
- If you go further to the right, you'll reach the place in picture 2. You can perform a sabotage here by pushing the tree. This will destroy the blockade on the river and wipe out the bandits below.

Now, choose the lower passage and deal with the bandits who weren't swept away by the water.
After walking over the damaged bridge, you will reach the area shown in the picture above. We marked a new secret on it - Stamina Upgrade. Collect it and go right - you will reach a new shrine.

Expect intense fights with bandits along the way to the right. They will feature enemies in heavy armor and at least 1 new enemy with a spear, whom you can safely eliminate with a bow.
Ignore the tower that will fall over in the background, because it won't be any danger to you. You will eventually reach another shrine.

Look around for new arrows and shurikens as you go further. You'll also find use in ranged attacks further to the right, because that's where you'll meet i.a. another archer. You can attack him quickly from a distance, but you can also run up and roll towards him.
Keep fighting and allow the enemies to surround you from both sides - if necessary, change the direction of the attack and perform a hit combo. Keep going left, and if you encounter some more distant enemies, you can use the bow again (aim a little higher). The linear route will lead you to the shrine.

Collect the nearby ammunition and enter the burning building, where you'll be attacked by a larger group of enemies. Try to weaken / kill at least a few of them with ranged attacks.
After leaving the building, you will arrive at the location shown in the picture. It contains the collectibles shown in picture 2 - Stamina Upgrade and an artifact - Rice Bowl. Keep going left until you reach a wounded villager (optional conversation) and a shrine. Go further to the left and collect more ammunition along the way.
Boss - Kagerou (second fight)
You're about to start the second boss fight with Kagerou. Just a small reminder - you have fought this boss at the end of Chapter 1 as young Hiroki.


During the fight, you have to block and parry the boss's attacks (he uses long combos so always wait for it to end) and counterattack. You can also weaken Kagerou by using shurikens and the bow.

The second confrontation with Kagerou can have two endings:
- Kagerou (seemingly) fatally injures Hiroki - This is the most likely result of the fight. A few cutscenes will play, after which you will start the fourth chapter of the campaign.
- You will be able to defeat Kagerou now - It is very difficult because you have to deplete his entire health bar. Play on easy and fight very conservatively, i.e. use blocks and wait patiently for an opportunity to attack. If Hiroki's health drops to a low level, consider loading the last checkpoint so the game doesn't overwrite your progress if you fail. Defeating Kagerou now will end your adventure prematurely and unlock the Early End trophy.

You are not permitted to copy any image, text or info from this page. This site is not associated with and/or endorsed by the Devolver Digital or Leonard Menchiari. All logos and images are copyrighted by their respective owners.
Copyright © 2000 - 2025 Webedia Polska SA for gamepressure.com, unofficial game guides, walkthroughs, secrets, game tips, maps & strategies for top games.