
Walkthrough - Third Echelon HQ - part 3 | Walkthrough Splinter Cell Conviction Guide
Last update: 11 May 2016
 | 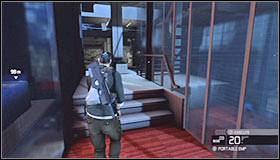 |
This conversation will end very soon and you should take your time to find a new equipment crate #1. It's VERY important that you take an assault rifle with you (preferably with a silencer). Make sure you're fully armed and slowly move towards the main area #2.
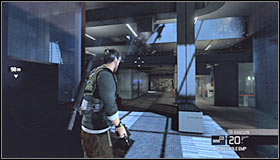 |  |
Choose an assault rifle from your arsenal, because three enemy agents will soon destroy a glass roof and slide down on ropes #1. They will be using the same sonar goggles as Fisher, so you won't be allowed to avoid having this fight. I would recommend retreating to Reed's office on the first floor #2.
 |  |
Take cover behind one of the desks and wait for enemy agents to show up #1. You can try eliminating them one by one or you can wait for an entire group and throw a grenade at them. Killing the agents won't solve the problem, because standard soldiers will soon show up here #2.
You must now decide how you want to resolve the situation with enemy soldiers:
OPTION A - killing all enemies
OPTION B - retreating to a safe area and avoiding contact
 |  |
Option A: Eliminating all hostiles shouldn't be a tough challenge, because they're not elite units. I would recommend taking cover behind the corner and using Mark and Execute action to deal with the closest enemy units #1. As for enemies standing further away, you can rely on your silenced pistol #2, you can stun them using a flashbang/EMP grenade or surprise them with a remote mine. Don't forget that you can interact with the equipment crate after the battle, so you won't have to worry about running out of supplies.
 |  |
Option B: Start running towards the stairs located to your right #1 and you'll end up on the same balcony where the last group of elite units showed up. Once you're there press the crouch key and start moving forward. Notice that if you remain close to the balustrade #2 you'll be fully hidden.
 |  |
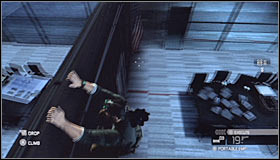
Get to opposite end of the balcony and then jump over the balustrade #1. Land near the desks. You can now use the fact that enemies went to inspect the stairs. Slide over the desk #2 and proceed to your right.
 |  |
Walkthrough (continued): Your next area of interest should be a long corridor filled with new traps #1. Start off by entering the first room to your right #2. Naturally you should be using your sonar goggles here so that you won't cross any of the beams.
 |  |
Once you're inside the room approach the wall located directly in front of you #1 and press the jump key to grab the ledge. Start moving left until you've reached a wall separating this room from the next one #2.
 |  |
You'll have to climb over to the other side #1, however it's important to wait for a new laser beam to move away. Exit this new room in order to return to the main corridor #2.
 |  |
You'll now have to enter a new room located to your left #1. Once again, you should grab a wall which separates this room from the next one (located closer to your destination) #2. Use your sonar goggles and wait for laser beams to move away before climbing over to the other side.
 |  |
This room contains a lot of laser beams, however you'll only be interested in avoiding a large and slowly moving horizontal beam. Take cover next to the first object #1, wait for this beam to move away and head forward #2.
 |  |
Take cover next to a second obstacle #1. Once again you should use the goggles. Wait for the laser to move to the first obstacle, climb on top of the second object and proceed to the end of the room #2. You may now exit this room using a nearby door. Thankfully a checkpoint is going to be created as soon as you're in the next corridor.
You must now decide how you want to reach Grim's office:
OPTION A - eliminating all nearby guards
OPTION B - reaching the first floor without killing any of the guard
 |  |
Option A: This is a much better option, because you're going to be surprised by elite guards on the first floor and if you ignore killing guards on the ground floor then you may be surrounded by both groups. Start off by moving forward #1. Proceed towards a large conference room found to your left #2.
 |  |
You should notice that this room is being patrolled by a single guard. Surprise this enemy and eliminate him in hand to hand combat #1. You may now approach the largest room. Mark closest enemy units and kill them using Mark and Execute system #2.
 |  |
You'll now have to deal only with enemies standing further away from your positions. Don't forget to use the goggles to find them quickly. I would recommend using a pistol to get rid of all of them #1. Proceed towards the stairs leading to the first floor when it's safe here #2.
 |  |
Option B: This is a less interesting option, because you're going to be surprised by elite guards on the first floor and if you ignore killing guards on the ground floor then you may be surrounded by both groups. Start off by moving forward #1. Proceed towards a dark room found to your right #2 and make sure to remain hidden.
 |  |
Use a nearby door to find yourself in the second dark room #1. Head forward here and it shouldn't take long for you to locate a door leading to the last third room #2.
 |  |
Once you're inside the third room you should wait for a nearby guard to turn around. Get closer to him and then set off an EMP device #1. Start running towards the stairs located to your right #2. Make sure to stop when you're about half-way through, because you wouldn't want anyone following you to the first floor.
 |  |
Walkthrough (continued): Start exploring the first floor by heading forward and then turning left #1. Get ready, because you're soon going to be attacked by two guards using sonar goggles and this means you won't be allowed to escape them or get past them without being noticed. I would recommend taking cover near the next corridor, waiting for them to show up and using grenades to kill them #2. If you didn't kill the soldiers on the ground floor you should act quickly to prevent them from showing up and surprising you from the back.
 |  |
Make sure that you've eliminated both elite soldiers and then start moving towards Grim's office #1. Once you're inside you'll have to approach the phone and press the action key #2 to trigger a longer conversation.
 |  |
Your next objective will be to return to the stairs you've used to get to the first floor. New enemies will stand in your way, but the good news is that you'll be allowed to use Mark and Execute system freely for the rest of the mission. Start off by taking cover next to the glass door #1. Mark both opponents seen in the distance #2 and then eliminate them.
 |  |
Head forward. I would recommend that you hide somewhere to your right after entering a new room. Wait for a guard to show up here and surprise him #1. Once he's gone proceed to the next corridor #2. Ignore what Grim is saying and what is happening around you, because you're not racing against time.
 |  |
The room to the left is guarded by two soldiers #1 and you can use Mark and Execute system again to get rid of them safely (or throw a grenade there). Proceed to that room and then to the next one. Expect to encounter new enemies to your right #2. You can either use Mark and Execute system on them or surprise them.
 |  |
Approach the exit from this room carefully and get ready to surprise a single soldier heading your way #1. Get closer to the staircase once he's gone. Notice that a new passageway has been unlocked next to the stairs. Two enemies are hiding there and the easiest way to flush them out would be to throw a grenade #2.
 |  |
You may proceed towards the unexplored corridor. Be careful here, because two other soldiers are stationed just around the corner #1. Use Mark and Execute system to kill them without taking any major risks. Head over there and expect to be surprised by a single soldier along the way #2.
 |  |
Be careful, because you're soon going to be attacked by two enemies sliding down on ropes #1. Use Mark and Execute system to kill them, preferably before they touch the ground. Ignore an explosion seen in the distance and instead get ready to defeat a new enemy soldier hiding to your left #2.
 |  |
Two other guards are stationed further away #1. You can use Mark and Execute to neutralize them or start throwing grenades at them. Head forward once they're gone and then turn left. Ignore the last opponent #2, because he'll soon die in an explosion.
 |  |
Jump over the receptionist's desk again #1 and start running forward. This mission will come to an end when you're close enough to the elevator shaft #2.