Space Combat | Imperial Training Star Wars EAW Guide
Last update: 11 May 2016
On behalf of the commanding officer, welcome to the training course. You have been chosen as the best young officers of the imperial army. You will bee trained to carry out most important tasks and to serve your Emperor well. As you are aware, the Emperor doesn't tolerate defeats, so better listen to me carefully. Making notes and records is prohibited - everything mentioned from this moment is top secret.
First of all, let's learn something about space battles and our imperial vessels. I see that you are surprised. I know that you may find those informations in your field manuals. But you should be aware, that there are some things, which cannot be mentioned in books. Rebel spies are everywhere.
Probe Droids
A very cheap unit that takes little time to build. A lot of young officers underestimate its value. It's always good to have some Probe Droids, since you can use them to know, how many troops are stationed in enemy systems.
TIE Scouts
Scouts are the only TIE unit, that cannot be manufactured in our destroyer hangars. They aren't used very often, because they are extremely specialized. Their abilities let them uncover distant parts of the battlefield. You may use them to locate targets for Broadside units.
TIE Scouts are not very helpful in dogfights, so you should keep them out of combat. Just hide them in the middle of asteroid belt or a nebula.
| TIE Fighters |

These are basic fighters of the Empire. You don't need to be worried about their production. Cruisers and assault ships have special hangars and assembly lines ready to create TIE fighters, so your captains replace casualties of their own. In the beginning of a battle, each destroyer releases contingent of TIE units. Once they are destroyed, ship begins production of new squadrons.
TIE Fighters are quite proficient at destroying rebel fighters - at least when used in large groups. Unfortunately, they are very easily destroyed by corellian corvettes and gunships. This is why you'd better keep them away from those ships. Fighter pilots are numerous and easy to train, but the Emperor doesn't tolerate inconsiderate losses.
| TIE Bombers |

TIE bombers can destroy rebel frigates or cruisers with ease. Their proton torpedoes ignore force fields and can damage critical systems directly. The best idea is to concentrate bombers fire on essential parts of the ship or base. Usually it is a hangar or a shield generator.
Light rebel ships, like corvettes, are the greatest danger for bombers, so you should keep them behind until they're clear to attack.
 | Tartan Patrol Cruisers |
This light cruiser is essential unit in the Empire space force. They may seem weak, but without them enemy bombers will rip your destroyers apart one by one. A couple of Tartan cruisers can easily shot down any number of small vessels, that's why the commander should always protect his main forces with these units.
Usually they should be placed near your destroyers. If the enemy has many big ships nearby, it's better to move Tartans behind them though. They can still shoot at fighters and bombers, but will be protected from the fire of lager warships.
I should mention that Tartan crew can direct additional power to cannons for a short time. It is very helpful ability when there are lots of enemy vessels nearby.
 | Acclamator Assault Ship |
Older type of the imperial destroyer. In many sectors it is still in use, but we are replacing it slowly with more modern Victory-class warship. Acclamator is quite resistant, has its own hangars with fighters and bombers, but is not very fast. Acclamators are best used in formation, protected by Tartans.
As well as Tartans or Victory destroyers, Acclamators have possibility to boost their canons for a short time. In such case, they becomes slow and their shields stop regenerating, but turbo lasers fire stronger and faster. You should use this ability when your Acclamator faces the enemy and isn't under heavy fire.
 | Victory Star Destroyer |
Victory star destroyers are very important in the imperial fleet. They are tough, have considerable firepower and hangars full of TIE units. Similar to Acclamators, they should be used as a main part of the offensive group. In a battle formation they can break even very large enemy forces.
Victory star destroyers can defeat rebel frigates quite easily, and they also gun down corvettes fast. Their biggest enemy is the Y-wing fighter, so your patrol cruisers should always protect them. Also, They shouldn't be left under fire of Marauder missile ships.
While commanding Victory star destroyer you should remember about their special ability and take advantage of it as often as it possible.
 | Broadside Class Cruiser |
In your field manuals these units are called the "space artillery". It's hard to argue with that. Broadsides have great range and firepower. Unfortunately, they are almost defenseless in close quarters. You might loose them very fast in battle chaos, so they should always follow the main force at safe distance. Also, remember not to leave them too far behind, because they may be destroyed by rebel sneak attack.
Broadside cruisers fire dangerous missile volleys. Because of the range, they can strike distant targets while staying stay out of their reach. They only need few scouts or other vessels, to locate proper targets.
Broadsides are very important, if you plan to attack space station of 4th or 5th level. Overcoming shields without them would be difficult and would take a lot of casualties.
 | Interdictor Cruiser |
This is highly specialized unit used to block hyperspace movement. Interdictors aren't a part of standard imperial combat groups. They are used mostly in special missions. You shouldn't take them with your fleet all the time, because they have poor firepower and will take valuable place. In case you have an Interdictor on a battlefield, you should remember about its second ability - it can disturb enemy missiles.
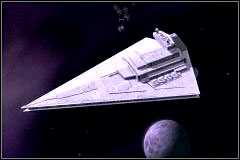 | Imperial Star Destroyer |
This huge unit is available only for experienced officers. To command the Imperial destroyer you need to deserve it! Building one of them takes a lot of money, but they are indispensable in large battles. Thanks to their impressive firepower, they can engage advanced space stations or Mon Calamari cruisers. It takes them only few seconds to destroy any enemy frigate.
Destroyers of this class, as well as smaller Victory units, are prone to bomber attacks or missile cruiser's fire. This is why they always need proper backup.
In the middle of the battle, it's easy to forget about ships special weapon - the tractor beam. A vessel caught with it cannot move and becomes an easy target!
Space combat
Now lets talk about typical space battle. Most imperial units move and turn very slow, which makes them most effective in formations. A destroyer formation, supported by Broadsides and Tartans, is always the core of your fleet. Such a group can slowly but systematically move through the map eliminating all opposition. Only Marauder missile cruiser can disturb their movement, firing out of the cannon range. So when you spot the Marauder, you should immediately send small group (for example one Tartan and fighter squadron) after him.
If Imperial star destroyers are available, it's good to make them main part of your assault force. Remember though, that they turn very slow, so it's better to have a some smaller units with them.
If you have some own missile cruisers available, then use them to weaken enemy stations and capital ships. Very advanced stations should be attacked only from a safe distance. After taking down all shields, you should fire at most important points of your target - hangars and shield generators for example.
It's enough for today. You can dismiss. The cantina will be opened from 8pm. All interested in a trip to the one of the moons are asked to report to me. Tomorrow we will talk about the land combat.