Mission 7 - Homeland | Protoss | Campaign Walkthrough StarCraft: Remastered Guide
Last update: 27 September 2017
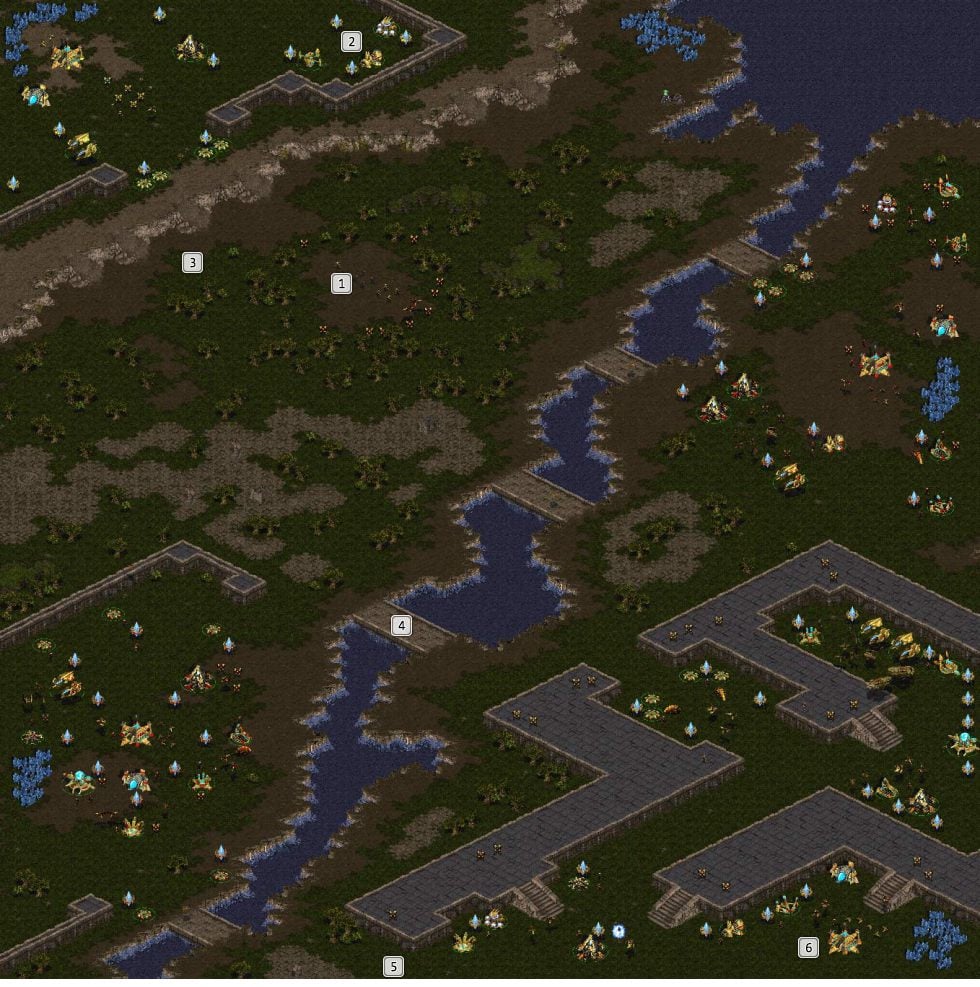
Starting Position � Having listened to the dialogue, move your forces towards the main base to the North. You can leave one Zealot as a decoy for the enemy.
Eastern part of the base. � This spot is defenseless. Build some turrets here. It's the favorite attack point for the Scouts of the Red Protoss. He'll be attacking this place over and over again until you'll claim the expansion space on the East.
Enemy assembly point � Just below the entrance to your base, both enemies will gather their assault forces. The Red Protoss will focus on ground units, including Reavers, the Orange Protoss will provide Carriers and Scouts. It would be a good idea to launch a preemptive strike to avoid unnecessary losses inside your base. Use flying units to attack the Red enemy and Dragoons and Scouts to deal with the Orange enemy. Watch out for enemy Observers, as they will detect your Dark Templars.
Second bridge from the south � This bridge is the best place to insert your strike force. You'll avoid the Red's bases and Orange's attention. Usually, every bridge will be guarded by an Observer, so you'll have to act fast.
Orange Protoss Base - southern entrance � The lower edge of the map hides a most poorly defended entrance to the enemy base. From this point, you can go straight for the enemy Nexus. The enemy will respond by sending in additional units, so waste no time on other structures.
Mission Objective - Nexus � The seat of the Conclave is located in this Nexus. Destruction of this structure equals victory, so focus all your attention on bringing it down. Zeratul and his Dark Templars deal heavy damage and can destroy the structure quickly.
Mission objectives:
- Destroy the heart of the Conclave
- Fenix, Zeratul and Tassadar must survive
Fenix will be waiting on Auir, in a Dragoon's shell. He gives you a quick rundown: The Conclave is looking for Tassadar and Zeratul, with the latter being already convicted of high treason. You decide the situation requires immediate remedial action, i.e. that the Conclave has to be destroyed in order to protect the Protoss.

You will only fight the Protoss in this mission. Your opponent has three bases and uses units that you can't even access at this point. Red bases are located on both edges of the map, but there is a bridge between them leading straight to the Protoss orange base. Destruction of its Nexus means the completion of the mission. At the starting point, you will see a group of infantry surrounded with Dragoons and Scouts (1). After all the dialogues, select all and retreat to your base in the top-left corner. This is a great place for defense. Place some additional turrets near the main entrance and in the east part of the base (2). Although there is a wall there, it will be the place that the Scouts attack most often. The attacks of the Protoss will be coming from the south.

The red and orange enemies will switch turns attacking you (3). They will attack with a mix of infantry, Reavers and air force. You will often be able to see an Observer, a mobile detector, and the Arbiter, the new "sorcerer". His passive skill allows him to conceal all units near him. This means that you will need your own Observers, or destroy the Arbiter. If you happen to run out of resources, there's a good spot for expansion in between the hill and the river, near the top of the map. Remember to fortify that place if you do expand there.
In the meantime, form your strike team. Teams of Zelots, Dragoons and Scouts are mandatory. You might also want to have a team of Reavers, who can attack turrets and enemies from a distance. Some Templars may also come in handy, but most of the time, you will need two or even three Psionic Storms to repel the enemies anyway. Take Zeratul as well (100 damage!) and his Dark Templars. You won't be attacking the red base, because it's difficult and time-consuming. There's a load of red units all around the map, and they will all defend their base. It's a lot simpler to just proceed to the orange base.
Assemble your forces and begin marching by going below the starting point of this mission. The Dragoons will still be there. Go towards the bridges in the center, but don't go through the main entrance (4). Proceed along the river towards the bottom left (5). There's another entrance there, and the resistance is significantly weaker. Attack only these units that are standing in your way and are a threat - leave the buildings alone. Stick to the bottom edge until you reach the Nexus (6). Now you just have to destroy the building.
An alternative way involves taking a whole squad of Dark Templars along with Zeratul and the Zelots and heading out straight to the Conclave. Go to the same spot as with your main assault party. The enemy shouldn't have too many units on the way plus some turrets on the south. Avoid combat, even if the enemy exposes you. Approach the Nexus and attack from the right flank. The mission is completed after the building falls.

