Mission 5 - Choosing Sides | Protoss | Campaign Walkthrough StarCraft: Remastered Guide
Last update: 27 September 2017
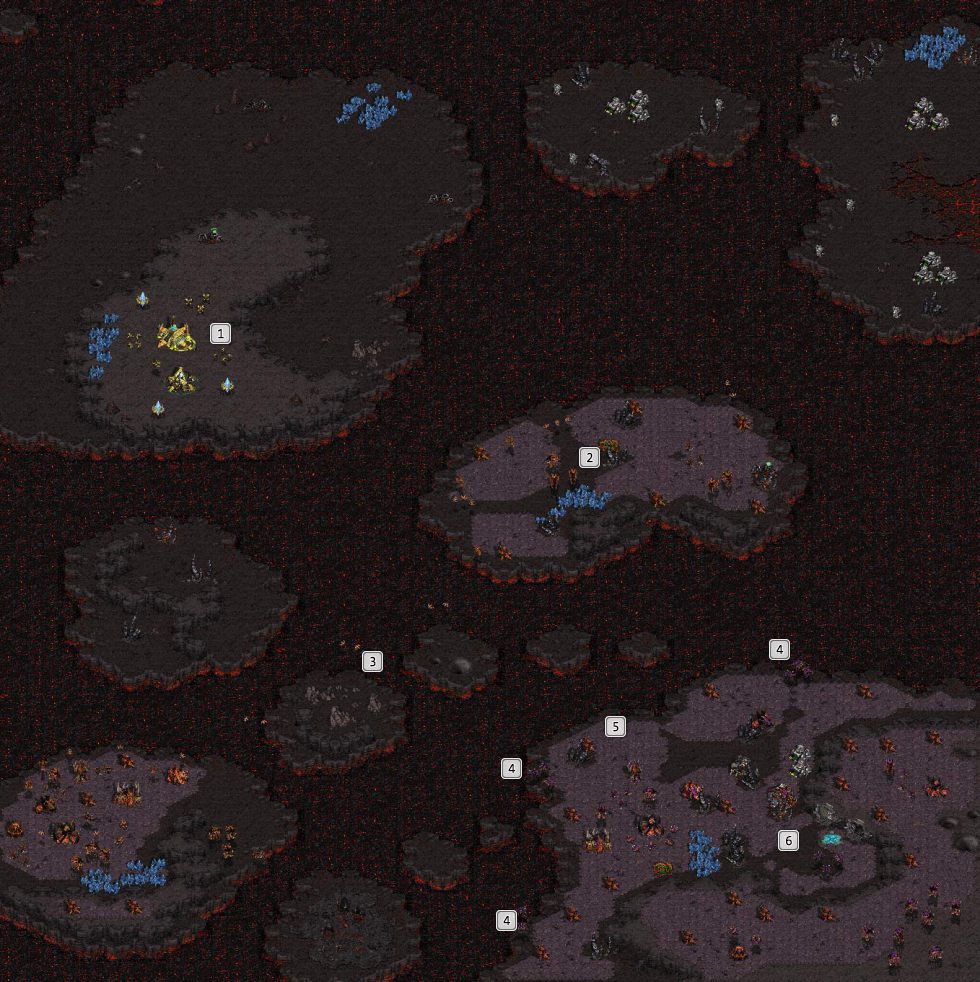
Starting Position � The Zerg will drop their forces on the lowest level rather than on the hill, on which your base is located. Try to build densely, so the enemy has a hard time attacking your positions. An additional flying squad will be useful to deal with enemy Overlords.
Central Island � There's a small Zerg base around here, along with additional resource deposits. You'll need an entire squad of Scouts and land strike force (for AA turrets) to clear this island. If you wish, however, you may leave the bases of the Orange Zerg in peace.
A Group of Scourges � You'll have to clear this sector of Zerg presence, particularly their kamikaze units, the Scourges, if you wish to transport your units though here. Use a few Scouts to take out the enemies with a single salvo. Try to attack isolated units. Once you get rid if them, your transports will have a free pass.
Guardians � The enemy has groups of Guardians placed around his base. You should begin with neutralizing them before you decide to invade the island. Send an entire squad of Scouts and position them so that they can fire an entire salvo in a single Guardian. This will prevent it from escaping, thus saving you the trouble of following it to its base.
Drop Zone � The northwestern corner of the island is the perfect place to insert your forces. There are no turrets there, enabling you to freely drop your entire force. From there, simply head for the marker while wiping out enemy units standing in your way.
Mission Objective � Remember that Tassadar and two Zealots must reach the marker. And right beside it is and infected Terran HQ, producing Infected Terrans. It's powerful kamikaze unit that can kill almost any other land unit in the game.
Mission objectives:
- Bring Tassadar and two Zealots to the facility's entrance
Aldaris condemned your alliance with Tassadar. But only Zeratul and his dark Templars seem to be capable of defeating Cerebrate. Tassadar wants to meet them, but they're trapped in the Char facility, which is overrun by the Zerg.
The whole map consists of a few islands. The objective is in the bottom-right corner, inside the base of the purple Zerg. The two islands before that are controlled by the orange Zerg - in the middle and on the bottom-left. There also are two islands with Terran turrets and magazines. If you attack those, a Dominion fleet will enter the fray! It will be a fill team of Wraiths and a Battlecruiser. While there are some useful resources there, you should only engage these forces later on.

Your base is on the big island in the top left (1). You have two mineral deposits and one gas. At the beginning, only develop your base on the hill. This will allow you to defend any attack. The enemy will throw its forces on the eastern part most of the time, before you decide to expand there. You will need strong air force in this mission. Do all upgrades you can and recruit at least one full Scout team. Build a Shield Battery to quickly replenish aircraft shields. The Zealots have to get to the objective together with Tassadar. You can fit four of them in a transporter, but only two Dragoons. Build 6 transporters, so to be able to fit two teams of Zelots along with Tassadar. You can support them with a small team of Templars and Archons
Destroying the base on the central island may seem easy (2), but the second base of Orange will constantly support this place. You don't have to clear this place if you have plenty of raw materials. Simply fly between these databases (3), but beware of the Mutalisk and the kamikaze (Scourge). You can easily deceive the latter by creating illusions of ships in your base (maybe with Tassadar or Templars) and send them to Scourge grouping areas.

You can make a landfall for the main base in the bottom-right corner on the northwest shore of the island. There's a lot less anti-air turrets there than in other places. The base doesn't have a Sunken Colony, but there are many other units concealed there. Before you do that, though, you need to take care of the three groups of Guardians on the perimeter of the base (4). If you don't get them now, your scouts will have troubles defeating them during the main invasion. Just approach the island from the side with lava and then approach the team in a way that will allow them to fire a single, deadly attack. Now you can drop your units in the mentioned spot (5). Push towards the marker ignoring most buildings. An infected Command Center is on the way, producing Infected Terrans (6). They are powerful kamikaze enemies that may destroy Zelots and Tassadar. With enough Zelots, though, you should be able to breakthrough easily.

There's also another way, which lets you finish the mission in under a minute, but it's obviously more difficult. You have to be very quick and precise. Don't worry if you don't make it the first time. You have a transporter in the base, along with a few Zelots and Tassadar, i.e. everything you need to finish the mission. Create an illusion of the transporters twice and them embark Tassadar and two Zelots. This order is important! Remember that the illusions disappear after a short period of time, but it should suffice. Go south and send one transporter to lure Scourge in. If you order it to move further beyond, it may even gain enough speed to escape the Zerg. While that happens, the whole team should fly in between the Scourges, who will be busy trying to destroy the illusion. Now make sure the real transporter is in the middle of the whole squad, in tight formation. Save the game if you have at least three illusions and the real transporter has a full healthbar. Enter the Zerg base and go straight for the marker, in the meantime controlling the velocity of the phoney transporters so that they're always closer to enemy turrets. When the real one gets close to the marker, disembark and quickly order the crew to move towards the target.

