Mission 3 - The New Dominion | Zerg | Campaign Walkthrough StarCraft: Remastered Guide
Last update: 22 August 2017
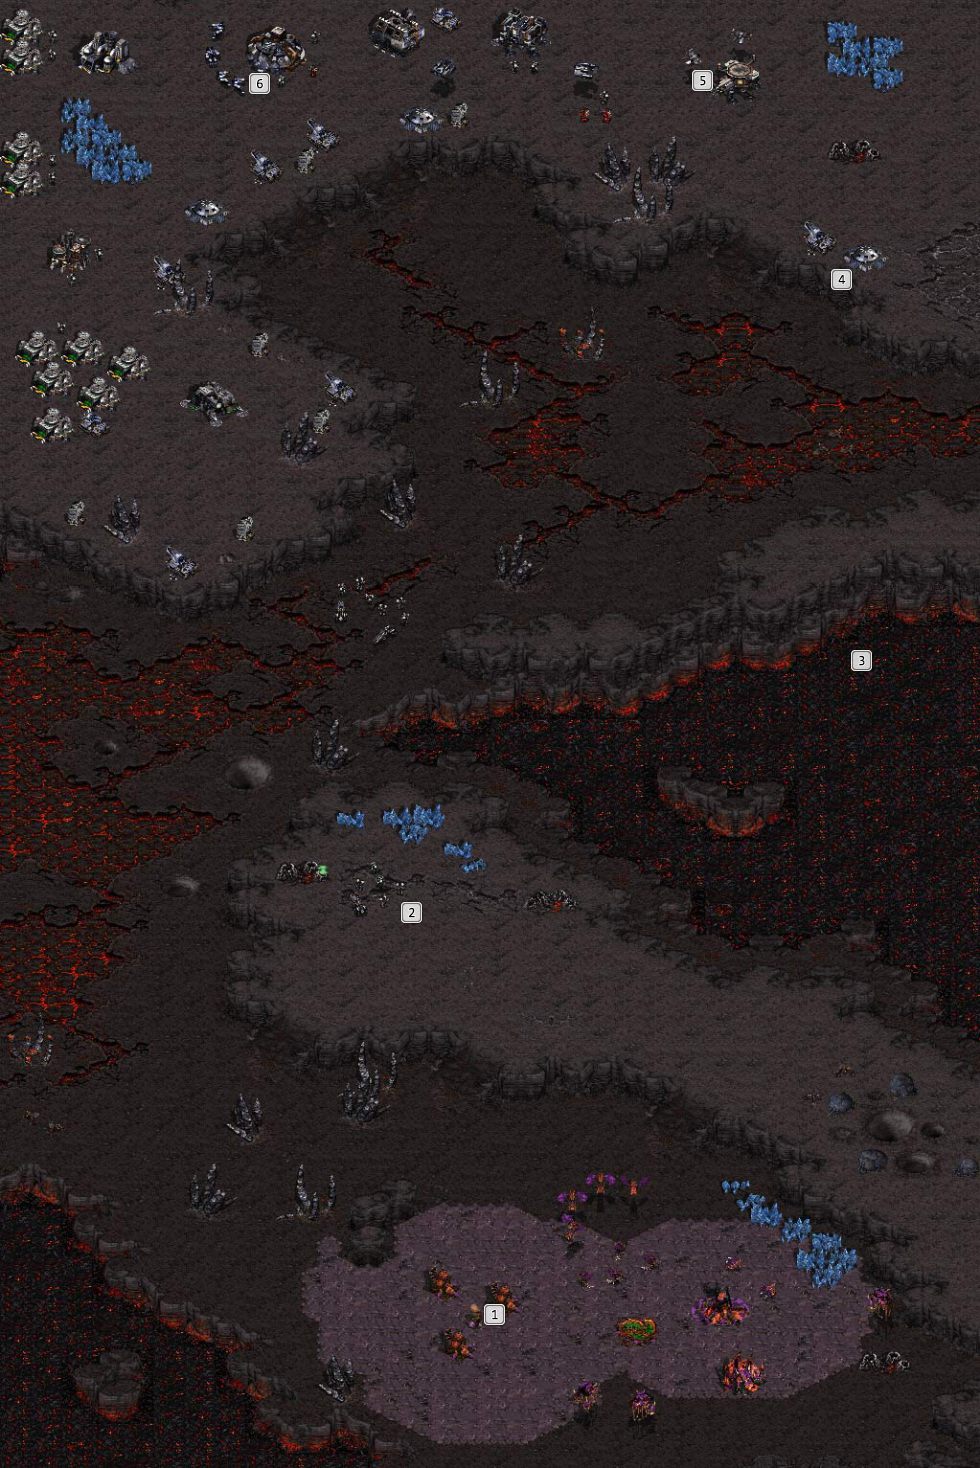
Chrysalis � In addition to expanding the base, build some extra Sunken Colony around the Chrysalis Chrysalis. The enemy will often send larger and larger groups of troops into this place.
Space for an additional base � In this mission you will need large amounts of gas. This additional expansion will be guarded by a small group of Marines. However, once the expansion is established, the enemy attacks will intensify. Build some additional turrets and keep a small group of defenders here.
Airships assembly point � At the right edge of the map, collect your Mutalisks and troops loaded into Overlords. From here you will head north to the weakest part of the enemy base.
Confederates base right flank � You will find a bunker with soldiers and a siege tank here. Attack both Mutalisk targets. Then, unload your soldiers on a hill and start attacking the base.
Starport � Straport is the most advanced building in the base. After its destruction, divide its troops into two groups. One destroy the buildings and the other defends the defenders. At this point the opponent will gather troops from its entire base.
Confederates base center � The Command Center should be destroyed as soon as possible. You will prevent the enemy from extracting resources and completing losses in the SCV. The opponent will rebuild the lost buildings, so destroying the workers is just as important. Then focus on the southern part of the base and eliminate the remaining forces.
Mission objectives:
- Protect the chrysalis;
- Eliminate the terran forces.
The Zerg Swarm arrived at Char, where your task is to keep looking out for chrysalis. However, the terran forces of the Dominion followed you here. Their task is to eliminate the zerg, and they will start with the base with the chrysalis. You have to defend yourself and plan a counterattack. There is a tough battle ahead of you - this is the first of many difficult and long missions of this campaign.
The terrans occupy the entire northern part of the map. Their base is located on a hill and is defended by Bunkers, Siege Tanks in the Siege Mode, and numerous Turrets. Your position is in the bottom and has only to land ways in. Although the enemy has transporters and fighters, the terrans mostly attack with infantry and vehicles. In this mission, the terrans mass produce Siege Tanks, frequently use them in the Siege Mode, and dynamically move them to threatened positions. The only consolation is the absence of Goliaths and the fact that Wraiths won't be using their cloaking ability. Only Marines, Missile Turrets, and Wraiths will pose a threat to your Mutalisks.

Start from increasing the number of your workers and begin extracting gas. Once you have 15-20 workers, build two extra Hatcheries. The initial enemy waves will consist only of Marines and Firebats, the later ones also include Vultures and Siege Tanks. A team of Zerglings and a few Hydralisks should be enough to defend your base for the first dozen of minutes. Build extra Sunken Colonies around the chrysalis and at the mineral deposits (1). The enemy usually targets these two places. There is a hill with additional raw materials in the middle of the map (2). However, if you set up a base there, enemy attacks will intensify. It's a good idea to refrain from expansion until the starting base's resources start to dwindle, especially its gas supply.

The enemy base is divided into three parts but has a weak spot. In the bottom part of the hill are Supply Depots surrounded by Turrets and tanks. The middle part consists of the Command Center and two production buildings. There are Bunkers and Turrets at the ramps. A frontal attack would be very costly for you army. The right side is the aforementioned weak spot of the enemy base. It consists of an unexploited deposit, a Starport, a tank, and a Marine-filled Bunker at the lower edge. It is an ideal place to perform a landing and storm the rest of the base.

Before you gather an adequate assault team, upgrade one of your Hatcheries to a Lair. This gives you access to a building that possesses the Mutalisk genotype. Apart from that, you can buy enhancements for your Overlords, for example, increased speed and better vision. The most important thing is the possibility of transporting land units. Prepare an assault squad that consists of a Mutalisk team and 2 groups of Zergling and Hydralisks (3). Stick to the right edge of the map and destroy the Bunker and the tank with your fighters (4). Now, deploy your army and head left, right at the top edge of the map (5). Optionally, you can take several workers with you and build Hatcheries that will serve as a training point and will block raw material extraction in this place. Order your units to attack the terran base.
Destroy the production buildings - Starport, Barracks, Factory, Command Center, one by one (6). Turrets are a threat to small groups of Mutalisks so it would be best if you infantry got rid of this danger. On the other hand, two teams of Mutalisks are capable of quickly destroying Turrets and start wreaking havoc in the enemy base. It's important to eliminate enemy workers and destroying the southern part of the base. The enemy often rebuilds the destroyed buildings in new places. The terrans also call for reinforcements from every corner of the map to fight you. Even if this attack fails, it's a good idea to quickly assemble another strike team, even a one consisting only of Zergling squads. The key is not to give the enemy time to retrain the workers and rebuild the Barracks and Factory.

