
Sons of the Forest: Shelter elements Sons of the Forest guide, tips
While there are blueprints available for various structures in Sons of the Forest, you can completely build the various elements yourself, creating your own unique base. In our guide you will find tips on how to build walls, doors, floors and other parts of the shelter.
Last update: 08 March 2023
Each basic shelter element, like walls, windows or stairs, can be built by yourself. Combining individual structures lets you tailor a base exactly to your needs. Below you'll find some instructions on how to craft shelter elements in Sons of the Forest.
- Introduction
- Floor
- Wall
- Window
- Door
- Single Step
- Basic Beams
- Struts
- Roof
- Stairs
- Ramp
- Defensive Wall
- Rope
- Rope Bridge
- Firewood
Introduction
Before starting construction you should read these tips:
- Some structures require you to cut logs into different lengths and thicknesses. We've described the rules governing this mechanic on the Log processing page.
- Building takes a lot of logs, so you should ask Kelvin for help, directing him to cut down trees and constantly provide you with resources. Remember, however, that if you're trying to build a Tree House, he may accidentally cut down the same tree you built your shelter on.
- Before starting construction you should first find a suitable area. The terrain should ideally be flat, as building a shelter on steep slopes is much more difficult.
- We haven't listed the exact number of logs you need, as it depends on how the size of the elements you construct.
- You must equip an axe before processing logs. If you don't, the game won't show you where to chop them.
- More complex constructions require knowledge on how to build other, simpler elements. For example, to build a roof you must first place walls and beams. We've listed all the necessary instructions below.
- You'll find visual instructions regarding construction in the Book, displayed by pressing the B key on your keyboard.
Floor

A basic floor requires:
- Logs;
- Planks.

First, arrange four logs into a square. Placing the first log makes a side arrow appear at its end. Repeat this for all the elements.

After laying out the outline, cut logs into planks and place them parallel to each other until they cover the entire surface.
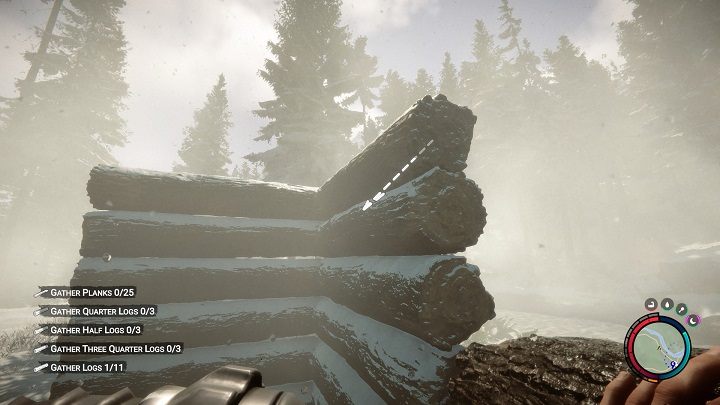
Wall

Take a log and place it horizontally on the ground.

Then place the next logs atop of it. The game will show you the correct spot with dashed lines, as pictured above. The optimal wall height is 7 logs.
Window
First, build a wall using the instructions above. Equip an axe and aim the camera at the center of the wall.

The game will show you where to chop with red dashed lines. Start chopping with left-click.

Repeat the process until you get the desired window size.
Door

After building the wall, cut holes in it just like you did when creating a window. This time, however, remove the centers of the logs all the way to the bottom.

Cut logs into half logs. The game will mark how to place them with a vertical arrow pointing upwards.

After filling the space, you can now use the door. It will open and close automatically when you go through it.
Single Step
You can only build a step after crafting a floor.

Cut the log lengthwise to get a plank. When you aim the camera at the floor and a left arrow appears, place it with a left-click to receive a step.
Basic Beams

Aim the camera down at the ground while holding a log, right-click to change the placing mode (a white circle will appear) and confirm with left-click. You'll now set the log vertically.

Lean the second log against the first. The arrow will point you in the right direction.

Place the third log under the opposite end of the second one. This will lift the entire structure and create a beam.

You can also use an axe to shorten the logs supporting the structure. This lets you adjust the beam height to your needs.
Struts
Struts connect side columns to the beam above them, letting you remove the middle supports holding them up.

First build some basic beams. You can follow the pattern found in the Book.

Cut a log in half to get half logs. Place one half in the corner of the beam's left end, and the other on the opposite side. The game signals this with an animated white arrow.
You can now remove the middle pillars with an axe, as the struts will prevent the structure from collapsing.
Roof
To create a roof, you must first build at least two perpendicular walls. Then rest a log against the end of one of the walls. It works on the same principle as crafting basic beams.

Place the second log to raise the beam.

Place the third log between the wall and the beam you just placed.

The last step is to cut the logs into boards. Keep placing them until they cover the area of your choice. White horizontal arrows indicate where to place the planks.
Stairs

Place a log vertically.
When you try to place a second log, you should see vertical dashed lines with a circle at the end. Accept the action with a left-click.

Place the log on the pieces you've just set up, just like when creating beams.

While holding the log, aim the camera at the center of the construction and change the construction mode with a right-click. When the animated dashed lines pictured above appear, confirm with left-click. The game will automatically cut the materials and place the planks. Repeat until you've completed the entire staircase.
Ramp

You can build the ramp nearly indentically to the stairs. The only difference is in how the boards are arranged. While holding the log, change the construction mode with a right-click until horizontal dashed lines appear. Confirm with left-click and repeat the process until filling the entire desired space.
Defensive Wall

Place the first log vertically. Point the camera down and place another log when a circle symbol with a short line appears. Repeat this process until you extend the wall to its desired length.

To sharpen the logs, equip an axe and point the camera at the top of the log. When red dashed lines appear, lefti-click. Repeat this with remaining parts of the wall.
Rope

You can place a rope on any wall, letting you climb it. Enter your inventory and select the rope. Approach the wall and, when you see a long vertical dashed line, left-click to attach it.
Rope Bridge

Build two walls, spaced apart from each other and facing the same direction. It's critical for them to be facing each other.

Select a rope from your inventory and approach one of the walls. When a long dashed line appears, left-click, approach the second wall and left-click again to connect both walls with the rope. Do this twice to make room for the plank floor.

Grab a log and point the camera at the logs. After left-clicking, the game should automatically cut the material into planks and place it down. Repeat this until filling the bridge with planks.
Firewood

Cut the log lengthwise.

Then cut the board into 4 pieces. This gets you small pieces of firewood you can throw into the fire to keep it going.