Guides & Walkthroughs New Guides Popular RPG Action Strategy Adventure YouTube Guides Mobile App

Sniper Elite 5 Guide, Walkthrough by gamepressure.com

Sniper Elite 5 Guide, Walkthrough

Table of Contents
Sniper Elite 5 - Mission 5
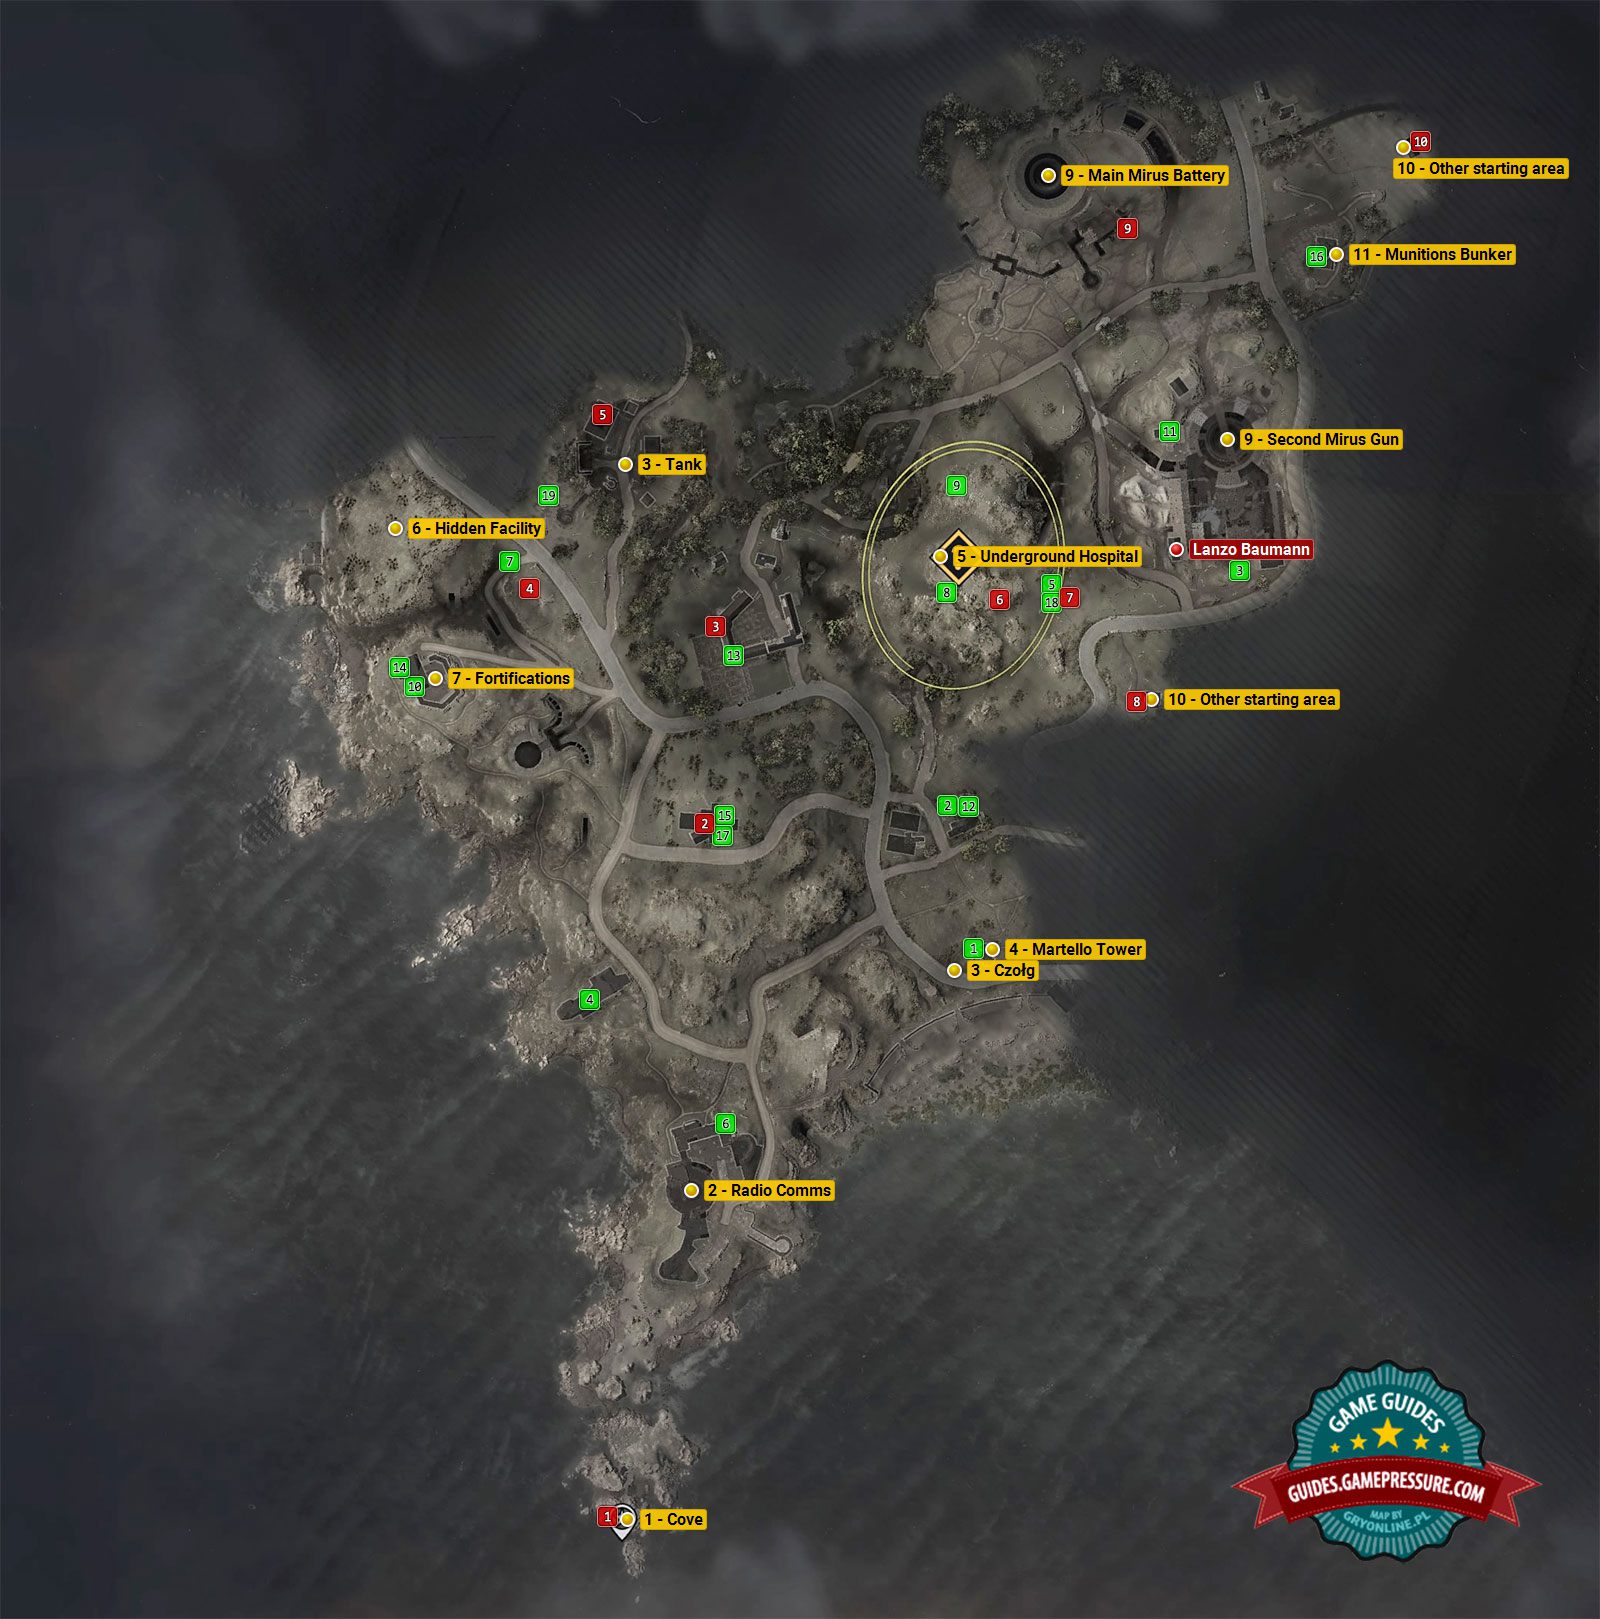
This is the default mission starting area. There are no enemies in the vicinity of the cove. You'll encounter first soldiers after heading north towards main and side mission objectives.
There's a radio communications spot here and you can sabotage it (optional mission objective). There are two ways of doing that - sabotaging 2 cables which are holding up the tower or destroying the radio equipment from the bunker. There's intel here on other locations from the map.
There are 2 tanks on the map - you can avoid them or try to get rid of them. Destroying the tanks can be achieved using panzerfausts, satchel charges (install the charge by the exhausts) or using armor piercing weapons/ammo.
The area around the tower is being patrolled by a tank (orange 3 on the map) and you can avoid it or try to destroy it. You also have to watch out for the enemies from the tower and the jager sniper. There's a panzerfaust at the top of the tower and you can find even more in the buildings to the north and to the west of the tower.
The hospital has 3 entrances - southern, north-western and north-eastern. Exploring it is a main objective, but it may be skipped if you find other clues earlier. There's a document-collectible in the northern part of the hospital containing a clue on the hidden facility (orange 6 on the map). There's intel here on other locations from the map.
You can find out about the facility from the documents in the underground bunker (orange 5 on the map) or in the fortifications (orange 7 on the map). There are two entrances - southern and eastern (watch out for the tank - orange 3 on the map). You'll find a U-boat and you must destroy the Kraken prototype (3 different sabotage options).
There's a small group of enemies here. Exploring the fortifications allows to find the documents and to find out about the hidden facility with the Kraken (orange 6 on the map). This is an alternative to visiting the hospital (orange 5 on the map).
This is a Kill List target. You can complete an optional objective if you kill him by burying him in concrete - sneak up on Baumann, pacify him (don't kill him!) and carry his body to the area where you can throw him towards the concrete.
This battery is still under construction and it's connected to a side objective. You can drop a hanging object to cause a big explosion.
You can reach the battery from the trenches or using the main path. Sabotaging the gun is the main mission objective and there are 3 available options.
There are 2 buildings on the map that may become alternative mission start areas. In both cases you have to climb the vines on the outer wall and unlock the building from the inside.
It's guarded by several enemies. You can find Panzerfausts, Satchel Charge, mines and other loot. All of these items may come in handy to destroy the tanks (orange 3 on the map) and the vehicles to the west of the bunker. Climbing to the roof of the bunker will allow you to attack enemies surrounding the main battery (orange 9 on the map).
The letter is in the inventory of the officer next to the tower - you must eliminate him and search his body.
The collectible is inside the building, on a large table.
The collectible is in the possession of a soldier patrolling the second Mirus battery build site. Eliminate him and check his body.
The collectible is inside the Nazi fortification.
The document is inside a locked hut - use a lockpick or the bolt cutters, crawl and use the ladder.
The document is inside the safe on the upper floor. You can get there by climbing the vines on the exterior wall. Use a Satchel Charge or find the combination on the ground floor.
The collectible is underground, in the Hidden Facility. You must check the room which also contains a safe.
The collectible is in the underground hospital, on a desk in one of the rooms.
The collectible is in the northern part of the hospital and collecting it allows to learn about the Hidden Facility.
The collectible is inside the Nazi fortification.
The item is inside the building next to the Second Mirus Gun construction site.
The artifact is inside the building, on a large table.
The bag is in the bedroom, on the upper floor of the farmhouse.
The eagle is on the roof of the north-western fortification.
The eagle is at the top of the central fortification.
The eagle is at the top of the eastern munitions bunker.
The workbench is in the upper room of the fortification - climb the vines to get there.
The workbench table is inside a locked hut - use a lockpick or the bolt cutters, crawl and use the ladder.
The workbench is in the trenches next to the entrance to the Hidden Facility.
The gnome is on the table near the mission starting area.
The gnome is in the fortifiaction's tower and you must climb the wall.
The gnome is in the garden in the farmhouse.
The gnome is in the shooting range above ground, between the targets.
The gnome is inside of the tents in the enemy camp.
The gnome is in the toilet in the underground hospital, behind a partially opened door.
The gnome is next to one of the windows of the closed hut.
The gnome is on the upper floor of the building used as alternative starting area. You must climb the vines.
The gnome is in one of the dark corners of the trenches in front of the Mirus battery.
The gnome is on the upper floor of the building used as alternative starting area. You must climb the vines.
There are 2 buildings on the map that may become alternative mission start areas. In both cases you have to climb the vines on the outer wall and unlock the building from the inside.
There are 2 tanks on the map - you can avoid them or try to get rid of them. Destroying the tanks can be achieved using panzerfausts, satchel charges (install the charge by the exhausts) or using armor piercing weapons/ammo.
Enlarge this map

Sniper Elite 5: Secrets and collectibles in Mission 5 (Festung Guernsey) - list of all Sniper Elite 5 guide, walkthrough

The island of Guernsey in Sniper Elite 5 hides 19 finds - documents, letters, artifacts, eagles and workshops. The guide to mission 5 will allow you to get 100% of the secrets.

Last update: 06 June 2022

Key points of Sniper Elite 5 - Mission 5

Main locations on the map

Kill List target

Secrets and collectibles

Gnomes (easter-eggs, minor collectibles)

The fifth level of Sniper Elite 5, Festung Guernsey, contains 19 unique secrets. Our guide explains where to find workbenches, dead-eye targets, hidden items, classified documents and private letters. We've also included a map of Guernsey island with all the collectibles marked.

List of mission 5 secrets

There are 19 primary secrets to be found in mission 5. Here is a list of them:

  1. Personal Letter x5
  2. Classified Document x5
  3. Hidden Item x3
  4. Dead-Eye Target x3 - Stone Eagles
  5. Workbench x3

You can also find and destroy gnomes (easter eggs) for one of the medals. We've described them at the end of the page.

Note - some secrets in this mission are easily missable, as they're being held by specific enemies. Try to search every enemy corpse, as they can vanish after a while, taking the secret with them. If they do, you'll have to load a previous save or restart the mission.

#1 - No Need to Worry

1 - Sniper Elite 5: Secrets and collectibles in Mission 5 (Festung Guernsey) - list of all - Secrets & Collectibles - Sniper Elite 5 Guide, Walkthrough
Type of collectible: Personal letter - Sniper Elite 5: Secrets and collectibles in Mission 5 (Festung Guernsey) - list of all - Secrets & Collectibles - Sniper Elite 5 Guide, Walkthrough

Type of collectible: Personal letter

You must eliminate and search the officer next to Martello tower - locate him with your binoculars (picture 1). Watch out for the tank and the sniper in the area.

#2 - Getting Off the Island

Type of collectible: Personal letter - Sniper Elite 5: Secrets and collectibles in Mission 5 (Festung Guernsey) - list of all - Secrets & Collectibles - Sniper Elite 5 Guide, Walkthrough

Type of collectible: Personal letter

You must explore one of the buildings in the central part of the island. Use the ladder and grab it off the big table. You'll find the secret #12 in the same place.

#3 - Confiscated Goods

Type of collectible: Personal letter - Sniper Elite 5: Secrets and collectibles in Mission 5 (Festung Guernsey) - list of all - Secrets & Collectibles - Sniper Elite 5 Guide, Walkthrough

Type of collectible: Personal letter

Locate a soldier from the construction site in the eastern part of the map (where the second Battery Mirus is being built), as he's the one who holds the collectible. Get rid of him and search his pockets.

#4 - Escaping Islanders

Type of collectible: Personal letter - Sniper Elite 5: Secrets and collectibles in Mission 5 (Festung Guernsey) - list of all - Secrets & Collectibles - Sniper Elite 5 Guide, Walkthrough

Type of collectible: Personal letter

You must explore one of the Nazi fortifications in the western part of the island. Search all the floors of the building, until you find the collectible next to the cork board holding some documents.

#5 - Harass the Huns!

2 - Sniper Elite 5: Secrets and collectibles in Mission 5 (Festung Guernsey) - list of all - Secrets & Collectibles - Sniper Elite 5 Guide, Walkthrough
Type of collectible: Personal letter - Sniper Elite 5: Secrets and collectibles in Mission 5 (Festung Guernsey) - list of all - Secrets & Collectibles - Sniper Elite 5 Guide, Walkthrough

Type of collectible: Personal letter

The secret is inside a locked hut between the underground hospital and the eastern construction site. You must open the door with a lockpick or pliers.

Crawl through a small hole in the hut and use the ladder. You'll reach the room holding the secret. There's also a workbench in the same area.

#6 - Grin and Bear It!

3 - Sniper Elite 5: Secrets and collectibles in Mission 5 (Festung Guernsey) - list of all - Secrets & Collectibles - Sniper Elite 5 Guide, Walkthrough
Type of collectible: Classified Document - Sniper Elite 5: Secrets and collectibles in Mission 5 (Festung Guernsey) - list of all - Secrets & Collectibles - Sniper Elite 5 Guide, Walkthrough

Type of collectible: Classified Document

You must reach an inaccessible room in the radio building found in the southern part of the map. Climb the vines shown in picture 1.

There's a safe in the new room upstairs. The code is on the ground floor, written on a piece of paper. You can also simply blow up the safe with an explosive.

#7 - Cut Costs Cost Lives

Type of collectible: Classified Document - Sniper Elite 5: Secrets and collectibles in Mission 5 (Festung Guernsey) - list of all - Secrets & Collectibles - Sniper Elite 5 Guide, Walkthrough

Type of collectible: Classified Document

You can only obtain this secret after infiltrating the underground Hidden Facility. The document is on the table, on the upper floor of the facility, in the same room as a safe.

#8 - Oafish Officers

Type of collectible: Classified Document - Sniper Elite 5: Secrets and collectibles in Mission 5 (Festung Guernsey) - list of all - Secrets & Collectibles - Sniper Elite 5 Guide, Walkthrough

Type of collectible: Classified Document

You must investigate an underground hospital related to one of the mission's main objectives. The document you're looking for is on a desk, in one of the hospital rooms.

#9 - Transport Troubles

Type of collectible: Classified Document - Sniper Elite 5: Secrets and collectibles in Mission 5 (Festung Guernsey) - list of all - Secrets & Collectibles - Sniper Elite 5 Guide, Walkthrough

Type of collectible: Classified Document

This document is in the northern part of the hospital. You probably won't miss it, as obtaining this document tells you of the Hidden Facility you need to access as part of the main mission objectives.

#10 - Drastic Measures

Type of collectible: Classified Document - Sniper Elite 5: Secrets and collectibles in Mission 5 (Festung Guernsey) - list of all - Secrets & Collectibles - Sniper Elite 5 Guide, Walkthrough

Type of collectible: Classified Document

You must explore the north-western fortification on the island. The document is on a table in one of the rooms.

#11 - Todt Uniform Badge

Type of collectible: Hidden Item - Sniper Elite 5: Secrets and collectibles in Mission 5 (Festung Guernsey) - list of all - Secrets & Collectibles - Sniper Elite 5 Guide, Walkthrough

Type of collectible: Hidden Item

You must examine a small building in the north-western part of the construction site (the one where the second Battery Mirus is being built at). The badge is on one of the tables.

#12 - Crystal Radio

Type of collectible: Hidden Item - Sniper Elite 5: Secrets and collectibles in Mission 5 (Festung Guernsey) - list of all - Secrets & Collectibles - Sniper Elite 5 Guide, Walkthrough

Type of collectible: Hidden Item

You must explore one of the buildings in the central part of the island. Use the ladder and grab it off the big table. You'll find the secret #2 in the same place.

#13 - Comfort Bag

Type of collectible: Hidden Item - Sniper Elite 5: Secrets and collectibles in Mission 5 (Festung Guernsey) - list of all - Secrets & Collectibles - Sniper Elite 5 Guide, Walkthrough

Type of collectible: Hidden Item

Reach the farm in the central part of the map. Explore the largest building there and go to the bedroom upstairs. The artifact is in the corner of the room.

#14 - Stone Eagle 1

Type of collectible: Dead-Eye Target - Sniper Elite 5: Secrets and collectibles in Mission 5 (Festung Guernsey) - list of all - Secrets & Collectibles - Sniper Elite 5 Guide, Walkthrough

Type of collectible: Dead-Eye Target

The Eagle is located on a fortification rooftop in the north-western part of the map. We recommend taking a shot from a long distance so you can easily locate the collectible.

#15 - Stone Eagle 2

Type of collectible: Dead-Eye Target - Sniper Elite 5: Secrets and collectibles in Mission 5 (Festung Guernsey) - list of all - Secrets & Collectibles - Sniper Elite 5 Guide, Walkthrough

Type of collectible: Dead-Eye Target

The Eagle is located on a fortification rooftop in the central part of the map. You should be able to spot it from anywhere in the area.

#16 - Stone Eagle 3

Type of collectible: Dead-Eye Target - Sniper Elite 5: Secrets and collectibles in Mission 5 (Festung Guernsey) - list of all - Secrets & Collectibles - Sniper Elite 5 Guide, Walkthrough

Type of collectible: Dead-Eye Target

This collectible is at the ammo bunker in the eastern part of the map, south-east of the artillery battery. The eagle is at the top of the bunker, you don't even need the scope to hit it.

#17 - Rifle Workbench

4 - Sniper Elite 5: Secrets and collectibles in Mission 5 (Festung Guernsey) - list of all - Secrets & Collectibles - Sniper Elite 5 Guide, Walkthrough
Type of collectible: Workbench - Sniper Elite 5: Secrets and collectibles in Mission 5 (Festung Guernsey) - list of all - Secrets & Collectibles - Sniper Elite 5 Guide, Walkthrough

Type of collectible: Workbench

The workbench is at the top of a tower of the central fortification. It seems inaccessible, but you can reach it by climbing up the wall, starting from the vines. Get to the highest room and interact with the workbench.

#18 - SMG Workbench

5 - Sniper Elite 5: Secrets and collectibles in Mission 5 (Festung Guernsey) - list of all - Secrets & Collectibles - Sniper Elite 5 Guide, Walkthrough
Type of collectible: Workbench - Sniper Elite 5: Secrets and collectibles in Mission 5 (Festung Guernsey) - list of all - Secrets & Collectibles - Sniper Elite 5 Guide, Walkthrough

Type of collectible: Workbench

The secret is inside a locked hut between the underground hospital and the eastern construction site. You must open the door with a lockpick or pliers.

Crawl through a small hole in the hut and use the ladder. You will reach the room with the workbench. You'll find the secret #5 in the same place.

#19 - Pistol Workbench

Type of collectible: Workbench - Sniper Elite 5: Secrets and collectibles in Mission 5 (Festung Guernsey) - list of all - Secrets & Collectibles - Sniper Elite 5 Guide, Walkthrough

Type of collectible: Workbench

The workbench is in the north-western part of the map. You must examine the trenches near the eastern entrance to the Hidden Facility.

10 gnomes in mission 5 - easter eggs

There are 10 gnomes to be found and destroyed in mission 5 - we've pictured one of them above - Sniper Elite 5: Secrets and collectibles in Mission 5 (Festung Guernsey) - list of all - Secrets & Collectibles - Sniper Elite 5 Guide, Walkthrough

There are 10 gnomes to be found and destroyed in mission 5 - we've pictured one of them above. You can treat them as easter eggs of sorts, as they have no practical use and don't count as primary collectibles.

We've marked the gnomes with red dots on our Guernsey island map. Destroying all the gnomes unlocks a gold medal, The Gnome Guard (one of the many medals available in the game).

See/Add Comments

You are not permitted to copy any image, text or info from this page.

This site is not associated with and/or endorsed by the Rebellion or Rebellion. All logos and images are copyrighted by their respective owners.

Copyright © 2000 - 2024 GRY-Online S.A. for gamepressure.com, unofficial game guides, walkthroughs, secrets, game tips, maps & strategies for top games.