Return to Monkey Island: Bella Fisher's Golden Key - walkthrough, solution Return to Monkey Island walkthrough
Bella Fisher's gold key from Part 4 of Return to Monkey Island requires obtaining 3 flags. Our soluition explains how to obtain the flag from the quarantined ship, the flag from the museum and the flag from Cod's Wallop store, as well as how to solve the puzzle of finding the wreck.
Last update: 29 September 2022
One of the objectives of the fourth chapter of Return to Monkey Island is obtaining Bella Fisher's Golden Key. Our walkthrough, which you can find below, shows how to get 3 flags that are required in order to get the key - these are gift shop flag, museum flag, and adrift ship flag. In the guide, we have also described talking to Chums and finding the Bella Fisher wreck puzzles.
- Quarantine Ship Flag
- Museum's Flag
- Flag from the Gift Shop
- A puzzle involving finding the wreck of Bella Fisher
Quarantine Ship Flag

Bella Fisher is a name of a ship and you will have to find its sunken wreckage . The map marker doesn't appear right away. To get access to the wreck, you need to get 3 Bella Fisher flags that will be used to solve the puzzle of the wrecked ship. You can collect them in any order.
The first flag is on the Adrift Ship , which is east of Melee Island and south of Terror Island.

On the ship, you will meet pirates quaranteeing as a result of scurvy running rampant They won't listen to your reason and believe that the disease is not contagious - you will need to prepare a flyer.
The flag you are looking for is attached to the drifting ship , but you will be able to take it only after you have fully solved the puzzle with the sick pirates.

Travel to Scurvy Island and after viewing its map, reach the camp.

Find Elaine's Note in the camp.

The content of the note contains information about Elaine's whereabouts - the location is random with each playthrough. In our example, the note said that Elaine works east of the waterfall and south of the lake, and as a result, we located the area to be the Lime Grove (screenshot above).

If you've guessed the location successfully, you should find Elaine there. She will give you the Elaine's Scurvy Flyer . Unfortunately, the flyer was done by an amateur, and in such form, won't convince the pirates to lift the quarantine.
Talk to Elaine again and ask her for a few Limes, which will be useful later.

The plan of action is to get Stan's help to make a better flyer than the one Elaine created. Stan must first be found and then persuaded to cooperate.
You have to travel to Brrr Muda Island. Go to the island map and select Ice Quarry as your next destination.
If this is your first visit to the northern part of the archipelago, you will be stopped at the 19th Parallel during your first attempt to reach Brrr Muda Island. You'll be left with a puzzle which requires you to fill a Customs Form and having limes (this puzzle is explained in Obtaining 5 keys to the safe page of our guide).

Talk to the Guard guarding the drawbridge and tell him you want to meet Stan. You will learn that the only people who can access the drawbridge are those who know the convicts and can prove that.

Return to the ship and travel to Melee Island - to get there you need to revisit Shipyard again, i.e. Stan's Previously Owned Vessels.
The hut was destroyed by an earthquake and you can take a picture of Stan from it.

Reach the High Street on Melee Island - you'll find the newly established Cod's Wallop gift shop here. Once inside, talk to the fisherman and choose the option to buy a fish . You can choose any type of fish from the stock (eg. Hagfish - as shown in the picture above).

Leave Melee Island and travel to LeChuck's Ship . There are no hostile pirates on the ship and you can start exploring it right away.
Go below deck and visit the Galley where Putra used to work. You will find Putra's Demon Pepper here - take it.

Now go to Scurvy Island and from the map of the island select the part of the grove where the seagull is visible - we have marked it in the picture above.

You must chase the seagull away . Start by opening the inventory - combine the Demon Pepper with the fish you bought in the fishing store.

Use the fish on the seagull - adding pepper worked - the bird will leave this place. You can now take Guybrush's Painting.

Now travel to the Camp. Reach the desk and take the Frame Painting.

Open your inventory and select the frame from it. Now you need to combine pictures to create one which will unlock the way forward. You need to:
- in the left part of the frame, put a picture of Stan (the one taken from Shipyard on Melee Island);
- in the right part of the frame, place a picture of Guybrush (the one you picked up from beneath a seagull in a grove on Scurvy Island).
If needed, check out the screenshot above which shows correct placement of the pictures.

Go back to the Ice Quarry on Brrr Muda Island. Show the picture to the guard to prove to him that you know Stan.
Stand back and wait for the drawbridge to lower. You can now enter the quarry.

Search the location for - Stan - he is in its final part. Talk to him about getting out of the quarry. You will receive a Judicial Order stating that Stan only has a month in jail left.
You can also show Elaine's Scurvy Flyer to Stan. Stan will want to help, but only if he meets Elaine in person. You need to extend his sentence so he is motivated to escape.

Leave Brrr Muda Island and visit the small islet of Barebones at the left end of the map. Here you will meet Ned who is hiding from Stan. Ask him if he has any documents that could incriminate Stan.
Now show Ned the Judge's Order which is proof of Stan's short sentence. In return, you will receive Ned's Satchel. Open it in your inventory and you will receive, among others, Ned's Financial Records.
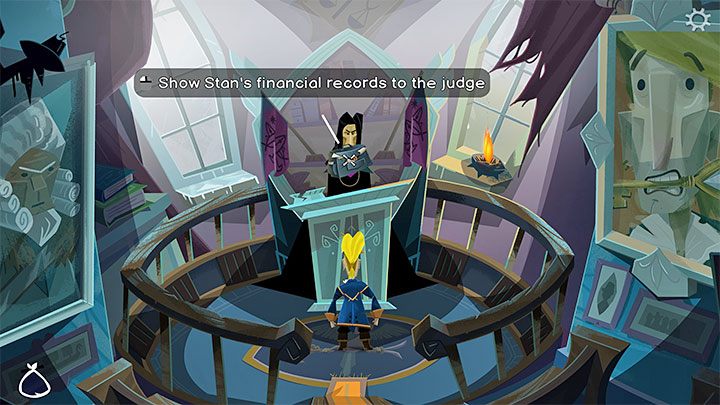
Return to Brrr Muda Island and travel to the Courthouse in town. Show Ned's Financial Records to the judge. Unfortunately, there is a complication, because you have to prove that you are Ned and a conversation won't get you any further.

Open your inventory and select the Frame from it. You have to match the pictures again:
- in the left part of the frame, put Ned's License, which you received from his satchel along with Financial Records;
- in the right part of the frame, place Guybrush's picture.
Show the complete frame (the picture above) to the judge. You've slapped another 10 years on Stan's sentence, and as a proof, you receive a document (Stan's Extended Ten-Year Sentence).

Go back to the quarry and show Stan the judge's ruling. He is now motivated to escape.
Select the Double Monocle from the inventory and use it on Stan's shackles. You can now see the Serial Number on his shackles.

Return to Melee Island and visit Locke Smith at her locksmith shop in High Street. Show her the Serial Number and you'll receive a Shackle Key.
Return to Stan and use the key on the shackles - Stan is now free.

You'll be taken to Scurvy Island, where Stan and Guybrush will start preparing a better Scurvy Flyer. You can add your own ideas in several places and it will affect the final look of the flyer, but your choices don't affect the effectiveness of the flyer.
Once everything is ready, take the New Pamphlet from the table.

With the flyer you can return to the Adrift Ship. Show the leaflet to the pirates - this will convince them to change their minds. You can board the ship and take the flag.
Museum's Flag

Visit the Museum on Melee Island again. The flag is stored in a glass case from which you already stole an item in Chapter 1.
The flags are guarded by 2 parrots. Next step is easy - feed them with Crackers.

You can use the previously obtained key (Museum Display Case Key) on the glass case. This will open it, allowing you to steal the flag.
You can view it in your inventory . It turns out that the flag is a fake, as Conrad increased security after the first theft.

Re-enter the museum. Open the case without feeding the parrots in order to trigger the alarm on purpose.

Conrad will begin the procedure of securing the real flag. Wait until you can enter the Storeroom.
The Real Flag is inside. Take it - Guybrush will replace the item with the fake he stole from the display case.
Flag from the Gift Shop

The Cod's Wallop gift shop is a new location on Melee Island - you can find it in High Street, where the building was still closed in Chapter 1. Inside, it will turn out that the shop is run by the former Pirate Leaders.

There is a flag in the shop - ask the Fisherman for it. You will learn of Chums - a secret organization consisting of fishermen. Say that you want to join them. You'll receive Chums Fishing Lure, an item that you can use on other Chums members that you meet - this way you'll know that you are talking to the right person.
Your task will be to learn to tell better pirate stories. You have to tell a story to each Chum member you meet (you can freely mix the story and dialogue options). Each member will give you tips how to improve the story (e.g. adding an introduction or paying more attention to detail) and you'll be able to retell the improved version right away.

You have to find all the members of the Chums and get tips from everyone. You will recognize each member of the group through a lure that is identical to that given to Guybrush. Here is a list of the locations in which they appear (you can visit them in any order):
Guard - he can be found in the Ice Quarry location on Brrr Muda Island.

Locke Smith - she runs a locksmith shop on High Street on Melee Island.

Pirate - a person sitting in front of the destroyed Scumm Bar on the docks on Melee Island .

Elaine - you can find her in Lime Grove on Scurvy Island.

Apple Bob - he is found on the main deck of LeChuck's Ship.

After visiting all the characters on the list , go back to Cod's Wallop. Use the bait on the fisherman you heard about Chums from.
Guybrush will tell a complete story . You will receive congratulations and you can take the flag hanging in the gift shop.
A puzzle involving finding the wreck of Bella Fisher

Having all 3 maps, choose any of them from the inventory and use it on the Sea Map.

An X sign will appear on the map of the archipelago, which marks the location of the Bella Fisher's fishing spot.

After you reach the destination, lower the Drop anchor. Try to go down the chain - unfortunately, Guybrush will be out of breath and you need to find a solution to this problem.

Come back to Melee Island. In the docks, next to the destroyed Scumm Bar, you will find an Exotic Drink. which is grog.

Head to the Cod's Wallop gift shop. Talk to the pirates sitting at the bottom of the screen. They will be interested in taking part in a Burping Contest .

Start by drinking an exotic drink after selecting it from the inventory. Only then should you join the competition. Choose the longest dialogue option from the list, i.e. the longest burp. The prize for winning the competition is a Blowfish .

Go back to the shipwreck (sign X) and try to descend again. After Guybrush runs out of air, open the inventory and choose the Blowfish - it will replenish your oxygen.

After reaching the bottom, go right. You will find the Golden Key - with it, return to the ship.