Guides & Walkthroughs New Guides Popular RPG Action Strategy Adventure YouTube Guides Mobile App
Free iOS App iPhone & Ipad
Download Game Guide PDF, ePUB & iBooks

Resident Evil Zero HD Game Guide & Walkthrough by gamepressure.com

Resident Evil Zero HD Game Guide & Walkthrough

Table of Contents
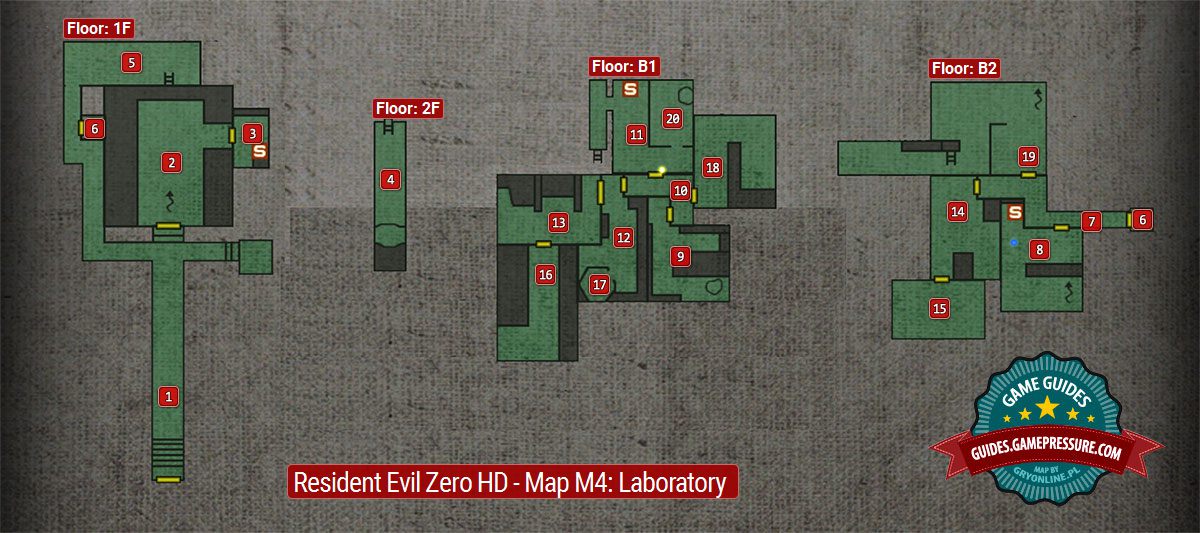
Resident Evil Zero HD - Map M4: Laboratory
First area of the laboratory - you get here from the observatory (M2,35).
There's a pressure plate which unlocks the church (M4,2) and an elevator which travels to floor B2.
You have a boss fight here with an infected bat, however it appears after you've visited the side room (M4,3).
There's a hole in the roof and using the Hookshot allows to get there (M4,4).
Church's side room. There's a typewriter here (plus some supplies).
Roof of the church. You get here by using a Hookshot in (M4,3), the ladder leads to the back of the church - (M4,5).
Back of the church. You can get here from the roof - (M4,4).
The switch unlocks the elevator in (M4,6).
You can activate the elevator by using a switch in (M4,5). It travels between floors 1F and B2.
Corridor. Only the eastern part is available when you get here for the first time, the western part is unlocked using a switch in (M4,10).
A zombie leech shows up here later on.
Library. You'll find a document, a typewriter and a service lift which travels to the floor B1 (M4,13).
You can use Hookshot on a hole in the roof to get to (M4,9).
You can reach this room by using a Hookshot in (M4,8).
There are documents here, a zombie leech and a Leech Capsule.
Corridor. There's a switch here which unlocks a new part of the corridor in (M4,7).
Room with a typewriter.
A ladder which leads to floor B2 becomes available later on.
Room with a document and red chemicals.
You can use a sterilizing agent later on to unlock the gas chamber.
Room with a document and green chemicals.
There's a service lift here which travels to floor B2 (M4,8).
The room can be unlocked using the Blue Leech Charm.
There's an Input Reg. Coil here.
Room with zombies and a Green Leech Charm.
Room unlocked using the Green Leech Charm from (M4,15).
A sterilizing agent is here and it's needed in (M4,12).
Gas filled chamber. It can be unlocked after using a sterilizing agent from (M4,16).
The chamber contains a key which can be used in (M4,18).
Locked room - a key from (M4,17) is needed.
There are hunters inside and you'll also find a file and a Dial needed for a puzzle in (M4,19).
Room with a cable car - it can be unlocked only with a Dial found in (M4,18).
There's an Output Reg. Coil here, as well as a lever which lowers a ladder to (M4,11). You can also use a Hookshot to get to room (M4,20).
Cable car control room - you can get here by using Hookshot in (M4,19).
In order to activate the cable car you must insert coils from (M4,14) and (M4,19).
You can activate the elevator by using a switch in (M4,5). It travels between floors 1F and B2.
Enlarge this map

Map [M4] | Laboratory Walkthrough Resident Evil Zero HD Guide

Last update: 02 February 2017

Key points of Resident Evil Zero HD - Map M4: Laboratory

Descriptions of the rooms from the map

Descriptions of the rooms from the map

First area of the laboratory - you get here from the observatory (M2,35).
There's a pressure plate which unlocks the church (M4,2) and an elevator which travels to floor B2.

You have a boss fight here with an infected bat, however it appears after you've visited the side room (M4,3).
There's a hole in the roof and using the Hookshot allows to get there (M4,4).

Church's side room. There's a typewriter here (plus some supplies).

Roof of the church. You get here by using a Hookshot in (M4,3), the ladder leads to the back of the church - (M4,5).

Back of the church. You can get here from the roof - (M4,4).
The switch unlocks the elevator in (M4,6).

You can activate the elevator by using a switch in (M4,5). It travels between floors 1F and B2.

Corridor. Only the eastern part is available when you get here for the first time, the western part is unlocked using a switch in (M4,10).
A zombie leech shows up here later on.

Library. You'll find a document, a typewriter and a service lift which travels to the floor B1 (M4,13).
You can use Hookshot on a hole in the roof to get to (M4,9).

You can reach this room by using a Hookshot in (M4,8).
There are documents here, a zombie leech and a Leech Capsule.

Corridor. There's a switch here which unlocks a new part of the corridor in (M4,7).

Room with a typewriter.
A ladder which leads to floor B2 becomes available later on.

Room with a document and red chemicals.
You can use a sterilizing agent later on to unlock the gas chamber.

Room with a document and green chemicals.
There's a service lift here which travels to floor B2 (M4,8).

The room can be unlocked using the Blue Leech Charm.
There's an Input Reg. Coil here.

Room with zombies and a Green Leech Charm.

Room unlocked using the Green Leech Charm from (M4,15).
A sterilizing agent is here and it's needed in (M4,12).

Gas filled chamber. It can be unlocked after using a sterilizing agent from (M4,16).
The chamber contains a key which can be used in (M4,18).

Locked room - a key from (M4,17) is needed.
There are hunters inside and you'll also find a file and a Dial needed for a puzzle in (M4,19).

Room with a cable car - it can be unlocked only with a Dial found in (M4,18).
There's an Output Reg. Coil here, as well as a lever which lowers a ladder to (M4,11). You can also use a Hookshot to get to room (M4,20).

Cable car control room - you can get here by using Hookshot in (M4,19).
In order to activate the cable car you must insert coils from (M4,14) and (M4,19).

Above, you can see a map of the Laboratory. It is a location consisting of four levels (on the surface, like the church and also underground research rooms). You reach this part of the world automatically after completing the puzzle in the Observatory (you have to find three stone tablets). It is worth mentioning that you can still return to locations that you visited before (for example to collect story items or supplies). The walkthrough describes the suggested order of exploration of the Laboratory. You will also see references to the map in the text. For example, "(M4,6)" means that you should look at point 6 on the map of the Laboratory.

See/Add Comments

You are not permitted to copy any image, text or info from this page.

This site is not associated with and/or endorsed by the Capcom or Capcom. All logos and images are copyrighted by their respective owners.

Copyright © 2000 - 2024 GRY-Online S.A. for gamepressure.com, unofficial game guides, walkthroughs, secrets, game tips, maps & strategies for top games.