
Establishing a path and powering the Capsule | Walkthrough Obduction Guide
Last update: 09 December 2016
In this chapter, you will learn how to create a universal path from the Maze's elements, as well as get to know how to power up the Capsule.
For more readability, the chapter has been divided into the following parts:
Labyrinth puzzle

See the image above. The first path will be created from the point highlighted on this image. The main structure is still in the starting position.
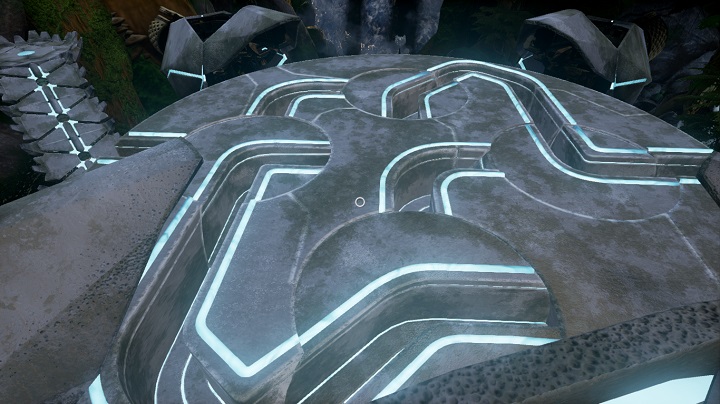
Press the button on the left side of the pillar three times. After finishing the process, you should see identical shape of the maze as above. Get down to the elevator and teleport to the cave.
Do not turn the small structure, which has been teleported together with you to Hunrath. Leave it after teleportation, and turn right after the stairs. Run through the cave, pass the bridge number 5 and go to the farthest teleporting device (you can use the other ones as well, but it's best to use the 3rd one from the bridge).

Run to the Maze and take the elevator to level 1. Make sure that what you see is identical to the picture above. Press the left button once and take the elevator to level -1. Teleport to Hunrath.
The structure that has been teleported with you has to be turned around. Do that, using the lower button. Press it three times, and get back to Maray, with the structure. Go up with the elevator.

Compare the shape of the Maze with the picture above. If you've done all the steps properly, it will look like this. Rotate the whole thing clockwise once.
Then take the elevator down to level 0 and take the path that leads to the chamber with three teleporting devices. Use the same teleport as at the beginning of this section. After you get back to Hunrath, run across the bridge number 5 until you reach the structure. Enter it and teleport, the said block doesn't have to be turned.

After teleporting, go back to level 1 and compare the shape of the Maze with the picture above. Turn the whole thing clockwise once again by pressing the left button once. Go down to level -1 use the teleport.
Using the lower button, turn the block twice. Teleport back to Maray. Take the elevator to level 1 and look at the whole thing.

If everything looks as shown above, it means you're doing good. Turn the whole thing once and teleport to Hunrath, where, by pressing any button you prefer, you should turn the block once. When you're done, use the teleport to go back to Maray.

After finishing all the above tasks, you should see a path identical to the one shown above. You can finally go to level 0 and enter the tunnel. Because the path is universal for every destination, it's enough to just turn it with the button on the wall.
Bridge 6 and activation of Capsule
After getting through the tunnel, proceed forward and keep to the right. You will arrive at yet another inactive bridge. Your task is to activate it which will let you travel freely from where you are now, to the Maze. Right combinations can be found at the start of this chapter (use them from 6 to 1!).
After entering right combinations, the bridge will be up and running. Now (via the chamber with three teleporting devices) you have to take the path to the labyrinth, take the elevator to level 1 and use the left button on the column controlling the labyrinth. When it turns 90 degrees clockwise, you will be able to - again via the chamber with three teleports - get into the labyrinth, through which you can get to the point situated straight in front the tower controlling the labyrinth.

See the picture above. There will be another Villein panel. Create a patter identical to the one shown above, and confirm by pressing a blue button. You will hence unlock the door highlighted on the picture above. For now, you're unable to get there, but it's a good idea to do these things to make the subsequent play easier.
After doing that, you have to go back to the mechanism controlling the labyrinth once again, and open a passage to the bridge - turn the labyrinth 2 times clockwise, and enter it from level 0 (use elevator) - at the end of the corridor will wait a portal-wall.

Do all the mandatory stuff to get to a new area in Maray. Follow the only path available here and go through the next portal. Behind it is another path, and at it's end, there's a Villein panel which can be seen on the picture above. Mark the points the same way as shown above and the next door hanging on rails will be open. Go back to the Maze.
Proceed now to the region you've explored first after completing the path from Maze's block. You can do that by changing the settings of the path or by using the bridge you've unlocked previously.

Once you get to the required place, reference the picture above. Highlighted is a place that you have to get to. Take the footbridge on the left, and you'll see another footbridge, going down. Use it, and then proceed to the central point of the whole building. You will see Josefa again, he will ask you to hurry. Right next to the screen there's a button. Press it, and the capsule spanning device will prepare a warm and cozy one just for you. Because you've just opened both blockers of the lift, you can go to the upper level of the structure you're now in, and enter the Capsule. Once you do it, the lift will start going.