NieR Automata: Chapter 17, 9S and A2 - Route C, D - walkthrough NieR Automata guide, tips
NieR Automata: on this page you will find the solucja for the 17th chapter of Route C, D - 9S and A2
Last update: 30 August 2021
On this page of the NieR Automata guide you'll find a walkthrough for Chapter 17, the finale of the game during which you play as 9S and A2. From our walkthrough you'll learn how to prepare for the final chapter, how to inflitrate the Tower, how to win the encounter against 2B copies and how to defeat the chapter's bosses, Ko-Shi & Ro-Shi (first separately, then combined).
- Preparations to the game's finale
- Tower Infiltration - how to open the Tower
- Exploring the Tower
- Battle against 2B copies
- Further Tower exploration
- Ko-Shi & Ro-Shi - preliminary info
- Ko-Shi boss fight (A2) and cyberspace
- Ro-Shi boss fight (9S)
- Combined Ko-Shi & Ro-Shi boss fight
Preparations to the game's finale
Chapter 17 is the final chapter of the game. It contains the final battles of the main storyline. You shouldn't need to overprepare for the game's finale, as this chapter's boss encounters shouldn't give you too much trouble on the default, Normal difficulty. However, you might still want to:
- upgrade the melee weapons you're currently using (if you have the necessary ingredients),
- upgrade your currently used pod programs (if you have the necessary ingredients),
We recommend saving your progress in a separate slot before heading to the Tower. Thanks to that you can keep your progress regarding the three keys, as well as have an easier time unlocking two secret endings.
It's worth knowing that by finishing the game, you're risking the loss of your save data, as the game may end up purposefully deleting it (it's not a bug). We've described it in more detail on the Route C and Route D endings page. Additionally, on the page Save data backup - how to create? found in the appendix of our guide, you'll learn how to create a backup of your data and how to prevent losing many hours of progress.
Tower Infiltration - how to open the Tower
After finding three keys in Chapters 13, 15 and 16 you can return to the Tower in the City Ruins. You must use the keys on the Sub-units around the Tower.

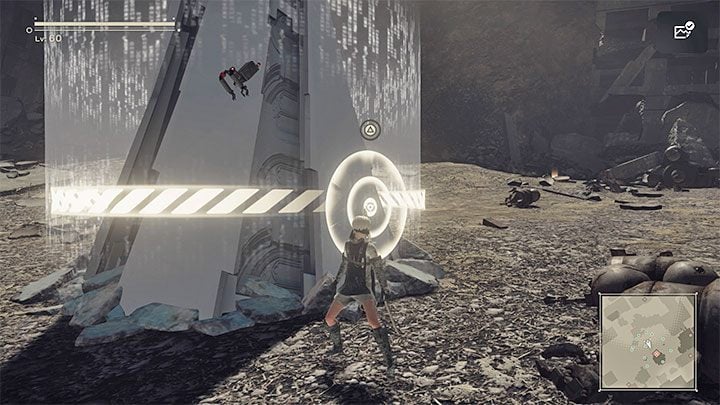
Each time you use a key you'll have to hack the sub-unit. The hacking mini-game will require you to go through an obstacle course and reach a black orb or several black orbs.
The mini-game shown on the picture above could be problematic due to the presence of enemies. While going through the course try not to destroy the black blocks which separate you from hostile units. That way you won't have to risk restarting the mini-game because of their attacks.

After you manage to break into three Sub-units you should save your game before heading for the Tower itself.
Your first attempt on hacking the Tower will fail. The process is very slow and you'll start getting attacked by hordes of machines interfering with your hacking.

Instead of trying to hack the Tower, focus on fighting the machines. You won't be able to defeat them all as new enemies will replace the ones you destroyed. You must hold out until the twins - Devola and Popola - arrive. They'll offer you assistance while you hack the Tower.
Before doing so, you're met with an opportunity to unlock two extra endings.
- Secret ending S can be unlocked if you run away from the Tower and the twins (example shown on the picture).
- Secret ending V can be unlocked by joining the sisters in combat instead of hacking the tower. The ending will trigger after you spend some time fighting alongside the twins.

To progress with the story you need to stand in front of the tower and hack it. New machines keep appearing on the battlefield, but they'll be busy fighting Devola and Popola, so they shouldn't bother you.

The tower, obviously, won't open right away - you need to finish a hacking mini-game first. Take advantage of the fact that the mini-game, unusually, doesn't have a time limit. Slowly move upwards and make sure to be careful when destroying enemies. When fighting against orbs always position yourself between their bullets, or in front of orange projectiles which can be shot down.
In the last area the orbs will be protected by force fields. You don't need to do anything. Wait for a cutscene involving 9S and the twins.

The game will try to show you Data Records about Devola and Popola which deepen your knowledge about their backstories. This scene is text-only and contains choices which don't change anything substantial.
If you don't feel like reading walls of text, you can skip the scene by holding the Circle button. The text will quickly scroll by, only stopping when you need to make a choice.
Exploring the Tower

The path inside the Tower is linear. You should expect encounters against infected YoRHa units which can be defeated in open combat (it's safer to fight them at range) or by hacking them.
Along the way it's worthwhile to look around for loot - glowing objects and chests (some of them need to be hacked open). That way you can get plenty of valuable loot and new Archives entries.
Battle against 2B copies

In one of the rooms you'll find hostile 2B models you have to fight off. This battle is best fought at range, using your pod's offensive programs. The enemies can very easily surround you if you try fighting them in melee. 2B Copies are relentless in combat, so you'd have to skillfully dodge their attacks.

During this encounter hacking is available. Try to gain distance from the copies before you try to hack them, otherwise they can interrupt you with a melee attack.
To win, you need to destroy all 2B models. This encounter isn't particularly difficult. It is, however, quite long.
Further Tower exploration

After dealing with 2B copies and watching a cut-scene, your control will shift to A2. She also needs to reach the Tower, but doesn't necessarily have to engage enemies along the way. At the Tower's entrance you'll meet Devola and have one final talk with her.
Inside the Tower you'll go through the same corridors as 9S, but you can find new loot along the way.

You'll reach the Library. You need to explore this place - both floors. You can pick up regular loot, enter rooms on the first floor and approach "glowing" bookshelves. By examining the first bookshelf you'll unlock a hacking ability for A2.

From now on, new hacking mini-games will appear. They may involve finding black orbs, as usual, or destroying tall objects - an example is shown on the picture. You'll be rewarded with a new Archives entry for completing each mini-game in the Library.
The last bookshelf will appear on the ground floor. Approach it to trigger a cutscene.

Your control will once again shift to 9S and you'll learn about the need to autoheal to stop the virus - hold the Triangle button to start the mini-game. The mini-game requires you to destroy black objects located on the main path's both sides. Remember to shoot down orange projectiles in order to prevent yourself from getting hit.

After you manage to heal yourself collect the loot around you (there's a closed chest here too) and carry on. You'll see two holograms and after a moment machines will attack. During the encounters prioritise the enemies that can fire many bullets at once. Rely on regular attacks and hacking - this battle shouldn't give you too much trouble. For winning the fight you'll be rewarded with a YoRHa Disposal Archives entry, with interesting story-related contents.

As you keep going, you will encounter a group of YoRHa units using Flight Suits. In this battle hacking is heavily recommended to damage those very durable enemies. Additionally, by detonating hacked units you can also harm foes close to them.

Run sideways and dodge a lot, as enemies have access to powerful red energy beams.
After eliminating all foes approach one of the Flight Suits and board it.
Ko-Shi & Ro-Shi - preliminary info
From now on, your control will periodically switch between 9S and A2. Each of the protagonists has to fight a separate, spider-like boss:
- A2 fights Ko-Shi,
- 9S fights Ro-Shi.
The tactics for 9S and A2 can be found below. During the boss fights you'll most likely switch characters many times. Each time you need to continue the battle against the controlled protagonist's respective boss. The fights are a bit staged and cinematic, you should expect 9S and A2 to defeat their enemy at similar times. However, this is still not the end. You'll need to defeat the bosses again after they combine.
Ko-Shi boss fight (A2) and cyberspace

This boss fight starts inside of the Library. The best approach is to use melee combos. You can also trigger Berserk Mode to empty the boss' health bar quicker.
After Ko-Shi leaves, you'll have an opportunity to use the previously inaccessible lower Library exit.

You'll reach a room with several object inside - by examining the central object you'll be transported to the cyberspace. Travel down a linear path while destroying black objects along the way.
On the arena, holograms will appear. The fight will seem pointless at first, as every defeated enemy is replaced by a new one.

You need to wait for the pod to tell you not to attack the holograms. From this point forward focus on running around the arena and dodging the projectiles fired by the holograms.

Eventually, the holograms will start fighting each other. You can join in or wait for them to kill each other, then take care of the only hologram that survived this "battle royale".
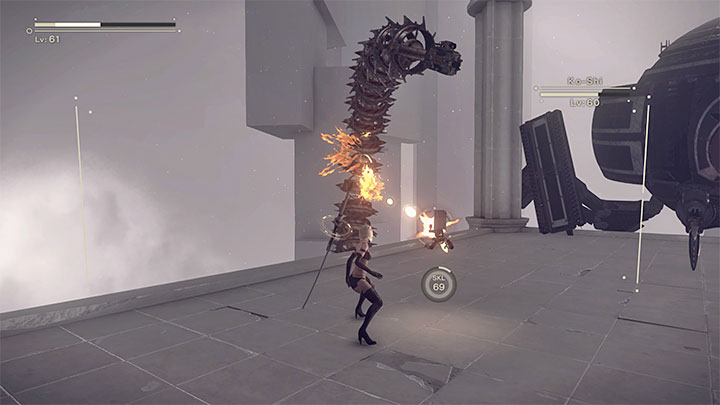
Soon after leaving cyberspace you'll resume your battle against Ko-Shi. To damage the boss you can use melee attacks, ranged attacks and Berserk Mode.
Ko-Shi will be attacking you with its appendages from time to time - pay attention to the yellow cores on them. If you can, lock the camera onto them and attack them at range with the pod.

All the while you must avoid other attacks from the boss. Those include:
- trying to crush A2 with its upper limbs,
- sending out shockwaves.
Most of the mechanical spider's attacks can be dodged with a double jump (and sometimes a mid-air dash).

Occasionally Ko-Shi will withdraw from battle, leaving you to fight a group of regular enemies. They shouldn't put up too much of a fight. The enemies can be eliminated quickly via Berserk Mode, but using it shouldn't be necessary to beat them. Remember to use melee attacks or strong ranged attacks to destroy shields some enemies can hide behind.
Ro-Shi boss fight (9S)

You'll be using the Flight Suit throughout the entirety of this fight. Keep in mind that aside from your normal shots you can also fire missile swarms with the L1 button. Use this attack over and over, right after its cooldown period ends.

Ro-Shi fires missiles in large bursts, so simply moving sideways might not be enough. Shoot down missiles as they flight towards you or move to the edges of the screen, to the boss' side, to get off their path.

In the second phase of the battle you'll reach a circular arena where your camera shifts into the TPP perspective. This should make the fight easier, as you'll have more freedom of movement. Fly circles around the boss and keep firing, attacking it in melee whenever you see an opportunity.
Combined Ko-Shi & Ro-Shi boss fight

After defeating Ko-Shi as A2 and Ro-Shi as 9S, the bosses will combine, beginning the final battle.

In this fight the game automatically and repeatedly shifts your control between A2 and 9S. You can't influence this, so just use the unique abilities of the protagonist who's playable at the moment. The bosses can be hacked as 9S and damaged at a faster pace thanks to Berserk Mode as A2.
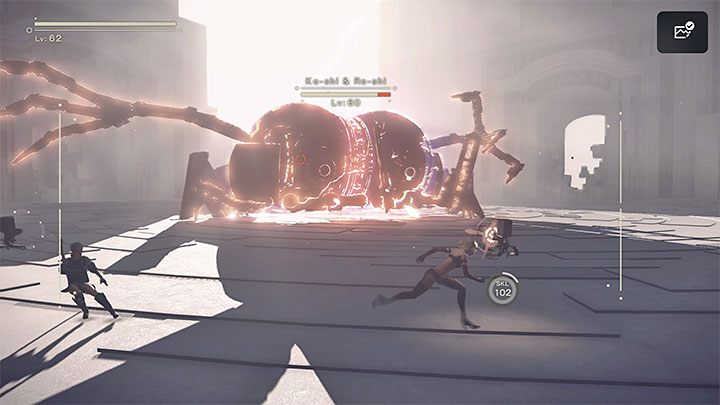
Their combined form isn't too challenging, but you should watch out when they become electrified, as it makes them temporarily stronger. They can also perform a spin attack while electrified. Your best bet in this situation is to keep your distance and use ranged attacks. If you can't get away in time focus on dodging to prevent damage.


The bosses also have some attacks they use less commonly, those being:
- quickly extending their appendages - dodge by making a side jump,
- generating shockwaves (example shown on picture 1) - you can dodge them by double jumping,
- shooting red energy beams (example shown on picture 2) - once again, the double jump is your best bet.

After dealing with Ko-Shi and Ro-Shi you'll need to make an important choice which will determine the game's ending. All available choices and their consequences are thoroughly described on the walkthrough's next page - Route C and Route D endings.