Forge of Heroes | Act II - Seahaven MMX: Legacy Guide
Last update: 11 May 2016
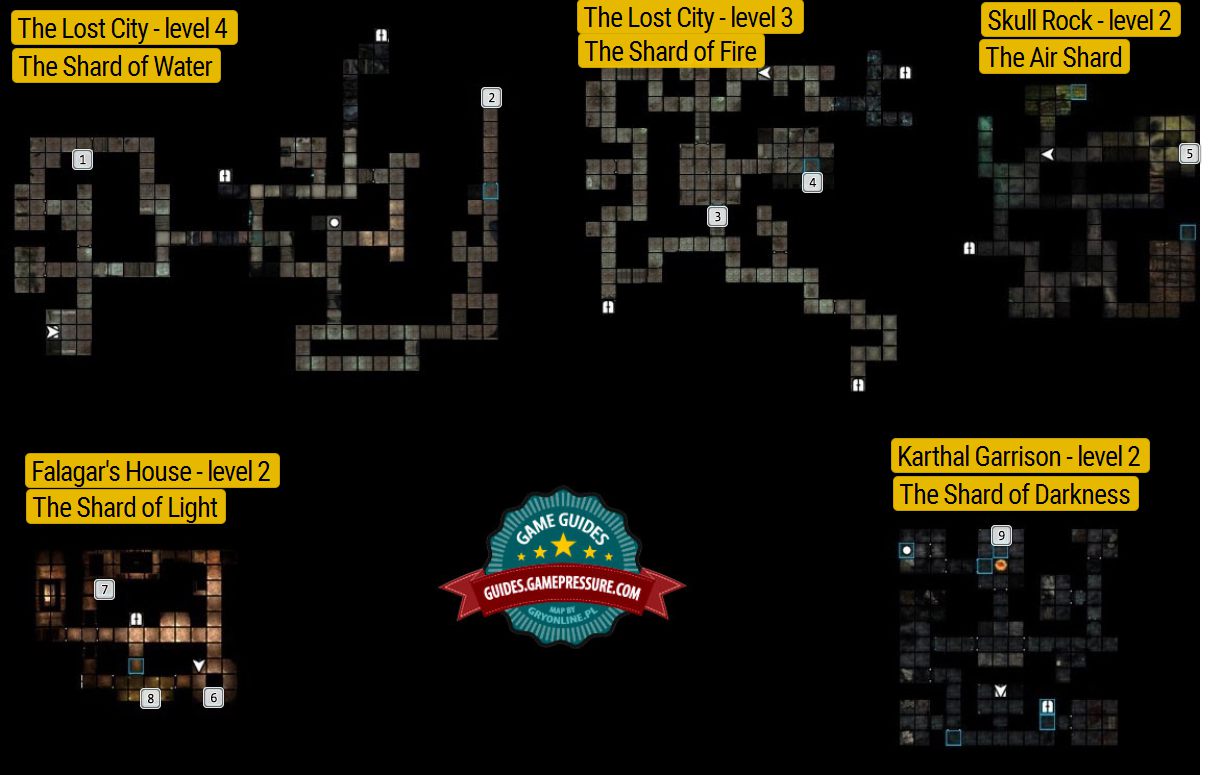
The key to the room with the Water Shard
The Shard of Water
The entrance to the room with the Fire Shard (requires the completion of "The Curse")
The Fire Shard
Air Shard - you need to kill the boss first
The cog for the lever to the room with the shard
The lever to the room with the shard
The Shard of Light
The Shard of Darkness - description in the chapter concerned with the "Liberation" quest.
You can receive this quest from Gralkor, the Lord of Earth after you complete the "Elemental Forge" quest. He will tell you to gather all the shards of each one of the elements and bring them to him. Only after that, will you become a hero.
The Shards to find are:
- Water
The water shard can be found in the Lost City, close to the Seahaven. The item itself is lying at the 4 level of the dungeon, in a sarcophagus. You need to find a golden key to open this one, which is in one of the chests.

Once you have it, you can go to the elemental forge and open the barrier. Inside, there is a small puzzle for you to solve. You need to align two tunnels so as both of them lead to the fountain, use the switch on the right to change the color of the base, and the ne on the left to make the stream of water as strong as possible. Approach the reservoir than and use it.
Behind you, there will appear the Lord of Water. It is best to cast some buffing spells, before you interact. What makes the battle difficult is that the opponent keeps using AoE spells and deals quite a lot of damage. Air based spells do not work here that well. After you defeat here, she will bestow a blessing on you, thanks to which you can walk on water.
- Air
The Shard of Air can be found at the second level of the Skull Rock. The way to get there has been described in the "Bounty Hunter's Sword" quest. To obtain it, you will have to defeat the boss, who is a siren. It is a very dangerous enemy, because she paralyses your party members. The best way to follow is to have on you a spell on you that makes you immune to this effect, or a spell that lifts paralysis.

The best thing to do is block the passage in a way that allows you to kill the two smaller sirens in the first place, and take to the queen afterwards. This is another one of the bosses that are best if not approached without the Burning Determination spell, or something that saves your companions from paralysis. She casts paralysis quite often but, if you have this spell on you, you win several turns for an additional attack. A good thing to do is weaken her armor with Acid Splash, and Shatter, after which you attack at short range. If your fighters are good, you can severe he quite a lot.
If you succeed, you will receive Yumiko's Bow from her, which can be returned to the owner. She is on the surface nearby. Behind the corpse, you will also find the Shard of Earth for the "Forge of Heroes" quest.
Once you have this item, you can return to the forge and find the air barrier. In front of it, there are two elite air elementals. The entrance is at level 3. To be able to enter in the first place, you need the gold key that is inside one of the chests. Then, you need to use the key to open the door in the center of the location, and step on two plates inside.
That is when you will be able to open the door to the barrier.

While behind the barrier, you need to pave your way with the floating slabs. The correct combination is:
The left one - once
The middle one - 3 times
The right one - twice
Back - 4 times
Once you have used the shard, there will appear another boss - the Air Lord. He behaves in the exactly same way as the elite air elementals, only his attacks are stronger. With a regeneration spell, you should have no problems at all, at level 20. It is a good idea to weaken his armor or poison him. Also, fire spells are effective here.
After you defeat him, you will be able to use the portals scattered all around the map.
- Light
The Shard of Light can be received during the "Motrgan's Informer" quest, because the item itself can be found at level 2 in Faralgan's house, in Karthal.
While at level 2, find a golden sprocket next to one of the statues and use it on the lever that opens the door to the storage. The Shard is up on one of the shelves.
Once you collect it, of course, a multitude of enemies will appear. Still, this is not going to be anything which you have not seen already. After you kill them, return to the forge, and the entrance is opposite the Air Chamber.
Inside, there is another puzzle that you need to solve. A pit with several plates that are already activated. Your task is to deactivate them all.
The pit needs to reset, so that the blue plates are at an angle from right (the bottom) to the left (top). You can reset it with the switch at the entrance.

While at the stairs, facing the pit, you need to step in the following order:
Ahead, ahead, back, back, back (onto the stairs), ahead, right, right, ahead, ahead, left, right, back, back, ahead, ahead.
After this combination, everything should be working perfectly and the blocks ahead should form stairs up to the altar. Lay the shard there and wait for the boss to appear. What is interesting, it is a dark-skinned Lady of Light. Of course, she fights like a light elemental, only stronger. The best method is to attack here with Dark Magic, if you do not have such attacks available for you, anything apart from light magic, will do.
- Darkness
The Shard of Darkness can be obtained during the "Morgan's Informer" quest of Act 3. You need to gain access to Falargan's house through the sewers and open the entrance to the second floor, with the key that you have found in the chest (manipulate the two levers).
On the higher floor, there is a multitude of monsters that you have already had the opportunity to fight, but need to get to the room with the statues. Collect the sprocket from one of them and return to the room where there is fire burning in the fireplace. There, on one of the walls, there is an inactive lever that you can fix with the sprocket.
This will open the door to the storage, where there is the shard on one of the shelves. You need to be careful because, as soon as you collect the item, you will be attacked by a hoard of mages and guards.
With the shard in your hand, return to the forge.

Inside, you are going to have some fun with portals. First, enter the first one and then, the one to the West. Then the one to the South of the map, to the first from the top, the one to the East, the one to the East, and again East.
This way, you will end up in front of the altar of Darkness. Put the shard there and start the battle. This is not any surprise, but the boss is a buffed Darkness Elemental. There is no point in attacking it with the Dark Magic however, you can harm him with Light Magic. If you do not have such spells, attack with the best ones that you have.
- Fire
The Fire Shard can be found at the third level of the Lost City but, only after you receive "The Curse" quest and you will have to kill the Crystal Spider.
"The Curse" quest quoted:
"After you enter the Chamber at the City's level 3, which can be opened from the bottom of the map, you will have to fight several undead and banshees, at level 20+, you should have no problems dealing with them. In the next room, there is the Crystal Spider waiting for you. This monstrosity fights at a distance and deals damage for 150-200, which is, additionally, and AoE attack. Therefore, you should not save up on your healing and regeneration potions, to be able to push forward. The most important thing here is to shorten the distance. It does not use its AoE attacks then and attacks individual heroes only, although just as strong.
At some point, it will start to teleport and start being active, out of a sudden. The Spider is very tough, but has few health points. Additionally, it will shut you up in cages two times, which you need to smash to be able to continue fighting.
The first moment is the worst, where you need to strive for short range combat",
After you kill the spider, the Shard can be collected in this chamber, on the right side of the entrance.

Take it to the forge to activate another puzzle. After you have defeated the fire elementals, walk back towards the exit, while still facing the chamber, and switch the lever.
Second right
First left
Second left
Then, walk by the wall on the right, and up, and pull the last lever. Then, you will have formed the way to the altar. After you have interacted with it, there will appear a boss that is a big fire elemental. You need to watch out, because its attacks claim as much as 300+ and he often blocks your attacks. The best method is to use water Magic and attacks that he cannot block.
Additionally, you will find the Regeneration spell useful, as well as several rejuvenating spells, just in case. After the battle, you will receive a blessing and the quest ends.

