Chapter XII - p. 1 Max Payne 3 Guide
Last update: 11 May 2016
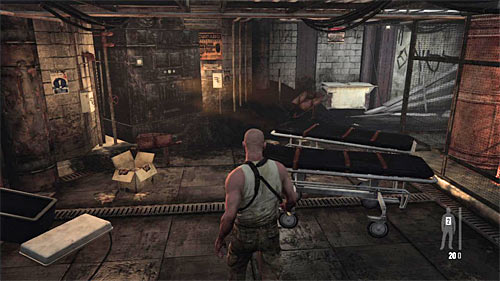
Move forward. Initially you won't run into any enemies. After the cut scene with enemies throwing the bags to the stove examine the gurneys shown on the screen, what gives you the first clue. [Clue 1/6 - Gurney].

Use the doors, and after getting into the small room open the first metal chest on the left. Pick up painkillers. The chest is another clue [Clue 2/6 - Ammo Crate]. You can move on. Max will automatically use the elevator to reach the new floor of the hotel.

Place yourself by the entrance to the room where you see the first enemies. You can attack them at once or wait until one of them get closer to you.

Of course, you have to take into consideration that the fight noises will encourage other enemies to run here. You can pick up a rifle from the dead enemy of interest in the grenade launcher lying on the table on the right (screen above). During the battle use covers and do not risk too much.

Move slowly forward, reaching the hole in the wall (screen). You have to be careful, because besides enemies noticeable far some additional may use the left passage. I don't recommend to choose this path for yourself because there are no covers.

Continue firing until you secure this part of the floor. Last enemies will appear probably by the narrow passage (screen).
Remark! You should know by now that you shouldn't leave the area of fights too early. So search carefully the floor.

Pick up ammo and return by the beginning location. You have to find the broken toilet in which fragment of a gun is hidden [Golden Gun - RPG 1/3].

Go to the passage mentioned before, at which last enemies appeared, and after reaching the closed gate push the button on the right. Prepare good gun and open the gate, reaching the new region.

Stay behind the default cover and eliminate thugs running at you. Then fire at their fellows staying far with the rifle or grenade launcher.

Stand CAREFULLY by the left corridor and attack the enemy standing far. As this opponent use the LMG rifle you have to be very cautious and use the bullet time to lean out and fire.
![Choose the corridor which was guarded by the thug you killed a while ago and search it what gives you piece of a gun [Golden Gun - FMP G3S Rifle 1/3] - Chapter XII - p. 1 - Walkthrough - Max Payne 3 Game Guide & Walkthrough](/maxpayne3/gfx/word/1131272562.jpg)
Choose the corridor which was guarded by the thug you killed a while ago and search it what gives you piece of a gun [Golden Gun - FMP G3S Rifle 1/3].

Return to the start location and choose the passage leading to the right area. Start attacking enemies standing on the other side of the big hole. Also now be cautious, because one of the opponents has LMG rifle.

Make sure you've eliminated all enemies and jump down to the hole. Prepare to quick do in 2-3 enemies who'll suddenly show up in front of you.

After killing them, approach the shelf in front of you and push A button to climb on it. Take from the dead enemy a LMG rifle and then go to the small room on the right (screen).