Battle of Pelennor Fields | Walkthrough - Act III LEGO LotR Guide
Last update: 11 May 2016
Characters: King Théoden (Armor), Éowyn (Dernhelm), Merry (Rohirrin Squire), Aragorn, Legolas, Gimli
Real Adventurer requirements: 95 000 studs
New characters: King Théoden (Armor), Éowyn (Dernhelm), Merry (Rohirrin Squire)
New characters to buy: Witch-king, Denethor, Gothmog, Citadel Guard, Corsair, Haradrim
Your part in the battle will begin with the arrival of Rohirrin reinforcements. You will control Eowyn riding a horse and will have to destroy as much environment elements and kill as many enemies as possible. You can throw your spear by pressing (H), which makes breaking items in front of you much easier. The charge will begin with the arrival of the Witch-King of Angmar.

Avoid the beast's attacks and wait until it hits the ground with its head and therefore become stunned. Approach it then and attack its neck three times. You have to repeat the whole process until the Witch-King falls down and stand against you.

Fighting him might resemble the fight with the Troll in the depth of Moria. You have to stand on a tile and dodge when you hear the enemy's shout. His mace will get stuck in the ground and you will have a chance to damage him. The second tile can be built from the bricks on the right side, while the third can be found after destroying the bushes on the left side of the arena. After disarming the boss, keep slashing him with your sword to launch the last sequence. When the Witch-King grabs you, switch to Merry and hit him in the back (just stand in the designated spot). Afterwards once again switch to Eowyn and make the final blow.

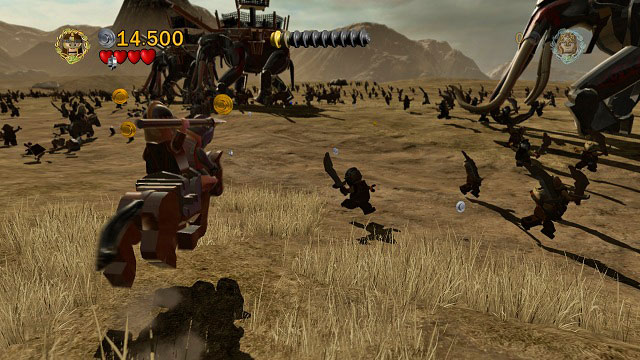
Reinforcements consisting of Aragorn, Legolas and Gimli (and of course the whole undead army which will be fighting in the background with Sauron's forces) will arrive. Your task will be to take care of the Mumakils roaming the battlefield. It can be done in two ways: the ones which have Morgul LEGO bricks on their legs should be attacked with Aragorn - after destroying the bracelets you just have to press (H) and he will finish off automatically.

The second Mumakil type is far more difficult to take care of. You need to switch to Legolas and start off by hitting the two moving targets on the animal's legs. Afterwards you have to grab onto the lower bar and jump onto the higher one. There, turn into the other direction and jump towards the rope hanging from the construction of the animal's back. After getting above, get rid of the whole crew and jump to the very top. Press (H) to defeat the rider and afterwards stand in the designated place and press (K) to make the Mumakil run from the battlefield. After getting rid of these two, you will have to take care of three more. Chasing them away will end the battle.