Guides & Walkthroughs New Guides Popular RPG Action Strategy Adventure YouTube Guides Mobile App
Free iOS App iPhone & Ipad
Download Game Guide PDF, ePUB & iBooks

LEGO Star Wars III: The Clone Wars Game Guide by gamepressure.com

LEGO Star Wars III: The Clone Wars Game Guide

Table of Contents

General Grievous - p. 10 | Free play LSW III Guide

Last update: 11 May 2016

Chapter 6 - Grievous Intrigue

True Jedi: 60,000

Minikits

#1_1 - General Grievous - p. 10 - Free play - LEGO Star Wars III: The Clone Wars - Game Guide and Walkthrough
#1_1
#1_2 - General Grievous - p. 10 - Free play - LEGO Star Wars III: The Clone Wars - Game Guide and Walkthrough
#1_2

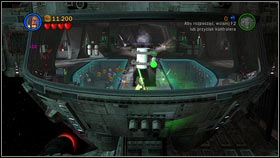
As the level begins, turn around 180 degrees and you will see a big window with a few boxes lying below it #1_1. Use the Force and keep throwing them at the window until there are 5 cracks. That way you will get the first minikit #1_2.

#2_1 - General Grievous - p. 10 - Free play - LEGO Star Wars III: The Clone Wars - Game Guide and Walkthrough
#2_1
#2_2 - General Grievous - p. 10 - Free play - LEGO Star Wars III: The Clone Wars - Game Guide and Walkthrough
#2_2

Keep going straight and you should reach a blue table #2_1. On its right side there's a gold box. Destroy it with a machinegun and build a lever from the fragments #2_2. Pull it and the second minikit will appear.

#3_1 - General Grievous - p. 10 - Free play - LEGO Star Wars III: The Clone Wars - Game Guide and Walkthrough
#3_1
#3_2 - General Grievous - p. 10 - Free play - LEGO Star Wars III: The Clone Wars - Game Guide and Walkthrough
#3_2

The next one is on Grievous' ship. On the right side, before the first ramp there's a big silver object #3_1. Destroy it with a rocket launcher, kill the plant that will appear and pick up the treasure #3_2.

#4_1 - General Grievous - p. 10 - Free play - LEGO Star Wars III: The Clone Wars - Game Guide and Walkthrough
#4_1
#4_2 - General Grievous - p. 10 - Free play - LEGO Star Wars III: The Clone Wars - Game Guide and Walkthrough
#4_2

In the second round room #4_1 your task will be to destroy three gold objects placed on walls. Two first can be found on both sides of the big blue barrier blocking the corridor #4_2.

#4_3 - General Grievous - p. 10 - Free play - LEGO Star Wars III: The Clone Wars - Game Guide and Walkthrough
#4_3
#4_4 - General Grievous - p. 10 - Free play - LEGO Star Wars III: The Clone Wars - Game Guide and Walkthrough
#4_4

The third can be found to the left of the red barrier #4_3. All the objects can be destroyed with a machinegun or with fast shooting droids by manipulating them with the Force #4_4. Once you finish, the fourth minikit will appear.

#5_1 - General Grievous - p. 10 - Free play - LEGO Star Wars III: The Clone Wars - Game Guide and Walkthrough
#5_1
#5_2 - General Grievous - p. 10 - Free play - LEGO Star Wars III: The Clone Wars - Game Guide and Walkthrough
#5_2

You will get the third one by fixing five leaking pipes. On the ramp leading to the first round room, keep an eye on the right side of the corridor. You should see steam coming out from behind the boxes #5_1. Destroy the boxes and use the Force to plate the red valve in the purple pipe part #5_2. You have to deal with the other leaks in an identical way.

#5_3 - General Grievous - p. 10 - Free play - LEGO Star Wars III: The Clone Wars - Game Guide and Walkthrough
#5_3
#5_4 - General Grievous - p. 10 - Free play - LEGO Star Wars III: The Clone Wars - Game Guide and Walkthrough
#5_4

The second is inside the room with barriers #5_3. Head to its right edge and destroy the silver box with a rocket launcher #5_4. In its place you will find the valve, so use it to fix the nearby pipe.

#5_5 - General Grievous - p. 10 - Free play - LEGO Star Wars III: The Clone Wars - Game Guide and Walkthrough
#5_5
#5_6 - General Grievous - p. 10 - Free play - LEGO Star Wars III: The Clone Wars - Game Guide and Walkthrough
#5_6

The third hole is on the second pipe #5_5. The valve is on the right side and the stem on the left #5_6.

#5_7 - General Grievous - p. 10 - Free play - LEGO Star Wars III: The Clone Wars - Game Guide and Walkthrough
#5_7
#5_8 - General Grievous - p. 10 - Free play - LEGO Star Wars III: The Clone Wars - Game Guide and Walkthrough
#5_8

A bit further (right before the room entrance) there is another silver box #5_7. Destroy it and fix another pipe #5_8.

#5_9 - General Grievous - p. 10 - Free play - LEGO Star Wars III: The Clone Wars - Game Guide and Walkthrough
#5_9
#5_10 - General Grievous - p. 10 - Free play - LEGO Star Wars III: The Clone Wars - Game Guide and Walkthrough
#5_10

The last one can be found on the ramp behind the blue barrier. The valve is hanging from the ceiling #5_9 and the hole is on the right wall of the corridor #5_10. Fix it and the minikit will appear.

#6_1 - General Grievous - p. 10 - Free play - LEGO Star Wars III: The Clone Wars - Game Guide and Walkthrough
#6_1
#6_2 - General Grievous - p. 10 - Free play - LEGO Star Wars III: The Clone Wars - Game Guide and Walkthrough
#6_2

The next one can be obtained in the room in which Eeth Koth is being held #6_1. You will have to block 4 shafts in the floor. Start off by going to the left edge of the location, where you will find a plugged cable #6_2. Pull it out with the Force and the shaft will be blocked.

#6_3 - General Grievous - p. 10 - Free play - LEGO Star Wars III: The Clone Wars - Game Guide and Walkthrough
#6_3
#6_4 - General Grievous - p. 10 - Free play - LEGO Star Wars III: The Clone Wars - Game Guide and Walkthrough
#6_4

Now stand beside the prisoner and look to the left #6_3. A big gold chair can be seen there. Destroy it with the machinegun. Its fragments will land on the floor a step lower. Build the second shaft blockade with it #6_4.

#6_5 - General Grievous - p. 10 - Free play - LEGO Star Wars III: The Clone Wars - Game Guide and Walkthrough
#6_5
#6_6 - General Grievous - p. 10 - Free play - LEGO Star Wars III: The Clone Wars - Game Guide and Walkthrough
#6_6

As you finish, stand beside Eeth Koth again and shoot the inactive panel above on the right with the rocket launcher #6_5. Its pieces will block the third hatch. The fourth one can be found on the right side of the room #6_6.

#6_7 - General Grievous - p. 10 - Free play - LEGO Star Wars III: The Clone Wars - Game Guide and Walkthrough
#6_7
#7 - General Grievous - p. 10 - Free play - LEGO Star Wars III: The Clone Wars - Game Guide and Walkthrough
#7

Use the Force to throw the nearby box into it #6_7 and you will receive the minikit. The next one is a few steps further, hidden behind the gold door on the right edge of the room #7. Destroy them with a machinegun and pick up the treasure.

#8_1 - General Grievous - p. 10 - Free play - LEGO Star Wars III: The Clone Wars - Game Guide and Walkthrough
#8_1
#8_2 - General Grievous - p. 10 - Free play - LEGO Star Wars III: The Clone Wars - Game Guide and Walkthrough
#8_2

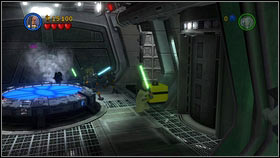
The next one can be obtained during the spaceship section #8_1. Your task is to shoot 5 ships marked with green arrows #8_2.

#9_1 - General Grievous - p. 10 - Free play - LEGO Star Wars III: The Clone Wars - Game Guide and Walkthrough
#9_1
#9_2 - General Grievous - p. 10 - Free play - LEGO Star Wars III: The Clone Wars - Game Guide and Walkthrough
#9_2

Once you're in the hangar, head to the left of the red landing pad. You will see 3 purple boxes #9_1. Arrange them on the purple panel so that they create stairs. Climb to the top and collect the minikit #9_2. Use Jar Jar Binks to jump high enough.

#10_1 - General Grievous - p. 10 - Free play - LEGO Star Wars III: The Clone Wars - Game Guide and Walkthrough
#10_1
#10_2 - General Grievous - p. 10 - Free play - LEGO Star Wars III: The Clone Wars - Game Guide and Walkthrough
#10_2

In the lower-right corner of the hangar you will see a silver cage #10_1. Blow it up with a rocket launcher and use the unlocked panel (Robonino) #10_2.

#10_3 - General Grievous - p. 10 - Free play - LEGO Star Wars III: The Clone Wars - Game Guide and Walkthrough
#10_3
#10_4 - General Grievous - p. 10 - Free play - LEGO Star Wars III: The Clone Wars - Game Guide and Walkthrough
#10_4

A white probe will appear and fly into the air #10_3. Destroy it with your spaceship and collect the last minikit #10_4.

See/Add Comments

You are not permitted to copy any image, text or info from this page.

This site is not associated with and/or endorsed by the LucasArts or Traveller's Tales. All logos and images are copyrighted by their respective owners.

Copyright © 2000 - 2024 GRY-Online S.A. for gamepressure.com, unofficial game guides, walkthroughs, secrets, game tips, maps & strategies for top games.