Guides & Walkthroughs New Guides Popular RPG Action Strategy Adventure YouTube Guides Mobile App
Free iOS App iPhone & Ipad
Download Game Guide PDF, ePUB & iBooks

LEGO Star Wars III: The Clone Wars Game Guide by gamepressure.com

LEGO Star Wars III: The Clone Wars Game Guide

Table of Contents

General Grievous - p. 6 | Free play LSW III Guide

Last update: 11 May 2016

Chapter 4 - Lair of Grievous

True Jedi: 125,000

Minikits

#1_1 - General Grievous - p. 6 - Free play - LEGO Star Wars III: The Clone Wars - Game Guide and Walkthrough
#1_1
#1_2 - General Grievous - p. 6 - Free play - LEGO Star Wars III: The Clone Wars - Game Guide and Walkthrough
#1_2

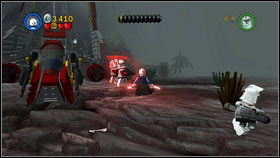
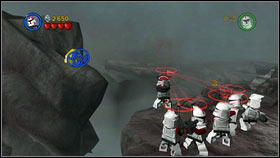
Once the level begins, head to the clone squad on the left #1_1. Take one with a radio with you and go maximally to the south. On the left you should see a gold rock #1_2. Order your companions to destroy it and the first minikit will appear in its place. Jump over the pit and collect it.

#2_1 - General Grievous - p. 6 - Free play - LEGO Star Wars III: The Clone Wars - Game Guide and Walkthrough
#2_1
#2_2 - General Grievous - p. 6 - Free play - LEGO Star Wars III: The Clone Wars - Game Guide and Walkthrough
#2_2

After your shuttle gets destroyed by a rocket #2_1, use Sith Force on the fragments and build a panel using them #2_2.

#2_3 - General Grievous - p. 6 - Free play - LEGO Star Wars III: The Clone Wars - Game Guide and Walkthrough
#2_3
#2_4 - General Grievous - p. 6 - Free play - LEGO Star Wars III: The Clone Wars - Game Guide and Walkthrough
#2_4

Use it with a character like Robonino and the nearby fly will be killed #2_3. In return you will receive another minikit #2_4.

#3_1 - General Grievous - p. 6 - Free play - LEGO Star Wars III: The Clone Wars - Game Guide and Walkthrough
#3_1
#3_2 - General Grievous - p. 6 - Free play - LEGO Star Wars III: The Clone Wars - Game Guide and Walkthrough
#3_2

Once you cross the second pit inside the building, you will reach a big room with lamps #3_1. Head to its west edge and fly to the nearby panel as R2-D2 #3_2.

#3_3 - General Grievous - p. 6 - Free play - LEGO Star Wars III: The Clone Wars - Game Guide and Walkthrough
#3_3
#3_4 - General Grievous - p. 6 - Free play - LEGO Star Wars III: The Clone Wars - Game Guide and Walkthrough
#3_4

You have to use it as a Bounty Hunter. A passage will appear, leading to a room with a pool table #3_3. Jump on it and use the Force to push the balls to the holes with matching colours. As the last fall in, a minikit will appear #3_4. Make sure to turn on the light with the lever nearby the door to make things easier.

#4_1 - General Grievous - p. 6 - Free play - LEGO Star Wars III: The Clone Wars - Game Guide and Walkthrough
#4_1
#4_2 - General Grievous - p. 6 - Free play - LEGO Star Wars III: The Clone Wars - Game Guide and Walkthrough
#4_2

A bit further from the lamp room there is a long corridor #4_1. At its beginning there are 3 panels. Use them. One requires a Bounty Hunter and two whichever Separatist droids. Once you're done, a few new bricks should be lying on the floor #4_2.

#4_3 - General Grievous - p. 6 - Free play - LEGO Star Wars III: The Clone Wars - Game Guide and Walkthrough
#4_3
#4_4 - General Grievous - p. 6 - Free play - LEGO Star Wars III: The Clone Wars - Game Guide and Walkthrough
#4_4

Build a blue vehicle from them and drive it onto the orange plate in the south #4_3. That way you will get another minikit #4_4.

#5_1 - General Grievous - p. 6 - Free play - LEGO Star Wars III: The Clone Wars - Game Guide and Walkthrough
#5_1
#5_2 - General Grievous - p. 6 - Free play - LEGO Star Wars III: The Clone Wars - Game Guide and Walkthrough
#5_2

Right before fighting the giant beast, you will land on a bridge above a river of lava. Use the Sith Force on the lava and a small platform will appear #5_1. Jump onto it and quickly pull out another one. Further to the west there will be yet another, thanks to which you will reach the fifth minikit #5_2. Just try to be fast, as the platforms fall down back into the lava after some time.

#6_1 - General Grievous - p. 6 - Free play - LEGO Star Wars III: The Clone Wars - Game Guide and Walkthrough
#6_1
#6_2 - General Grievous - p. 6 - Free play - LEGO Star Wars III: The Clone Wars - Game Guide and Walkthrough
#6_2

Inside the room where you fight Gor, go to the north-west. You will find a panel for character like Robonino there #6_1. Use it and the enemy will start dancing #6_2, while you will be able to collect the minikit floating above.

#7_1 - General Grievous - p. 6 - Free play - LEGO Star Wars III: The Clone Wars - Game Guide and Walkthrough
#7_1
#7_2 - General Grievous - p. 6 - Free play - LEGO Star Wars III: The Clone Wars - Game Guide and Walkthrough
#7_2

Don't disturb the enemy and head to the southern part of the location #7_1. You should see 3 gold objects there. Destroy them with a machinegun #7_2.

#7_3 - General Grievous - p. 6 - Free play - LEGO Star Wars III: The Clone Wars - Game Guide and Walkthrough
#7_3
#7_4 - General Grievous - p. 6 - Free play - LEGO Star Wars III: The Clone Wars - Game Guide and Walkthrough
#7_4

Further ones can be found in the next location - the landing pad. The fourth is to the right of the entrance #7_3 while the fifth and sixth are on the sides of the chessboard #7_4.

#7_5 - General Grievous - p. 6 - Free play - LEGO Star Wars III: The Clone Wars - Game Guide and Walkthrough
#7_5
#7_6 - General Grievous - p. 6 - Free play - LEGO Star Wars III: The Clone Wars - Game Guide and Walkthrough
#7_6

Four last ones can be found throughout the round platform. two on the right #7_5 and two on the left side #7_6. Destroy them all for another minikit to appear.

See/Add Comments

You are not permitted to copy any image, text or info from this page.

This site is not associated with and/or endorsed by the LucasArts or Traveller's Tales. All logos and images are copyrighted by their respective owners.

Copyright © 2000 - 2024 GRY-Online S.A. for gamepressure.com, unofficial game guides, walkthroughs, secrets, game tips, maps & strategies for top games.