Death Star Escape | Story Mode - Episode IV LEGO Star Wars 2 Guide
Last update: 11 May 2016
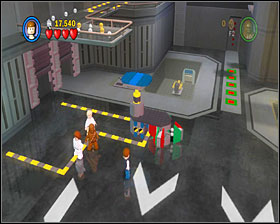
Use the loose bricks by the door to build a footbridge, jump on it and use the lever to open the exit. Go through the corridor and use the helmet dispenser. When you're in the big hangar, jump down and defeat all the stormies. Move the blue platform on the left so it touches the turnstile in the middle. Use it to extend the platform as high as possible. Use the grapple point to the right to get back to the upper level. Use the switch at the back of the platform in there so that the orange marker is to the far right. Now grapple up across the room to reach the lever to the left.
 | 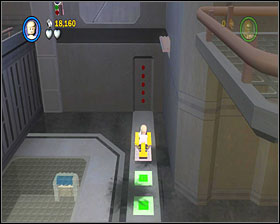 |
Use the lever to make a crate appear. Push it down and along the track. You'll be able to access a scooter - jump on it and use it to ride along the red markers in the middle of the room, turning them all green. You'll have to aim carefully to have it done. When you manage to do it, go back to the upper level. If you don't have a helmet, get back to the helmet dispenser and reach the door you opened by lighting the markers on the floor.
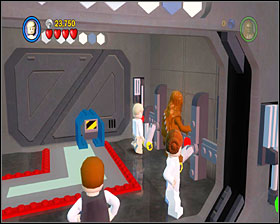 |  |
Go to the right and open the door, using the bricks to form a panel. Open the next gate and defeat the soldiers in there, then push the crate along the track to place it in the mechanism in the next room. Go further. You must use all three levers at once - AI will help you with that. Go through the moving platform and grapple up. Use the lever and build a panel out of the junk that fell out. It'll turn on the elevator. You'll have to get a helmet at the middle level. It's not easy as you're being constantly attacked by stormies. When you manage to get it, go to the top level and use the door.
 |  |
This part can be tricky - you must act fast. Build a grapple point on the floor and use the hook. Get a helmet and build another grapple point. Quickly get to the next platform and use the door here. If you're lucky and quick enough, you won't get hit and won't have to go back for the helmet.
 |  |
Destroy the panels near the doors to get through. Defeat a huge group of stormies and close the doors that they're using to get in here. You now have a brief moment before they start coming again, use it to build a gate out of blue and grey bricks on the floor. Destroy it when you're done and you'll reach the hangar.
 |  |
Use the lever to the right of the entrance to turn on the air vent. Go across the platform to the other side and build a handle on the right wall, then push it to free the droids. Let R2 use the panel at the bottom-left corner of the room and you'll get another scooter - once again use it to light all the markers on the floor. Switch to 3PO and use the air vent you turned on at the beginning to get to the upper platform, then use the panel.
 |  |
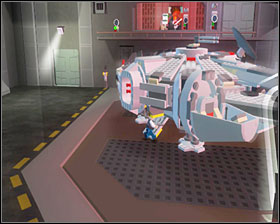
Now back to R2. Use him to operate the panel to the right of the fighting Jedi (left screenshot below). Move the blue crate to the right and use the bricks to construct a grapple point. Grapple up and turn the lever there. The Falcon is safe. Defeat the rest of the stormtroopers and board it.
 |  |