Guides & Walkthroughs New Guides Popular RPG Action Strategy Adventure YouTube Guides Mobile App
Free iOS App iPhone & Ipad
Download Game Guide PDF, ePUB & iBooks

LEGO Pirates of the Caribbean: The Video Game Game Guide & Walkthrough by gamepressure.com

LEGO Pirates of the Caribbean: The Video Game Game Guide & Walkthrough

Table of Contents

A Touch of Destiny - walkthrough | Dead Man's Chest LEGO Pirates: TVG Guide

Last update: 11 May 2016

Trip with a monkey

1 - A Touch of Destiny - walkthrough - Dead Man's Chest - LEGO Pirates of the Caribbean: The Video Game - Game Guide and Walkthrough
First use Jack's compass to find the eye and the pistol - A Touch of Destiny - walkthrough - Dead Man's Chest - LEGO Pirates of the Caribbean: The Video Game - Game Guide and Walkthrough

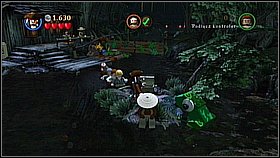
First use Jack's compass to find the eye and the pistol. The first object is on the island on the right (dig it up using the spade lying nearby). [1] The second one is in the chests on the left. [2]

2 - A Touch of Destiny - walkthrough - Dead Man's Chest - LEGO Pirates of the Caribbean: The Video Game - Game Guide and Walkthrough
Take the cage with the monkey and put it on the raft - A Touch of Destiny - walkthrough - Dead Man's Chest - LEGO Pirates of the Caribbean: The Video Game - Game Guide and Walkthrough

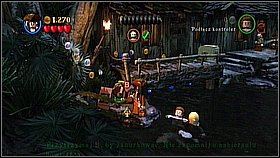
Take the cage with the monkey and put it on the raft. [1] Use the mechanism to sail the first part of the river. When the tentacles will wrap around jump on the platform with the boxes. Hit the one on the left and use the dynamite (the torch lies nearby). [2]

Move on.

3 - A Touch of Destiny - walkthrough - Dead Man's Chest - LEGO Pirates of the Caribbean: The Video Game - Game Guide and Walkthrough
When you get to the second obstacle shoot at the three targets on water - A Touch of Destiny - walkthrough - Dead Man's Chest - LEGO Pirates of the Caribbean: The Video Game - Game Guide and Walkthrough

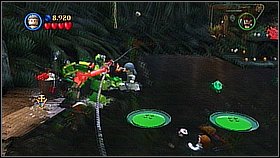
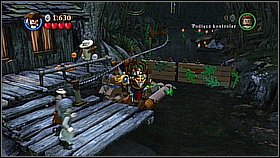
When you get to the second obstacle shoot at the three targets on water. [1] Grab the torch and jump to the left. [2] Remember that you can jump from the leaves (press A when you land on them). You can pick the torch from the shore (even when it is wet) so the last jump does not have to be perfect. Use the dynamite.

4 - A Touch of Destiny - walkthrough - Dead Man's Chest - LEGO Pirates of the Caribbean: The Video Game - Game Guide and Walkthrough
Repair the traction as Mr - A Touch of Destiny - walkthrough - Dead Man's Chest - LEGO Pirates of the Caribbean: The Video Game - Game Guide and Walkthrough

Repair the traction as Mr. Gibbs [1] and sail along. When you reach the other building you need to repair the helm. Get to it as Mr. Gibbs by going around the platform and jumping on the chests. [2]

5 - A Touch of Destiny - walkthrough - Dead Man's Chest - LEGO Pirates of the Caribbean: The Video Game - Game Guide and Walkthrough
Use the helm three times until the monkey will get on the platform - A Touch of Destiny - walkthrough - Dead Man's Chest - LEGO Pirates of the Caribbean: The Video Game - Game Guide and Walkthrough

Use the helm three times until the monkey will get on the platform. [1] Take the animal to the closest catapult. [2]

6 - A Touch of Destiny - walkthrough - Dead Man's Chest - LEGO Pirates of the Caribbean: The Video Game - Game Guide and Walkthrough
To fire the cage use Jack's sword to activate the mechanism near the machine - A Touch of Destiny - walkthrough - Dead Man's Chest - LEGO Pirates of the Caribbean: The Video Game - Game Guide and Walkthrough

To fire the cage use Jack's sword to activate the mechanism near the machine. Shoot at the target that will appear above. [1] To travel along grab the rope which is lower (with the green bricks). [2]

7 - A Touch of Destiny - walkthrough - Dead Man's Chest - LEGO Pirates of the Caribbean: The Video Game - Game Guide and Walkthrough
Get across the bridges to the right and move the cage on the further platform - A Touch of Destiny - walkthrough - Dead Man's Chest - LEGO Pirates of the Caribbean: The Video Game - Game Guide and Walkthrough

Get across the bridges to the right and move the cage on the further platform. The monkey will be kidnapped by an alligator. [1] Jump left on the chests. [2]

8 - A Touch of Destiny - walkthrough - Dead Man's Chest - LEGO Pirates of the Caribbean: The Video Game - Game Guide and Walkthrough
On the left side of the river use Jack's hook to climb up - A Touch of Destiny - walkthrough - Dead Man's Chest - LEGO Pirates of the Caribbean: The Video Game - Game Guide and Walkthrough

On the left side of the river use Jack's hook to climb up. [1] Draw aside two chests. [2]

9 - A Touch of Destiny - walkthrough - Dead Man's Chest - LEGO Pirates of the Caribbean: The Video Game - Game Guide and Walkthrough
Run to the right across the narrow bridges - A Touch of Destiny - walkthrough - Dead Man's Chest - LEGO Pirates of the Caribbean: The Video Game - Game Guide and Walkthrough

Run to the right across the narrow bridges. [1] Shoot at the target to lower the bridge. [2]

Alligator

10 - A Touch of Destiny - walkthrough - Dead Man's Chest - LEGO Pirates of the Caribbean: The Video Game - Game Guide and Walkthrough
You will face the alligator - A Touch of Destiny - walkthrough - Dead Man's Chest - LEGO Pirates of the Caribbean: The Video Game - Game Guide and Walkthrough

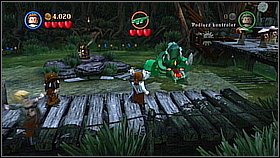
You will face the alligator. Dodge its attacks running to the left and right. Pay attention to what the natives throw at you - expect bombs. Pick them up and throw them at the alligator when it will show up with its jaws open. [1] Repeat the scheme three times. [2]

Further excursion

11 - A Touch of Destiny - walkthrough - Dead Man's Chest - LEGO Pirates of the Caribbean: The Video Game - Game Guide and Walkthrough
Use the pieces of the alligator to get on the island [1] Take the cage and walk the narrow plank - A Touch of Destiny - walkthrough - Dead Man's Chest - LEGO Pirates of the Caribbean: The Video Game - Game Guide and Walkthrough

Use the pieces of the alligator to get on the island [1] Take the cage and walk the narrow plank. [2] Put the cage on the green floor panel.

12 - A Touch of Destiny - walkthrough - Dead Man's Chest - LEGO Pirates of the Caribbean: The Video Game - Game Guide and Walkthrough
The bridges will take you to the right side of the map - A Touch of Destiny - walkthrough - Dead Man's Chest - LEGO Pirates of the Caribbean: The Video Game - Game Guide and Walkthrough

The bridges will take you to the right side of the map. You have here two mechanisms which can be activated by the sword. Activate them and pick the winch that will fall from the net. [1] Go back and use it on the mechanism to lift another bridge. [2]

13 - A Touch of Destiny - walkthrough - Dead Man's Chest - LEGO Pirates of the Caribbean: The Video Game - Game Guide and Walkthrough
Roll the cage across the bridge [1] and put it in the mechanism that opens the door - A Touch of Destiny - walkthrough - Dead Man's Chest - LEGO Pirates of the Caribbean: The Video Game - Game Guide and Walkthrough

Roll the cage across the bridge [1] and put it in the mechanism that opens the door. [2]

In the hut

14 - A Touch of Destiny - walkthrough - Dead Man's Chest - LEGO Pirates of the Caribbean: The Video Game - Game Guide and Walkthrough
In the hut grab the two ropes to open the door upstairs - A Touch of Destiny - walkthrough - Dead Man's Chest - LEGO Pirates of the Caribbean: The Video Game - Game Guide and Walkthrough

In the hut grab the two ropes to open the door upstairs. [1] Upstairs destroy the table's legs (on the right) to throw down the chest. [2]

15 - A Touch of Destiny - walkthrough - Dead Man's Chest - LEGO Pirates of the Caribbean: The Video Game - Game Guide and Walkthrough
Climb the wall and throw down all blue and white bricks - A Touch of Destiny - walkthrough - Dead Man's Chest - LEGO Pirates of the Caribbean: The Video Game - Game Guide and Walkthrough

Climb the wall and throw down all blue and white bricks. [1] Use them to build a path and move the chest. Activate the mechanism under the wall (using character with the sword). [2]

16 - A Touch of Destiny - walkthrough - Dead Man's Chest - LEGO Pirates of the Caribbean: The Video Game - Game Guide and Walkthrough
Go downstairs and assemble the pieces on the table - A Touch of Destiny - walkthrough - Dead Man's Chest - LEGO Pirates of the Caribbean: The Video Game - Game Guide and Walkthrough

Go downstairs and assemble the pieces on the table. Later assemble the chair. [1] Use the spyglass. You need to find the ship in the south-west part of the map and follow it. [2]

See/Add Comments

You are not permitted to copy any image, text or info from this page.

This site is not associated with and/or endorsed by the Disney Interactive Studios or Traveller's Tales. All logos and images are copyrighted by their respective owners.

Copyright © 2000 - 2024 GRY-Online S.A. for gamepressure.com, unofficial game guides, walkthroughs, secrets, game tips, maps & strategies for top games.