Guides & Walkthroughs New Guides Popular RPG Action Strategy Adventure YouTube Guides Mobile App
Free iOS App iPhone & Ipad
Download Game Guide PDF, ePUB & iBooks

LEGO Jurassic World Game Guide & Walkthrough by gamepressure.com

LEGO Jurassic World Game Guide & Walkthrough

Table of Contents

Breeding facility | Jurassic Park III - secrets LEGO Jurassic World Guide

Last update: 11 May 2016

Minikit #1

Minikit #1 - Breeding facility | Jurassic Park III - secrets - Jurassic Park III - secrets (missions) - LEGO Jurassic World Game Guide & Walkthrough
Minikit #1

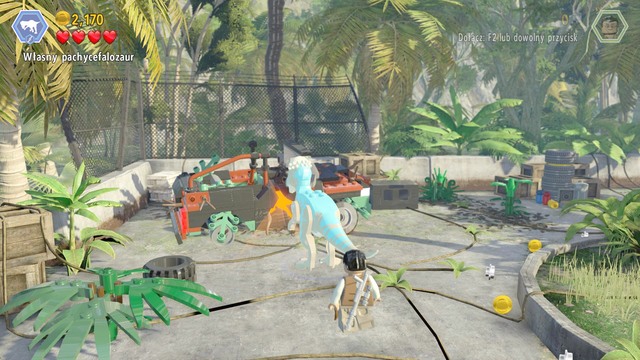
Switch your character to pachycephalosaurus and break the car wreck shown on the picture with your head. You will receive first minikit as a reward.

Minikit #2

Minikit #2 - Breeding facility | Jurassic Park III - secrets - Jurassic Park III - secrets (missions) - LEGO Jurassic World Game Guide & Walkthrough
Minikit #2

Take control of a character with a weapon (for example, Udesky) and shoot at four shields shown on the screen. You will receive second minikit for that.

Minikit #3

Minikit #3 - Breeding facility | Jurassic Park III - secrets - Jurassic Park III - secrets (missions) - LEGO Jurassic World Game Guide & Walkthrough
Minikit #3

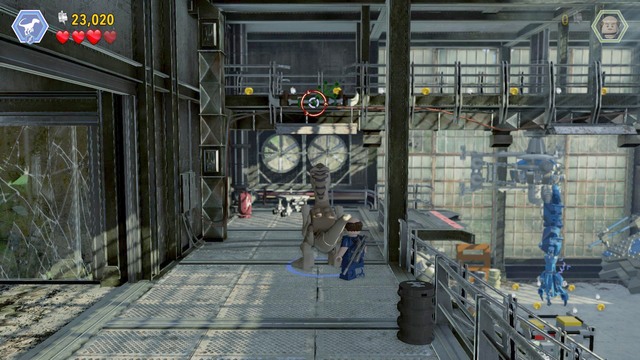
Walk to the place shown on the picture as a raptor and jump on the rod. After going up, go left. At the end of the platform you will find third minikit.

Minikit #4

Minikit #4 - Breeding facility | Jurassic Park III - secrets - Jurassic Park III - secrets (missions) - LEGO Jurassic World Game Guide & Walkthrough
Minikit #4

Shoot at the blue shield as Barry, then enter the darkened room as Malcolm. At its end you will find the fourth minikit.

Minikit #5

Minikit #5 - Breeding facility | Jurassic Park III - secrets - Jurassic Park III - secrets (missions) - LEGO Jurassic World Game Guide & Walkthrough
Minikit #5

After walking up, go to the panel and solve the riddle as Malcolm. Once you light up the images correctly, the door will open. Behind them you will find the minikit number five.

Minikit #6

Minikit #6 - Breeding facility | Jurassic Park III - secrets - Jurassic Park III - secrets (missions) - LEGO Jurassic World Game Guide & Walkthrough
Minikit #6

Walk to the panel shown on the picture as Hammond and hack it. Four buttons will appear from the ground. To receive the minikit, you must pump the water to the broken container. The correct button combination is as follows: 3-4-2-1 where 1 is the first button from the right.

Minikit #7

Minikit #7 - Breeding facility | Jurassic Park III - secrets - Jurassic Park III - secrets (missions) - LEGO Jurassic World Game Guide & Walkthrough
Minikit #7

Before you walk downstairs, enter the small room on the right and use the computer as Murphy. After walking through the labyrinth a safe will open. Inside you will find the minikit.

Minikit #8

Minikit #8 - Breeding facility | Jurassic Park III - secrets - Jurassic Park III - secrets (missions) - LEGO Jurassic World Game Guide & Walkthrough
Minikit #8

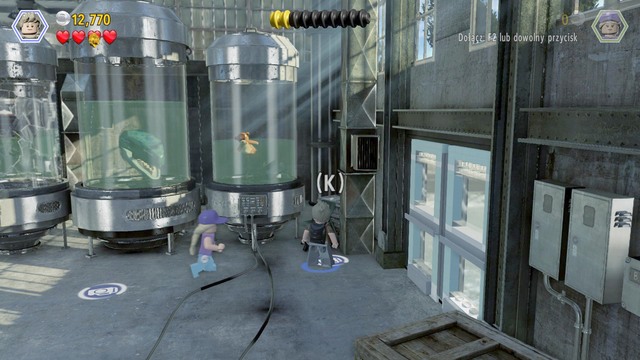
To receive the eighth minikit, you must make a photo of four items in the containers. You mustn't photograph the raptor's head shown on the left side of the picture.

Minikit #9 and #10

Minikit #9 - Breeding facility | Jurassic Park III - secrets - Jurassic Park III - secrets (missions) - LEGO Jurassic World Game Guide & Walkthrough
Minikit #9

Stick to the right side during the chase. At the beginning you will collect first minikit. Then you will make a sudden turn. After that, stick to the upper side and you will reach the last, tenth minikit.

Amber #18

Amber #18 - Breeding facility | Jurassic Park III - secrets - Jurassic Park III - secrets (missions) - LEGO Jurassic World Game Guide & Walkthrough
Amber #18

Immediately after entering the complex, jump as a female character on the desk on the right side and then on a yellow rod. After getting up, use the ladder to reach the roof. There you will find the amber that will unlock another dinosaur.

See/Add Comments

You are not permitted to copy any image, text or info from this page.

This site is not associated with and/or endorsed by the Warner Bros Interactive Entertainment or Traveller's Tales. All logos and images are copyrighted by their respective owners.

Copyright © 2000 - 2024 GRY-Online S.A. for gamepressure.com, unofficial game guides, walkthroughs, secrets, game tips, maps & strategies for top games.