
LEGO Skywalker Saga: Reap What You Solo - walkthrough LEGO Skywalker Saga guide, walkthorugh
This page of the guide for LEGO Star Wars The Skywalker Saga contains a walkthrough of the level Reap What You Solo from episode 7 - D'Qar system, rathtar.
Last update: 14 April 2022
On this page of the LEGO Skywalker Saga game guide, you can find the third part of the Episode 7 walkthrough (The Force Awakens). Our guide will walk you through the Reap What You Solo level and its quests. You will learn what to do as Rey and Finn's team as well as Han Solo, Chewbacca and BB-8's team, and more.
- Rendezvous with the Resistance
- Reap What You Solo - challenges
- Reap What You Solo - the first rathtar
- Reap What You Solo - force field generator
- Reap What You Solo - reaching Eravana's final chamber
- Reap What You Solo - using the 2 switches at the dock
Rendezvous with the Resistance

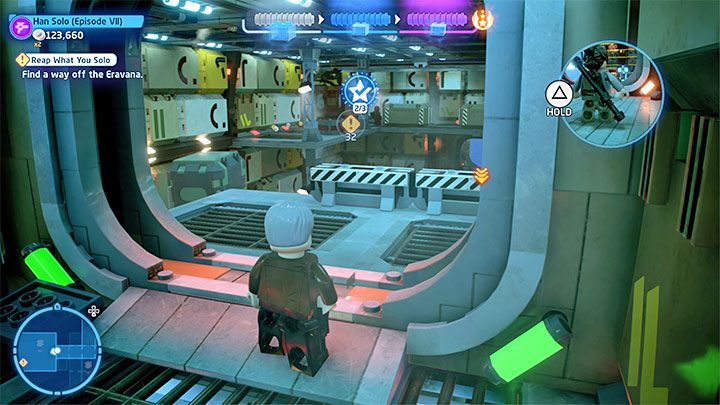
Your adventure will resume on board of the destroyed starship from the previous story quest. Your destination is the D'Qar system - select it from the galaxy map and confirm that you want to travel to D'Qar Space.
After reaching your destination, a cut-scene will immediately start, initiating the Reap What You Solo level.
Reap What You Solo - challenges

This level features 3 challenges:
- The High Ground - You have to find your way to the viewpoint. You'll have the chance to complete this challenge after disposing of the first rathtar while playing as Han's team. Soon after selecting the new corridor, he can break into the terminal from screenshot no. 1 with BB-8's help. This will lead you to the viewpoint from screenshot no. 2.
- Rathtar Ruse - You have to defeat the second rathtar blocking the way instead of skipping it. You can find a walkthrough of this challenge in our guide. After defeating the first rathtar, play as Rey's team.
- Turret Takeover - You have to take over the turret from below. You can find a walkthrough of this challenge in our guide. After defeating the first rathtar, play as Rey's team.
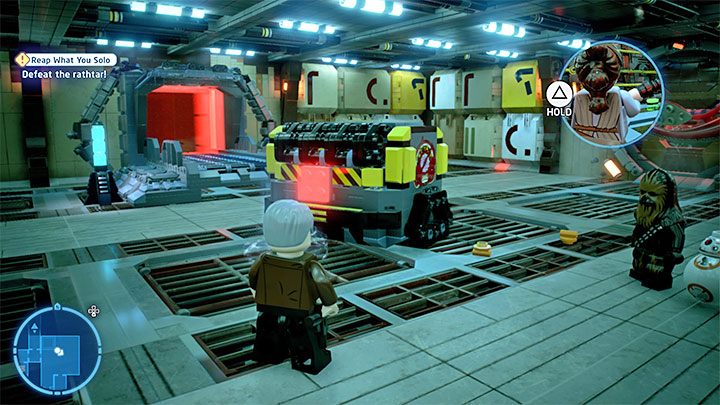
Reap What You Solo - the first rathtar

Once the quest starts, use Finn's skill to latch onto the hook. A cut-scene will start notifying you that a huge monster, i.e. the first rathtar, appeared.
From now on, you can switch between two teams of heroes - the first group consists of Rey and Finn and the second of Han Solo, Chewbacca and BB-8. You can switch between them by holding down the button visible on the screen (Triangle/Y on the pad). Both teams will have to work together to solve puzzles and get out of Eravana, although later in the level you'll be able to decide which group to play as first.
Our walkthrough prioritizes Rey and Finn, since choosing them allows you to complete one of the challenges easier. However, you can also try to play Han Solo's team first and only switch to the other heroes when you're prevented from progressing further.


Pick Rey and Finn. You have to push the generator from screenshot no. 1, then press the button.
Switch to Han and Chewbacca. Aim at the panel on the wall from screenshot no. 2 to automatically target and destroy the weak point.

Switch back to Rey and Finn. Reach the chest in the elevator (it descended from Han and Chewbacca's level) and start pushing it. You have to move it to the conveyor belt from screenshot no. 1.
Switch to Han and Chewbacca. The chest will be delivered to their level. Press the button from screenshot no. 2 to activate the cannon from the chest and get rid of the first rathtar.
Reap What You Solo - force field generator


From now on, you can switch between the heroes more freely and you can slightly affect the course of the quest. We suggest playing as Rey and Finn for a while at the start, as this will allow you to complete one of the challenges of this stage.
Press the button and use the newly unlocked corridor. On your way, you will encounter the second rathtar and you can deal with it in two ways:
- Run on the wall like in screenshot no. 1 - it will allow you to get past the monster without eliminating it.
- Craft a Breaker Blaster and use it to destroy the fragment of the ceiling from screenshot no. 2 - you will dispose the monster and complete the Rathtar Ruse challenge.


After making either choice, continue your journey and defeat the small creatures along the way. Inspect the hook on the wall of one of the containers. Tear it out and build a cannon. The first time you try to use it, you'll complete the Turret Takeover challenge.
Sit in the chair to take control of the turret in the upper warehouse. Use it to clear the area of enemies and items. It's crucial to destroy the force field generator from screenshot no. 2. In the room you've just unlocked, pick up the blue container and place it in the nearby slot.
Reap What You Solo - reaching Eravana's final chamber

Now switch to Han Solo's team. Right after selecting the next passage, you can optionally use BB-8 to hack into the blue terminal and reach the viewpoint required for The High Ground challenge, which we have described it in the previous section.
By following the main path, you will eventually reach the room with a turret. Delegate BB-8 to the blue terminal adjacent to the force field (pictured above).


Switch back to Rey's team. Hold the gadget crafting button and craft a Net Launcher. Use it in the spot from screenshot no. 1 - deploying the net will grant your heroes access to the upper ledge.
At the top, you'll find two levers from screenshot no. 2. Each of the heroes has to jump to a separate lever.

You will receive a new task to save Finn, who got captured by a rathtar. Go through the next corridors. Reach the device from the screenshot above - it's where you'll need to place the nearby container and press the red button. Finn will be saved.
Continue on and defeat the single monsters along the way. Finn and Rey will reach the final chamber.


Switch back to Han and Chewbacca's team. Go to the room with the rotating mechanism from screenshot no. 1. Using the rotating mechanism will open the nearby containers.
You need to release the levitating machine from the lower right container. Place it in the correct spot and press the button (screenshot no. 2).

Push the machine back towards the containers and use the rotating mechanism. In order to progress the main storyline, you need to open the upper right container. Climb the machine and use the passage from the screenshot above.
Follow the next corridors until you reach the button. Thus, Han Solo, Chewbacca and BB-8 will reach the final chamber.
Reap What You Solo - using the 2 switches at the dock


The quest's final room contains 2 switches and the two groups (Rey and Finn's as well as Han, Chewcbacca and BB's) need to reach a separate switch.
In the case of Finn and Rey's team, select Rey and craft a new Net Launcher. Use it in the spot from screenshot no. 1. Reach the top and, from the spot from screenshot no. 2, continue jumping until you reach the ledge with the switch.


In the case of Han Solo, Chewbacca and BB-8's team, move BB-8 to the blue terminal from screenshot no. 1 and complete the mini-game involving rotating the rings. This will allow one of your heroes to grab onto the handle from screenshot no. 2.

Wait for the container to change its position and grab the second handle of the neighboring container, which will stop nearby. It will "bring" your character to the second switch.
Once you have pressed both switches, you'll see a cut-scene depicting your escape and this extremely long level will finally be over.