Level 9: Goromorg Temple I Legend of Grimrock Guide
Last update: 11 May 2016

The Goromorg Temple consists of two levels. The first one contains quite interesting puzzles and introduces two new enemies. If you want, you will be able to level up the characters in your party.
 | At the very beginning of the temple, note the new environment element here - banners on the wall. Rip off all that you come across (by attacking them), as many of them hide some minor or even quite valuable collectibles. Behind the alcove covered by the banner marked on the map you will find Bread. |
 | Inside this room an Uggardian which will leave an Ornate Key (need further on) after dying awaits you. In order to get inside, rip off the banner by the door and press the button behind it. Inside you will find two scrolls - one of them contains hints on the puzzle by the end of this level. |
 | The first bigger puzzle in the Temple is the "Checkered Room". The name itself implies what you will have to do. 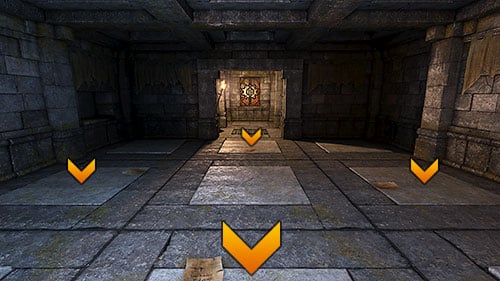 Out of nine pressure plates found here, hold down four with any items you like, as seen above (I used some old Toorum's Notes). |
 | Inside the Armory there's another Uggardian waiting for you, but also some nice items: Arrows, Lightning Bombs, a Long Sword, an Iron Basinet and a Ring Mail. |
 | Inside the Armory, there's also a secret to be discovered. Destroy the boxes in the northern alcove and another one will open in the south. One more Uggardian will come out of it and after you defeat it you will be able to collect the almost-best axe in the game, coming under the name of Norja. |
 | A quite tricky puzzle awaits you here, though with this guide it will be no challenge. Move along the corridor slowly, one square at a time. When you note that the walls have strangely changed (chains and metal rings which appear on them are a good determinant), turn around 180 degrees and carefully head forward. The whole trick here is that the corridor turns around unexpectedly at some points, so you would just walk along three squares all the time. |
 | The hard part begins here, so be sure to regenerate, prepare Healing and Energy Potions and maybe some helpful items (bombs, throwing items etc.). These corridors are inhabited by a new type of enemy, the Ice Lizards, which additionally keep respawning here. It has its good sides, as the meat they leave behind is heavy but very satiating and the experience is also quite good. In case you would have to run away, you can return here and close the door behind you. Remember not to get surrounded by the Lizards, as it might end pretty badly. |
 | A small secret can be found here. In order to open it, locate the button on the wall behind the corner. Here you will find an interesting item - the Pit Fighter Gauntlets. Apart from that, you can also collect two Bombs from here. |
 | In order to open this door, you will have to switch the lever at the marked spot. Behind the door there's one of the items which you need to take to continue onwards. In this case it's the Scroll of Lightning Bolt. |
 | At this spot you will find a handy item - the Circlet of Wall, which increases the wearer's strength - by the wall. In the north-east corridor there are Lightning Bombs.  The concentration of Lizards will be highest in this area, so one of them will probably drop the Gold Key needed for the Treasury. It's also possible that you will find it anywhere between points (7) and (11). |
 | Here you will finally be able to take a rest from the unending wave of blue lizards. Lock both gates behind you and take the herbs from the eastern and western ends of the corridor. |
 | A portal-oriented puzzle awaits you here. Open the gate with the Ornate Key and be ready to fight a couple Uggardians (the door will lock behind you after you head inside). After the battle, take a look around the room. Three portals can be found here, with number assigned to them. Head through any one and by the feet of the statues in the middle a scroll with a hint ("III - II - I - III") will appear. What it means is that you need to enter the portal in this order: 3 > 2 > 1 > 3. This way you will reach the next point on the map. |
 | Here you will face a dexterity puzzle. Firstly, you will end up on a pressure plate, right before two trap doors out of which one keeps closing and opening. In order to reach it, you will need to place something on the plate you're standing on. After doing it, stand on the locked door and note the grate on the left. behind it, there's another pressure plate on which you need to place something and do it fast enough not to fall down when the second trap door opens again (if you however do fall, skip to point (14) as you will return here either way). Afterwards enter the newly opened corridor and pull the lever. Note the flicking portal on the other side of the automatic portal. Feel the moment so that you can cross the temporarily closed trap door and not hit the portal, or else it will take you back to before the trap. On the other side you will find another lever and a passage to a second item which you need to take from the pedestal to move on. This time it will be an Ornate Key. Once you're done with point (13) and (14), return to the portal which you used to get here and return to (12). In the marked place, you will find a hidden button which opens the door of the chamber. |
 | If you haven't fallen into the basement in the previous point, do it now as another secret - and a quite good one at the same time - can be found here.  To solve this puzzle, you will need three torches and two stones.  In order to open grate (B), you need to place three torches into the empty handles on the walls of the basement (1, 2 and 3). Once you do it, take a look around and find a place on the ground where the shades cross and create a darker spot (A). Stand on it and throw a stone east and then north. Voila, the grate becomes open and in return you will receive the Cuirass of Valor. In order to return upstairs, just use the portal (P). |
 | This long corridor is the older and meaner brother of the one at point (6). This time you need to cross it square after square according to the hint on the scroll which you have found at point (2). To make things easier, I have drawn the proper track on the mini-map. After you cross the corridor properly once, you will be able to move through it freely. |
 | In these corridors you will come across more Uggardians. In the marked room in the north-east you will find another Toorum's Note and a stone (hold it for later). |
 | Inside this slightly bigger room you will come across a new enemy, known as Shrakk Torr. It's a rather annoying enemy who can spread poison, but two of them shouldn't be a problem. After the fight, tear off the banner in the marked spot to find the Lurker Hood (the last part of the set). |
 | This door can be opened only with the button on the wall, which has been marked on the map. After getting inside, collect the Book of Infinite Wisdom. It's the last item you needed to collect from the shelf to move on. |
 | The walls of the room will rise, changing this series of nooks into an intersection, from which you will have easy access to each part of the level. Afterwards stand on the pressure plate to open the door beside it and don't forget to take the Sulphurous potion from the shelf. |
 | A Crystal of Life, finally. Apart from it, there's also a puzzle which blocks further way. In order to solve it, put the following items on shelves marked as A, B, C and D: A - Key B - Arrow C - Stone D - Skull After you place the right items on the right shelves, you will hear a lick and the gate to the further part of the underground will open. Right behind it you will find a scroll with congratulations on your progress. |
 | Here you will also come across a Treasury, similar to the one from level 6. You have found the Gold Key which opens a selected lock while fighting the Ice Lizards.  Here's what you can find behind the gates:
|
 | The last collectibles on this level can be found behind the Iron Door. In order to open them, just place a Bone Amulet (you should have two) on the nearby shelf. Behind the door you will find the most powerful artefact for the mage: the Zhandul's Orb. |
 | Now you just need to cross the spiral corridor in which two Ogres await you. It's best to lure them into charging and keep backing out towards the entrance, attacking with all you've got, at best from a distance. You can also lure the Ogre into the Treasury and finish it off normally there. The second Ogre might cause you more trouble, as the door will close behind you. Though if you're fast enough, you might be able to open it with the marked button on the wall. After the fight, it's time to descent into the next part of the Temple. |
 | Stairs to level 8. |
 | Stairs to level 10. |