Level 7: Ancient Chambers Legend of Grimrock Guide
Last update: 11 May 2016
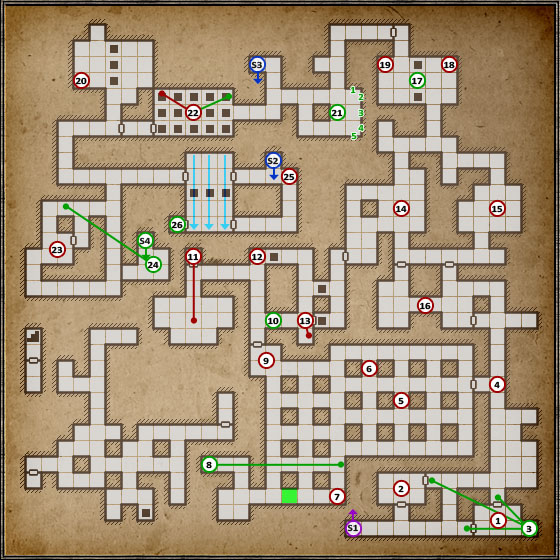
This level is a walk in the park compared to the previous one. You will have to face some demanding enemies here, but they're not all that dangerous this far into the game. The puzzles are less frustrating as well, through still interesting. A moment of relief after being imprisoned on level 6.
 | You begin the adventure in the Chambers inside corridors with multiple Slimes. Inside the first room (opened with a nearby button) you will find Toorum's Note, hidden beneath a cloth on the ground. There's also a secret here, more on which can be found below (3). |
 | Some more Slimes, a Grim Cap and an alchemy herb. |
 | In order to open this alcove, you will have to complete a very easy activity, i.e. open all the doors in rooms (1) and (2), apart from the southern ones in (2). Inside the alcove you will find the Ring Greaves, Throwing Knives and a Battle Axe. |
 | The northern part of the tunnel is collapsed, so the only possible way is through the door into the western chamber. Here you will find the Maze of Shadows - an easy puzzle with quite a bit of prizes to collect. In order to get through this labyrinth, you will have to move only along the unlit squares, avoiding the light of the torch. I won't draw the track, as you shouldn't have problems with such an easy puzzle this far in the game. Just remember that entering the light takes you back to the entrance door. Inside the niches in this labyrinth you will find two Slime Bells) used at alchemy. |
 | The Scroll of Darkness can be found here - it's a spell opposite to Light. |
 | On this pillar you can find the Hardstone Bracelet. Right beside, by the northern wall you should also find Toorum's Note regarding this part of the underground. |
 | In this (seemingly) dead end you will find a Wooden Box with a big supply of food inside. There's also a hidden button here which will let you reach a double secret. |
 | Press the button in the wall at (7) and the wall will raise, giving you access to a portal (marked with green) which will take you to a secret room with Herders. After killing them, search the room for Throwing Axes, Crossbow Quarrels and food. On one of the walls you will also find a stone with a carved rune. Press it and another wall will raise, behind which you can find some Frost Bombs. |
 | This room is the official target of your trip through the "shadows". The grate, controlled by the nearby lever, will let you use this nook as a safe spot should you need to run away from the further corridors. |
 | This area is swarming with Uggardians, additionally it's rather narrow and therefore it's hard to avoid their fireballs. It's best to lure them to point (9) and eliminate one at a time there. Jump into the trap door here to reach a secret containing the Bracelet of Tirin. The nearby portal will take you back upstairs. |
 | In order to reach the room behind the door you will have to firstly stand on the pressure plate in the adjoining room. After doing so, immediately return to the door and kill the Slime there. Be quick, as inside the room with the plate the walls have opened and let out more Slimes. After killing all of them, collect the Iron Key found behind the open door and search the neighbouring room for the Diviner's Cloak. |
 | Use the Iron Key you have found on the lock here and the trap door blocking your way will lock, giving you access to the next puzzle. |
 | Inside this corridor and on the other side of the trap door you will see two demon heads which, as you have probably guessed, spit projectiles. Beside the grate you should see a metal button and a "socket" for the projectiles mentioned above. The second socket is on the other side of the grate. There's also an open trap door there. In order to open the grate and close the trap door, you will have to proceed as follows: press the metal button, quickly make space for the incoming projectile by heading towards the trap door (10) and immediately jump back onto the square with the button right after the grate opens. This way the second projectile will close the trap door. |
 | Here you're in for some more Slimes. Beside the pillar in the corner of the room there's a Throwing Axe. |
 | Here you can find the Crystal of Life and an interesting item lying nearby - the Fire Torc. |
 | Inside the first room you will have to solve an easy puzzle using the demon head, socket and of course a light projectile.  You will find two pressure plates here. The first one opens the grate and the second shoots a projectile from the demon head. Stand on the first one and wait for the gate to open completely, quickly stand on the plate below the grate and immediately return onto the previous one. As the projectiles hits the socket, two more rooms will open and you will be attacked by Uggardians. Inside the room behind the grate you will find a rare treat for the Mage - the Shaman Staff and Scroll of Invisibility lying below the demon head. The second room hides another Toorum's Note and a lever opening the wooden door leading to the corridor beside point (14). |
 | Inside the room with two portals and trap doors. Jump down and you will find yourself in a peculiar, though dangerous room, the floor of which is almost completely filled with pressure plates. Each place releases a poisonous projectile from the demon head found on the other side of the room. Move carefully through the plates so that you're not killed before reaching the other side of the room. There you will find the Boots of Valor (part of a set). Beside the demon heads you will find a lever which frees Spiders and Crabs from behind the grate in the spot where you landed. Defeat them, search the alcoves from which they headed out in search of food and use the portal to return upstairs. |
 | A portal which takes you to the other side of the room, to point (19). |
 | A portal which takes you to point (20). |
 | Inside the alcove in the northern wall of this room there's a bag containing some alchemy ingredients. Use the portal to return to point (19). |
 | Here you can find a rather easy secret. On the walls there are five levers which need to be arranged in the below order: 1 - up 2 - however 3 - down 4 - however 5 - down Placing levers 1, 3 and 5 in the right position will be confirmed by a click. After you set them all correctly, you will be able to take the Assassin's Dagger - a great weapon for the Rogue. |
 | Inside this room you will find an easy puzzle, which however requires good reflex. The floor here is entirely made from trap doors which keep closing and opening because of the demon head which spits projectiles into the socket on the other side.  In order to cross this room to the other side and open the door, you will have to head into the middle of the room when the trap doors close and therefore block the path of the projectile. Approach the projectile socket and while looking at it, move left at the right moment, press the button on the wall and immediately move right. Uggardians will fly into the room, so it would be best to retreat to the starting point at (21) and kill them there, without having to worry about the trap doors. After dealing with the enemies, return to the room with the trap doors and once again block the projectile with your own body. Turn around towards the corridor which you used to come here and to the left of the entrance you will find a not-so-secret secret - a shelf with the Bracer of Fortitude. Stand beside the socket and while looking towards the item, quickly run to grab it at the right moment and immediately return afterwards. If you want, you can also fall down through the trap doors - below there's an Ogre, which however shouldn't be too much of a threat at this stage of the game, yet still provide some experience points for your party. Inside this basement you will also find a Heavy Shield, a Milkreed and a Crossbow Quarrel. You can use the stairs to head back up. |
 |  At this spot you will find a very good, heavy weapon - the Flail. First however you will have to defeat a Tentacle and an Uggardian. |
 | Nearby the room with the Flail you will find a runic stone on the wall. Press it and quickly run south through the corridor to reach a room with a staircase. It leads to a secret part of the lower level - the Dismantler's Vault, inside which one of the most powerful weapons in the game can be found. |
 | On the shelf beside the stairs there's another Skull, one of five which you can find. Of course give it to your Minotaur. |
 | In the end there's still the Iron Door, opening which requires some reflex and dexterity.  Once you enter the room, the demon heads on the other side will start spitting light projectiles. If whichever reaches its socket, you will be immediately taken back to the door and will have to start from the beginning. Face the demon statues and block the incoming projectiles with your own body and keep in mind that they will gradually gain speed. When the statues finally stop, the Iron Door will open, granting you with the Chitin Boots (last part of the set!) and the Scroll of Enchant Fire Arrow. |
 | Stairs leading to level 6. |
 | Stairs leading to level 8. |
 | Stairs leading to the basement below the room at point (22). |
 | Stairs to the secret part of level 8. |