Level 6: Trapped Legend of Grimrock Guide
Last update: 11 May 2016

"Trapped" is by far the longest and hardest level up to now. As the name suggests, you will be trapped here right after going through the first gate. You will free yourself only after crossing the level to the other side, which is when the stairs to level 5 will be unlocked again. Be sure you have everything you need before exiting the stairs and be ready for some tough fight. Make sure to keep all your party members alive at all cost, as for some time reviving them will be impossible.
 | Right after crossing the threshold of this level you will be attacked by three Spiders. If you immediately turn right after entering the main hall, you will be able to get across the gate at (17), lock yourself there and eliminate the Spiders from there one at a time, as well as safely rest.  Regardless of how you defeated the Spiders, rest at (17) before the somewhat epic fight with the new enemy - Ogre. He's circling around the room and once angered, he won't let you go. The fight will be long and demanding, so full health, energy and a bunch of Healing Potions are welcomed. After you win, the dead Ogre will leave behind the Ogre Hammer and a Sack with some food and a Gold Key, needed for one of the three prizes waiting for you at the end of this level. |
 | In this room you will have to eliminate a few Spiders and in return you can find a weapon for your Warrior inside the corridor from which they came (Cutlass). |
 | Inside this room there's an interesting secret. Cross the corridors once in accordance with the hints on the map and a stone will appear before you. Cross them once again and the stone will be replaced by a Skeleton. Do it once again to finally solve the secret and receive a Sack with the Speed Potion and the recipe for it. |
 | This room from now on will be your emergency "pantry", or rather Snail farm. They keep on respawning here, so you don't need to worry about food. Just don't forget to lock the door once you exit, or else they will spread throughout the whole level and eat the lettuce;) |
 | A puzzle with portals awaits you here, one that can cause some confusion easily, though luckily for you, not with this guide.  All portals have been marked on the mini-map with blue and two others will be covered further on. Start off by locating the button on the wall (without entering any portal). After pressing it, the portal marked as red will (right beside where you're headed) will be deactivated. Now enter the portals in the order: 1, 2 and 3. At this point you should reach an alcove, inside which the first of four Round Keys is. |
 | Inside the alcove beside the key you will find another button in the wall. Press it and enter portals 4 and 5. The portal marked as green will be deactivated, so you will be able to reach the second alcove and find one of the most interesting artefacts: the Spirit Mirror Pendant, which increases the rate at which the wearer gains experience. |
 | Having the Round Key, you will be able to reach the Crystal of Life and finally catch some breath. From now on you will be able to fight with more confidence, as you have a revival point nearby. The Crystal room can also be locked, so it's a good place to sleep. |
 | Inside the small room beside the Crystal of Life you can find a teleport which will start to move you between a couple rooms at a fast pace. You will stay in each room for about a second. The one which should interest you is the one with the wooden door and a chain with which you can open it. Inside there's a Snail - not a powerful enemy, but you will only have time for 1 or 2 hits with each jump. After killing it, run into the room with the lever during the next jump and switch it. Head back into the portal and you should note that the grate which was previously blocking access to the room with the Giant Crab has opened. Kill the Crab and collect another Round Key. You will be able to use it to open the first gate south of the Crystal of Life and take the Antidote recipe Scroll found on the other side. |
 | Now, having access to the Crystal of Life, you will be able to approach this secret without much risk. Place a torch in the handle which you can find inside the alcove north of the Crystal room. Three squares further north a new corridor will open, inside of which there's a Skeleton and two Fire Bombs. On the left wall you should find a stone with a carved runic sign. Press it and the corridor will open even more. You will find yourself inside a small room with a portal which you cannot go though. Place an item inside the portal (put it down, don't throw) and a gate will open on the other side. Behind it you will find a good item for the Mage - the Orb of Radiance. Unfortunately the biggest trouble is just waiting for you. After you pick up the Orb, you will be trapped inside the room with two Crabs, which will additionally most likely pin you down inside the narrow corridor, without leaving any space to manoeuvre. You need to give it everything you've got to avoid seeing the GAME OVER screen. It's a good idea to freeze the Crab which you fight with bombs/spells. If you managed to retreat from the Orb corridor fast enough, you might be able to return to the main room after killing the first Crab and therefore defeating the second will be just formality. In order to leave this room after the fight, find the runic stone again and press it. |
 | These corridors are full of single Skeletons which appear here from time to time. You're in for a similar task as on level 4, i.e. leading the Skeletons to a given target. |
 | On the walls inside one of the corridors you will find a hidden button which opens the alcove in the north. Inside it you should find (surprise) more Skeletons, a Heavy Shield and Ring Boots. |
 | Behind the pillar, a bit further south you will find one more button. It opens the room in the south, freeing two Archers and containing a prize: the Frostbite Necklace. |
 | This part is a bit tricky. In the marked spot on the floor you will find a pressure plate which however cannot be held down with any item, but only with the weight of a body - not necessarily your. The plate grants access to a room with yet another Round Key, though as fast as you step off it, the room will start to close and you won't be able to reach it on time. Here the endless wave of Skeletons starts to make sense. Lure at least one of them to the plate, stand on it yourself, wait until you hear that the room has opened completely, quickly let the Skeleton take your place and run towards the room. Inside there's a group of Skeletons waiting for you, as well as some herbs and the key. In fact you're now in possession of all the Round Keys necessary to leave this level, but yet another key waits for the persistent, together with a prize. |
 | After eliminating the Crabs lurking in this area, you can jump down into the trap door right now or first solve the other puzzle on this level. A full description of this multi-part secret can be found in point (21). |
 | In this inconspicuous corridor you will find a big threat and quite a secret right beside. At the end of the corridor there are two items necessary to reach the further part of this level. On the floor in front of you, you should see a pressure plate - don't stand on it just yet, as it will turn on a demon statue which will start spitting fireballs. Start off by locating the button on the right side of the corridor. It will open an alcove which you will be able to jump into to avoid the fireball. Step onto the pressure plate and immediately retreat to the freshly opened alcove. After the fireballs passes by, run deeper into the corridor, press the button on the left and immediately run back to the alcove. The last button has opened yet another alcove, right beside the statue. At the right moment, run towards it. From here it will be much easier to take the Scroll of Fireball and the Fire Blade from beneath the statue. |
 | The newly opened alcove is a secret as well. Inside it you can find yet another hidden button which opens a secret staircase inside the previous alcove. You can use them to reach a spot which you have already seen in the secret part of level 4, but a grate has been blocking access there. Collect the Plate Cuirass and Plate Gauntlets - yummy. Unfortunately nothing comes free. You will come across Uggardians, capable of casting fireballs, for the first time. These guys are no joke - they're tough, fast, levitating (trap doors don't work on them) and their attacks hurt, hurt pretty badly. If your Mage can use Fire Shield, now might be a very good time to use it. |
 | In order to safely get to the other side of this trap door, you first need to do two things. Firstly throw something at the demon statue visible on the other side and immediately move back, as the item will fall onto a pressure plate and cause a fireball to be casted at you. Afterwards you will have to either cast a Fireball or shoot the Fire Blade at the statue - both will get the job done, closing the trap door and letting you pass. |
 | Here you will have to fight two Uggardians found in the neighbouring room. Start attacking them from afar - at best with arrows/bolts and ice missiles. Fighting them in a bigger room isn't a good idea, as you might easily fall into one of the trap doors there. |
 | Here you can find the last Round Key, but reaching it will require quite some reflex. Both pillars here have buttons on them (one of the eastern and four on the western).  Each button closes one trap door, giving you access to the next button for a couple seconds, which closes the next door and so on. The proper track and the order (starting with the button on the eastern column) have been presented on the mini-map. You need to be really fast not to fall down. When you finally reach the shelf with the key, don't pick it up at once. In order to create a way back, pull out the torch from the handle and one of the trap doors creating the bridge will close. Now take the key and quickly retreat to the room at point (18), as you will be attacked by another Uggardian. Note that jumping into whichever trap door will take you to the main (least "secret") part of the secret (21). |
 | It's not the end of this chamber. The first secret found here will require you to follow the whole red track once again, though this time it will be prolonged by two additional buttons (green track on the mini-map). The time limit is even strict than last time, but the prize is well worth it. After you press the last button, a hidden room will open and another Uggardian will come out. After killing it, you will find the Ring Mail and Sword of Nex - a great weapon for your swordsman and at the same time the key to a secret (22). |
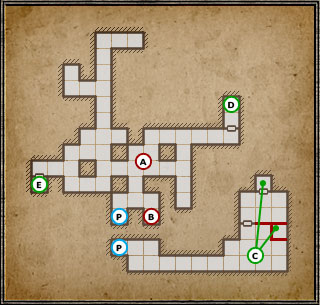
 | Jumping into this trap door will end up with landing at a seemingly dead end with a cage ((E) on the map below), from which a crustacean is smiling at you sincerely - wait a bit and the cage will open. After the fight, collect the third out of seven Treasure in the game - the Crown of Kings.  As seen on the map, this secret is pretty much a dungeon of its own - a two level one. In part (A) - which you can also access through trap doors at points (17) (18) and (19) - you will find only Crowerns, Wyverns and some items: two Tar Beads, a Wooden Box (containing a Healing Potion and an Antidote) and a couple Peasant Breeches and Sandals. On the nearby shelf (A) you will also find a scroll with a hint on how to find the Crown, but you've already don't that. The trap door at (B) will take you even lower, where quite the prize awaits you.  Point (C) contains a small puzzle and there are also some Frost Bombs lying nearby. You will come across an iron door with some Scavengers on the other side. To open it, place any item you like on the pressure plate behind the grates, but precisely where I marked. Kill the lizards and head inside. Being on the other side, pick up the item that you put on the plate. This way you will close the gate and open a secret alcove which hides the Full Helmet (heavy armour). To get out of here, repeat the process with putting weight on the plate and use the nearby (P)ortal to return onto the upper level. The portal at part (A) will take you back to level 6. There's still one more secret left in this underground (D), accessible only by jumping into the trap door at point (14) on level 6. Here you will find the Lurker Pants and a Shuriken. The order at which you discover the rooms found here is entirely up to you. |
 | Inside the nook behind the demon statue you should easily find a familiar block with a runic sign. Press it and a corridor leading to the "Fighter's Challenge" - a secret very worthy of your time and at the same time one of the hardest fights in the game - will open. The corridor and stairs will lead you to a demon statue, though you shouldn't approach it just yet. If you have the Sword of Nex with you, the statue will teleport you to a large room, inside which a vast amount of Scavengers awaits you. If you think you've seen enough of them by the end of level 4, you're very wrong - here, there's 10x more of them. Before teleporting, you should rest, regenerate, prepare a tactic and as many Healing Potions as you can. If you have a Speed Potion, give it to your best and fastest warrior - it will come in handy. After teleporting, you will find yourself in the very middle of the Scavengers group. Fight your way through them with everything you've got and use any breach there is to reach the corner of the room. I would advise doing so normally, but in this case it's the only way to protect your back and therefore the weakest party members. Don't worry even if 3 of your party dies - I finished this challenge having one, barely living warrior - you don't need anything more. If you can't handle this fight, just let go. You will be able to return here anytime with higher level characters. If you managed to survive, congratulate yourself and search the room for the Gold Key and some Bombs lying on the ground. The Gold Key can be used to open the only door found here, behind which you will find the excellent Shield of Valor. A teleport will appear in the middle of the room, which will take you back to the upper level, but don't use it just yet! On the western wall of this room you will find a hidden button which opens a secret alcove containing the fourth Treasure, the Ancient Apparatus. It's a prize well worth the effort. Now head back up, hug the Crystal of Life and be ready for some more prizes. |
 | If you have gathered all the Round Keys, you should still have one left. It fits the Iron Door here, behind which you can find the Chitin Mail (second to last part of the whole). |
 | In the end, there's still one gift waiting for you. The Gold Key that the Ogre at the beginning of the level had fits all the doors here, though you can choose only one. Inside the cells, you can find:
The choice is up to you, though keep in mind that the Tome of Fire is by far the most precious item. After reaching the end of this level, the door to level 5 will also be unlocked. |
 | Stairs to level 5. |
 | Stairs to level 6. |
 | Stairs to the secret basement at level 5. |
 | Stairs to "Fighter's Challenge" |
 | Stairs to level 5 (available only as a way back after falling from 5). |
