Level 4: Archives Legend of Grimrock Guide
Last update: 11 May 2016
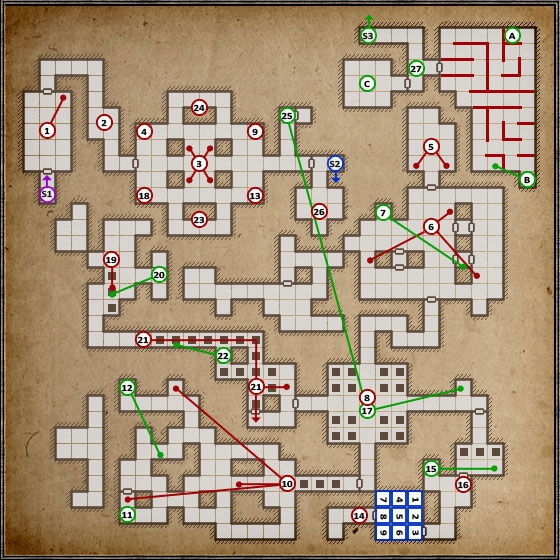
This level resolves more around puzzle than fighting, though there will be some of it as well. Here you will also find the description of a secret part of the tunnels, the entrance to which can be found on level 3.
 | There won't be much fighting on this level, but the first and one of the most difficult will welcome you right away. After pressing down the plate, you will be attacked by two Adult Herders. During the fight with them, look out for toxic clouds which they spit and be constantly on the move. If you lose a part of your team but manage to defeat them in the end, don't worry. One of the Herders will drop an Iron Key which fits into the lock beside the gate leading deeper into the tunnel. Alternatively you can also return to the 3rd level and use the Crystal of Life. |
 | Inside this room, on the shelves, you will find a Scroll, another Flask and a Grim Cap. |
 | This chamber is the central point of the whole underground. The portals here lead to four puzzles which you need to solve to get out of here. Start off by dealing with the two groups of Skeleton Archers and then note the four pillars here. There's a text fragment and a shelf on which you need to place a second fragment so that they create a whole. Strolls with the missing parts can be found at the end of each puzzle waiting for you. The fragments connect with each other in the below order:
After you solve the scroll puzzles, new corridors (24) and (25) will open, from which a swarm of Scavengers will appear. It's best to retreat to the Crystal of Life right after placing the last scroll (26) and lure single enemies/small groups there. Take a nap after each fight (as allowed by the monsters) and keep on fighting, using the Crystal if any of your team members should fall. Notice: after you let out the Scavengers, the portals in the central part of the hall will be turned off! |
 | This is a portal leading to your first mission: Beast Gardens and Menagerie. The order in which you complete quests doesn't really matter - I choose a clockwise order. |
 | Inside this room you will have to fact an easy puzzle. In front of you there will be a locked gate with a button on its left side and a well-known hole on the right. Behind you, on the right side, there's a demonic statue which spits magic missiles when you press the button by the door. You just need to quickly block the missile's path after pressing the metal button, as otherwise it would close the door once again. |
 | Inside the main chamber of this challenge you will find three cells with a pressure plate inside. On the walls marked on the map you can find buttons which open the cells. Your task is lore luring one Skeleton Warrior into each cell (they keep on appearing endlessly until you solve the puzzle). With all three occupied, the door in the southern wall will open (it's quite possible you will be attacked by Crowers). Before leaving this room, look around for plants in the alcoves and an enigmatic drawing nearby the northern cell (a curiosity regarding the secret part of this level). There's also a secret here, more on which later on. |
 | Inside the southernmost cell there's a button hidden in the wall. Press it to open the northern alcove in the northern corner, where you can find Leather Boots, Bread and Ring Gauntlets. |
 | At this place paths from each of the four challenges meet. The portal in the middle will take you back to the central hall (3) and scrolls lying around are the missing pieces of text which you need. You will come across a few Crowers here, though you should be able to easily eliminate them. |
 | Another portal and another challenge inside: The Catacombs. |
 | In the area where you show up you should see three opened trap doors which block your way to the next scroll. In order to close them, you need to find three pressure plates and take weights off of them. You will some across Skeletons of both kinds and the weights you will find on the plates are useful collectibles themselves. The last "weight" are Skeletons themselves, locked inside the western cell which you can open with the nearby lever. Here you can also find another Toorum's Note (beside the south-east pillar) and a Crossbow Quarrel, which will soon prove very useful (inside the alcove in the north).  After heading through the portal in this part of the underground you will be attacked by a Tentacle, a powerful but stationery enemy. |
 | Inside the same cell inside which the last pressure plate is, you will find a button on the wall which can open a secret. Inside there's a Sack (inside a Burrow Rat Shank, Tar Bead and Leather Gauntlets) and beneath it a Bone Amulet. |
 | The next secret is an alcove with a stone button marked on the map. After pressing it, you will first have to face a group of Skeletons which you have freed this way. After killing them, press the button once again and quickly head towards the marked room, as it opens only for a short while. Inside you will find the Flarefeather Cap and a Fire Bombs. |
 | The next dungeon with a challenge, this time more logical and memory-oriented: Trails of Thought. |
 | After entering this room you need to move in a strictly defined way in order to reach its other side. First you need to reach the button which opens the locked door and afterwards reach the door itself. If you stand on the wrong plate, you will have to start from the beginning.  To make things easier, I numbered the plates like a phone keyboard. The proper order in such case is: 8 > 5 > 2 > 3 > 6 > 5 > 8 > 9 > 6 > 5 > 8 > 7 - this way you will reach the button. After pressing it, follow the path: 4 > 5 > 8 > 7 > 4 > 5 > 8 > 9 > 6 > 5 > 2 > 3 to get to the door. |
 | Start off with the secret found in this room. On the wall on the right there's a hidden button which open the alcove in the corridor before the door. Inside you will find the Venom Edge. |
 | Here we have a puzzle a bit similar to the last one, but luckily much less complicated. In order to lock all trap doors in a given order (beginning from behind the gate): front, back, right, left. On the shelf above the last trap door you will find a key to the nearby door. Head inside the corridor on the other side. |
 | Here there's a secret thanks to which you can open the Iron Door on this level (25). Below the portal on the "crossroad" (8) there's a trap door. Press the button hidden in the alcove and run towards the portal which is temporarily turned off and the trap door opened. You will fall onto the lower level where you can find the Gear Key. The description of the level can be found at point (28). |
 | The last challenge on this level is Time and Tide. |
 | As the name suggests, this challenge is about good sense of time and movement. The first task is very easy. Inside the alcove you will find a Throwing Knife, in case you don't have anything to throw. Stand on the pressure plate before the opened trap doors and you should hear ticking - three ticks to be exact. Instead of a fourth tick, a portal will appear above the second trap door for a fraction of a second. Feel the moment and throw anything at the portal, more or less half a second after the third tick. The item will be moved to the pressure plate on the left side and the trap doors (apart from the last one) will close. |
 | The portal above the locked trap doors can be used to reach the secret room behind the grates. Place an item on the "ticking plate" and stand on the second trap door. Inside the secret area you will find the Book of Infinite Wisdom. |
 | The next mission requires much more feeling and a bit of luck.  First of all save your game and prepare a throwing weapon or one to shoot with, as it will be necessary here. After pressing the pressure plate on the floor, the trap doors will start locking and opening after around a second. You need to plan each move so that you can cross the whole corridor using them. After reaching the room a pressure plate on the other side of an opened trap door, shoot/throw something onto the plate to open the door and quickly get through it. It might require some training and the Crowern flying in the area makes thing even more difficult. If it stands in your way and you cannot kill it with one or two hits, you're sure to fall onto the lower level (28). Then it's best to load your game and try again, as the Crowern follows a different path each time. Kill it when you reach the other side, as you will head through this path once again to find a secret. |
 | This secret is much easier if you have already gone through the trap doors once, killed the Crowern and left yourself an open gate at the end of the corridor. Once again head to point (21), but this time look right when you're on the second trap door and press the button there. It will open a branching in the tunnel. Turn right into the newly opened passage, look right, quickly take the Chitin Mask and keep following the closing trap doors. |
 | Inside this corridor you will find a Battle Axe on the wall and two alchemy plants growing from the floor. |
 | Inside the next corridor you can find one more plant and a lever which reactivates the portals in the main hall. |
 | It's the door for which you need the Gear Key obtained in point (17). Use the key on the gear-shaped lock and inside you will find the Chitin Greaves. |
 | Inside the room with the Crystal of Life you will also find a Frost Bomb and a Burrow Rat Shank. |
 | Return onto the third level and use the previously found stairs (S3). You will reach an otherwise inaccessible part of level 4 known as the Slime Dungeon. The name isn't random, as you will meet new enemies - Slimes - here. The mini-map doesn't show grates which create an easy labyrinth of corridors here, but I marked them with dark red. Carefully examine this underground, searching for plant resembling cabbages. The Slime Bell is a new ingredient needed for alchemy. Thanks to it you can brew an antidote. (A) - at this spot you can find the another Treasure, the Golden Deity Figure. (B) - here you can find the Green Gem, needed to open the door at point (C). In order to open the secret room, you will have to press the stone button on the nearby wall. (C) - in order to enter this room, you will first have to "feed" and demonic statue sticking out of the wall. To do that, just place the Green Gem into its mouth. Inside you will find a prize for crossing the Slime Dungeon - a Crossbow, Poison Quarrel and Poison Bomb. As you leave the dungeon, don't forget to take the Green Gem with you. |
 | This part is technically a piece of level 5, ale practically it's still level 4. 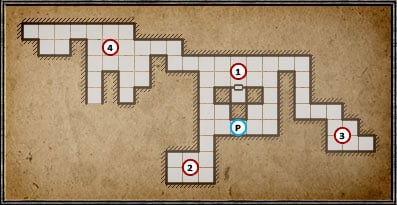 (1) - you can reach this part of the underground by jumping into one of the trap doors at point (8). Here you will find a Baked Maggot, a previously locked secret (17) and a portal to the main hall. (2) - in order to get here, you will have to jump through the trap door at point (10). Here you can find the Tar Bread and two Quarrels. To leave this room, you will have to locate a stone button on the wall. (3) - jumping down the hole at point (16) you will reach a room where two Slime Bells grow. In order to leave the trap, use the button on the southern wall. (4) - The trap door at (19) leads to the western part of this underground and only some alchemic plants can be found here. In order to get out, you need to pull the lever by the eastern wall.  Note the armour visible behind the grates in the southern corridor - you will return here again, but from another place. (P) - Portal leading back to the main hall (3). |
 | Stairs to level 3. |
 | Stairs to level 5. |
 | Stairs to level 3. |