Level 1: Into The Dark Legend of Grimrock Guide
Last update: 11 May 2016
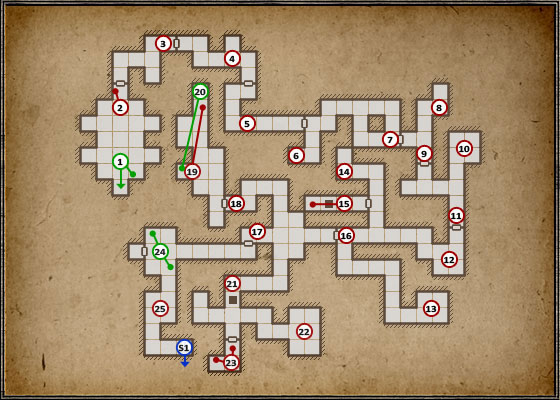
The first level of Grimrock is more of an introduction, serving as a way of familiarizing you with the game mechanics and explaining the game nuances. It's pretty much the whole game in a nutshell, as you will come across every element used in the further puzzles here. You will also encounter a couple enemies, but no one particularly scary or dangerous.
 | You'll be placed beside the very first secret right away. In order to reach it, turn around and on the left wall you will find a broken stone, the smaller part of which is a button. Press it to open a wall behind which there's a Shuriken and Lurker Boots. Both might be very handy for a Rogue in your team. If the darkness makes it difficult for you to find the hidden button, you should start off by heading to point (2). |
 | Take the torch from the handle by the bars and give it to one of your party members. Torches burn out after some time, so collect more as you go through the underground. Taking the torch from the handle will also cause a grate to open. |
 | In order to open the bars here, just pull the chain with a handle on the right side. |
 | Here you will find some equipment useful for your warrior. First off there are two clothes (a very weak item, but nonetheless an armour) in the corridor branch and additionally a mace in the niche in the eastern wall. The next grates can be unlocked with the very distinctive lever. |
 | At this spot you will come across one of the most common puzzle element in Grimrock. The locked grates in front of you become unlocked as you step on the pressure plate on the floor and become locked again once you step off it. To prevent that from happening, just place an item of choice on it. The game will suggest you use the nearby rock, through take into account that rocks are also weapons and therefore you should use the recently collected torch and leave the rock for your Rouge to use as weapon. |
 | Here you will find the Brass key to the gate before which you will soon stand. |
 | Use the key on the gate found in this corridor (pull it from the inventory and let go on the lock), but make sure you've collected the rock beside the pillar before going through. |
 | Here you will come across an easy puzzle, with a hint in the form of runes found on the wall. Press them and a "loose rock" writing will appear. Inside the niche with the torch you will find a broken stone (just like in point 1 - all look alike). After pressing it the wall will open, behind which you will find an Iron key, necessary for point (9). |
 | Here's the gate for which you need the Iron key. Use it on the lock fond on the wall beside the grates. |
 | Here you're in for your first, easy fight with a Giant Snail. One of your warriors should already have a mace and your Rogue a Shuriken and two Rocks. You mage isn't quite helpless as well, as his first spell - Fireburst - is ready to use. Kill the Snail, collect the items found in this room (Leather Boots, Leather Pants, Knife) and a torch. |
 | In order to open this grate, just pull the lever found on the right wall. |
 | Inside the alcove in this room you will find a Throwing Knife for your Rogue. |
 | On your way to this room you will have to fight two more Slimes (remember to collect the meat they leave behind). Inside the room itself you will find a Loincloth, Sandals, Rock and a Baked Maggot on a stick. |
 | In this nook you will find a Rock and some Bread. |
 | Open the gate and approach the hatch in the floor. It's open and therefore you cannot cross it to the other side. In order to fix this, just throw any throwable weapon (Shuriken, Knife, Rock) onto the other side and as it falls onto the pressure place the hatch will close and make it possible for you to cross it. There, you will find the Iron key used to open the gate. Pick up the item you've thrown and don't worry about falling down, as at the bottom there's a portal which will take you to the other side of the hole. The health you lose because of the fall is minimum and doesn't matter right now. |
 | Here's the gate which the Iron key which you have just found fits. |
 | Here you will come across the first of the more complicated puzzles. The hint on the wall across the door suggests bringing back sight to the sculpture beside the door. In order to do that, you will first have to find its eyes.  After placing the jewels into the sculpture's sockets (After returning from point 23), the gate will open and you will be immediately attacked by the strongest enemy yet - a Skeleton Warrior. Kill it and you can take the jewels back from the sockets. One of them will be needed for uncovering a secret at the end of the game. |
 | Don't enter the room after opening the grates, as you might be pinned by the four Herders inside. Instead stay on your side of gate and eliminate them one at a time. In case you need to regenerate, just lock the grates and take a nap for a while. After eliminating all of them, search the room for two Grim Caps, a Rock and Tar Bead, needed for alchemy (we will get there eventually). |
 | Inside the locked cell you can find the first "'eye" of the statue - the Blue Gem. In order to open the cell, use the lever found in the northern recess. Collect the gem and note the rectangular button on the wall on the right. |
 | The button in the cell (19) opens the room in which you will find a Dagger, Tar Bead and two Cave Nettles - another alchemy ingredient. The Dagger is a successor to the blunt knife that one of your characters has been using up until now. |
 | Cross the room with the statue, following the corridor to the hatch at its end. In order to lock it, just pull the lever in the very corner of the corridor. You can (but don't have to) jump into the hole in the floor, where after fighting a Snail you can find the Peasant's Cap and a Rock. You can take the portal back to the upper level. If you don't want to jump down for those items now, you will be able to collect them at the very beginning of the second level. On the other side of the hatch there's a single snail. Kill it and head to point 22. |
 | At this place, kill another Snail and collect the items found in the room: another Loincloth, Tattered Cloak, Rock and the Scroll of Fireburst. |
 | Return to the pressure plates found on both sides of the grates. Stand on the plate found on your side for the grate to open and two Snails to appear. On the other side you will find another Blue Gem, though there's still one problem left. Trying to leave the cell will end up with the grate locking. In order to unlock it again, you have two possibilities.  The first of them is placing any item (e.g. a burned torch) on the plate inside the cell and pressing the button hidden on the cell wall.  The second method implies putting the item through the locked grate and placing it on the plate on the other side, at the same time standing on the plate in the cell. This method will let you recover the item used as weight. You can now return to (17) and place both gems into the statue's sockets. |
 | If you have lost a party member while fighting the Skeletons, don't worry about it and take care of the Iron Door in front of you.  The Iron Door and at the same time a secret and a collectible, as they count to the end statistics. In the alcove on the left side of the door you will find an enigmatic hint on how to open them. In order to do that, you will need to find two buttons hidden in the chamber's walls - one on the right side of the door and the second on the left side of the alcove with the Scroll. On the other side of the Door you will find the Whitewood Wand for you mage and a Scroll with its description. |
 | Here you will find possibly one of the most important items in the game - the Crystal of Life.  Clicking on the Crystal will recover full life and power to each party member, as well as resurrect the dead. Inside the alcove beside the Crystal you can find a scroll with its description. |
 | These stairs lead down onto the next level of Grimrock. Before going down however, you can find the Scroll of Poison Cloud beside the alcove. |