Mission 4 - Kalash Site Homeworld: Deserts of Kharak Guide
Last update: 24 June 2016
Artifacts to obtain: none
Primary objectives:
- find Kalash wreckage;
- build a scanner and examine the wreckage;
- find 3 remaining wreckages and deploy scanners there;
- defend all of the scanners for 3,5 minutes;
- destroy remaining Gaalsien units and defend the Carrier.

In this mission, you will only have to defend specific positions, which is not too demanding. You start by exploring an area on Rachel's vehicle - simply drive north for several tens of seconds.

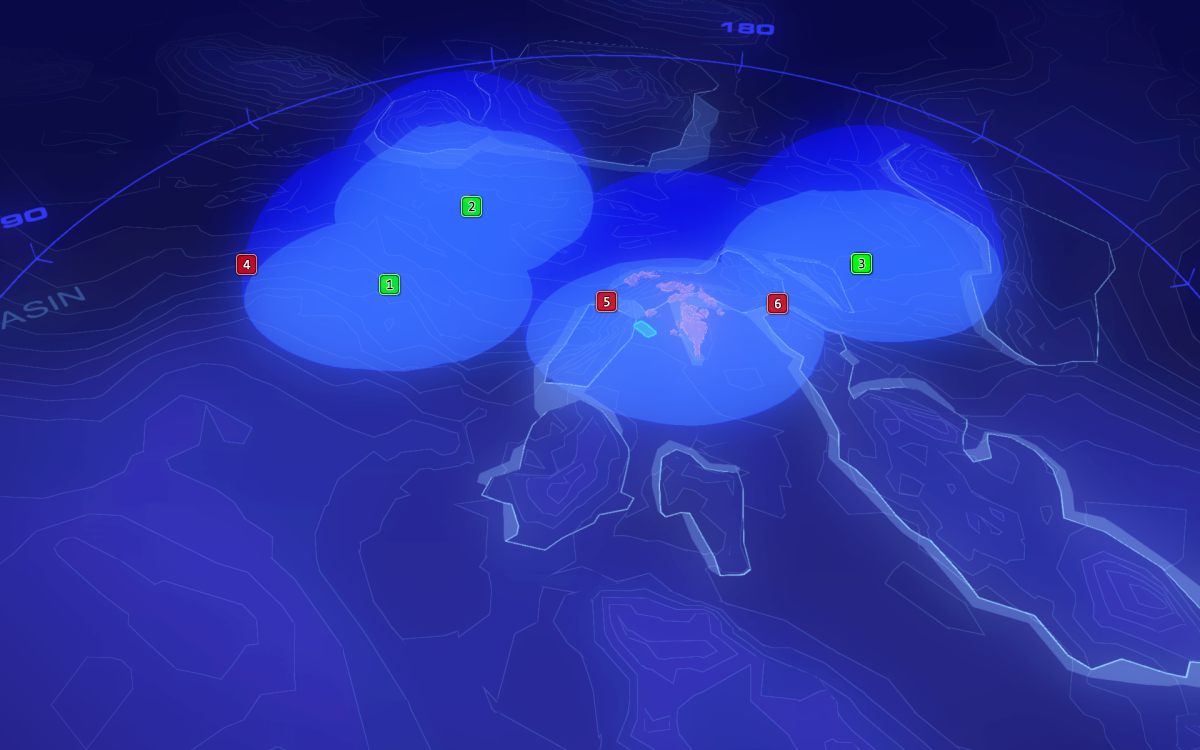
You set your base around the wreck. There are three locations that you have to explore and they have been shown on your tactical map. This is where you have to deploy Scanners. They can be deployed by Rachel and by Baserunners. Before you produce them, you first have to discover them (Baserunner Fabrication). They are also capable of deploying long-range turrets that have low durability.

On the minimap you will notice random tornadoes. Avoid them to prevent your units from being damaged or destroyed. It is best to watch over each group of vehicles that you send out.

You can send out the initial units, i.e. 4 LAVs, 2 RGs and 4 AAVs, with Rachel into the first point to the West [1], to deploy the first scanner there. Deploy your units close to the scanner, but above it for better accuracy. Deploy AAVs in front of RGs, and Rachel right behind them (within the healing distance). You can leave those units here until the end of the mission.
After you have taken any point with the scanners, you have to defend the scanner from small enemy groups that keep attacking (usually, several LAVs plus two AAVs). If the scanner is destroyed, you have to deploy it again. To win, you have to hold all 3 of the locations of scanners for, at least, 3,5 minutes.
Hint: Your Baserunner has a special ability - dispatching of a scanning sensor. It costs mere 50 Cu, and it functions just like a stationary radar - it expands your range of vision and allows you to find objects hidden on the map (like lurking enemy units, defenses or - for this mission - wrecks).

Assign Salvagers to gathering resources (mainly Cu, orange), you do not have to build new ones. Instead, build 4 AAVs and 2 RGs, 1 Support Cruiser and 1 BR, and send them East [3]. Also, it is a good idea to deploy 2 turrets here (using BR), and to deploy a scanner behind the wreck.
Hint: It is a good idea to upgrade AAVs (increase integrity, AAVs Hull) and Support Cruisers (higher repair rate, Support Cruiser - Repair Speed).
![Switch back to Kapisi and build more units to send them to point [2] - Mission 4 - Kalash Site - Campaign mode walkthrough - Homeworld: Deserts of Kharak Game Guide](/homeworlddesertsofkharak/gfx/word/86059308.jpg)
Switch back to Kapisi and build more units to send them to point [2]. Here, you can build more of them - around 6 AAVs, 4 RGs, Supports and Baserunners, just like before). deploy them on both sides of the wreck. The enemy will attack mainly from the North.
As a secondary objective, the game suggests that you buy aircraft - Strike Fighters. It is a good idea to do this to familiarize yourself with them. However, you first have to discover Strike Fighter Fabrication. Build 3 of these and try them out on any of the enemy groups. To do this, switch to Kapisi and in the new column, in the bottom-right corner of the interface, select to attack, marked with "W" ("W" is also a quick air-raid hotkey). After you have selected targets for the planes, they will find them themselves and return to the HQ to replenish ammo and fuel.

Hint: Westwards of the first point ([4]) there is a small enemy base and a production unit, which is where small groups of enemy units come from. It is a good idea to go there and destroy the base, or perform several air-raids.

After you have taken all of the three locations, a countdown will start. During that time, you cannot let any of the scanners be destroyed. After the countdown reaches 0, there is one more short procedure for you to perform. You have to eliminate all of the enemy units remaining on the map. They will attack your carrier in [5] and [6]. For this reason, you can have the units return to their base and use air-raid (if you have bought them). Still, Kapisi should be able to fend them all off, after all of the energy points are transferred to Turret Network.
Note: It is also likely that, after you defeat all of the assaulting units, the mission does not end. If this happens, start searching for the stray unit that may have gotten stuck somewhere. This is when aircraft and scanner drones of Baserunner will be of use.

