
Mithril bricks locations (16-30) | Middle Earth - Mithril LEGO bricks LEGO The Hobbit Guide
Last update: 11 May 2016
Brick 16
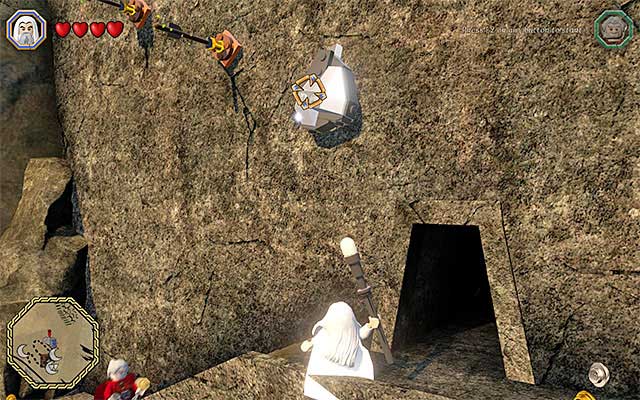
Location: High Fells
Description: Reach the very top of the cliff and switch to Saruman. Use his staff to smash the mithril bricks shown in the above screenshot. Switch to an elf now and use the bow to stick an arrow into the wall. Then, jump to reach it. Take jumps towards the successive bars and grab the collectible in mid-air.
Brick 17
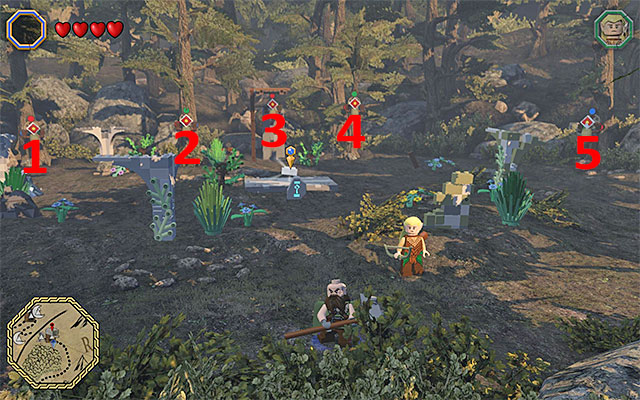
Location: High Fells
Description: The Mithril brick is near the location that a small gate leads to. After you walk into the next location, start by smashing all of the objects in the area, thanks to which you will find two targets. Apart from that, use the rotary mechanism, thanks to which you will reveal one more target. Only then, switch to a character with slingshot (e.g. Ori) and start hitting the targets, of which there are five here. The solution to this puzzle has been presented in the above screenshot - above target 1, there needs to be a red circle, above target 2, a green one, a red circle above target 3, green above target 4 and blue above target 5.
Brick 18

Location: Troll Dwellings
Description: You should notice that around the spot, where there is the mithril brick, there are moles coming out of holes in the ground. Start attacking them. After you have eliminated the first mole, a countdown will start and, before the time is up, you need to kill a total of 9 moles. I recommend that you use here a good melee weapon and keep looking around (sometimes, a mole appears in the very spot in which you eliminated the previous one).
Brick 19
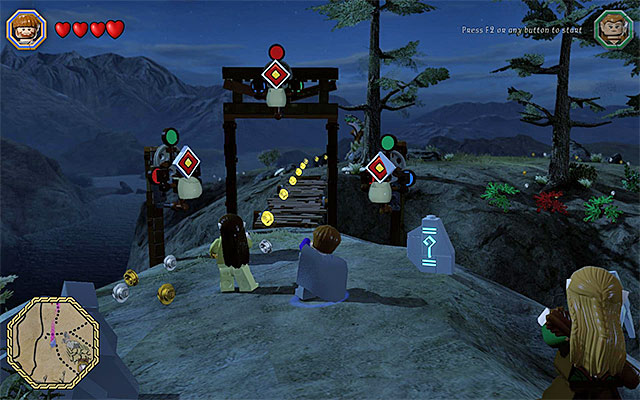
Location: Troll Dwellings
Description: The mithril brick in on a seemingly inaccessible island to the South of the main part of the Troll Dwellings and to the West of the Pass of Caradhras. You can reach the island in several different ways but I recommend that you reach it from the North. Take the upper path and reach the raised drawbridge. Switch to the character with slingshot and start shooting at the targets. The solution to this puzzle has been presented in the above screenshot - above the target on the left, there should be a green circle, a red circle above the middle one and a green circle above the one on the right.

On the island, find the large boulders and walk onto the pressure plate. Switch to an elf now and walk through the first ring, which will start a race against time. Take well-aimed jumps towards the successive ledges, across the checkpoint gates. After you reach the top ledge, stop and jump. You will this way jump across the last checkpoint and grab the mithril brick, in mid-air.
Brick 20

Location: Troll Dwellings
Description: Start to the South-West of the marker for the mithril brick , at the bridge between the Troll Dwellings and the Eastern portion of the map. Here, you will find a boat (it is at the end of the trail of yellow studs) and after you jump onto it (the character swap key/button) you need to steer North-Eastwards. Remain close to the left side of the river. Your destination is the small harbor shown in the above screenshot.

Switch to the elf here. You need to take turns, use the bow to hit the "empty" interactive slots and take long jumps to grab on to the successive bars. Towards the end of the climbing, you will have to use another unique ability of the elves, which is bouncing off the brown walls. Keep performing all of these actions until the moment, in which you reach a ledge that is inaccessible in any other way. You can now smash the chest with the brick inside.
Brick 21

Location: Rivendell
Description: You need to start by making it over to the inaccessible ledge above. To do that, switch to an elf and start bouncing off the vertical walls. Unfortunately, you will not be allowed to collect the brick straight away, because you need to complete a quite difficult race, first. The time trial starts at the moment at which you cross the first ring. The track abounds in many moments where you need to be very precise (and lucky) and you are sure to need several attempts, before you finally learn it. You should be especially careful at the moments at which you need to walk over ropes and narrow ledges or take precise jumps onto the small platforms It is easy to make a mistake here and nearly all of the mistakes end in the necessity to start the race over.

Towards the end of the trail, you will probably have the most problems with the part of the track, where you need to bounce off green plants. Try to perform the bounces flawlessly, to reach the areas above. Also here you need to avoid any mistakes, because you may slip off a roof and fall into the waterfall, which may cost you lots of time, in the best case. Reaching the last ring before the time elapses, (it will be regenerating, gradually, at each checkpoint) will be rewarded with the mithril brick.
Brick 22

Location: Rivendell
Description: The mithril brick is on the balcony that is inaccessible, by default and reaching it requires you to explore the area more carefully. Start by searching out the interactive golden catch and rip it off with a character that uses flail (e.g. Dori). This will unlock access to the first manhole. Cross it and walk onto the pressure plate.

Switch to another character and take the other newly-unlocked manhole. After you reach the vicinity of the tower, start jumping over to the beams on the right. Thanks to this, you will reach the chest with the crank in it. Collect it and go towards the beams on the left. Also here, you need to take several well-aimed jumps. Reach the mechanism, click the crank into place and interact with it. You now only need to take the third manhole that has been unlocked. It will take you to the balcony with the collectible on it.
Brick 23

Location: Rivendell
Description: You need to reach the cave behind the waterfall and the easiest way to do that is by following the trail of yellow studs. (of course, set your destination in the location, where the mithril brick is). Before you are able to collect the brick, you will have to solve another puzzle, which consists in pushing the three big blocks in the correct way. Start by switching to Saruman and smash the mithril obstacles at the central garden house. Then, switch to any character with warhammer (e.g. Dwalin) and give the first stone block a push. .

You now need to switch to the goblin and turn to the nearby tower, because that is where you can wall-climb. After you reach the very top of the tower, switch to the character with warhammer again. Push the stone block down and towards the next hole.

Finally, you need to take a side-path, which will take you to the upper part of the cave. Start here by using any wizard's staff, to smash the cluster of mithril bricks. For the last time, switch to the character with warhammer. Push the stone block down and over to the hole. Wait for new ledges to emerge from under the ground and take them to reach the mithril brick.
Brick 24

Location: Rivendell
Description: First of all, you need to reach the big platform above, where you also complete a side quest, connected with the elven blacksmith. Do not follow the suggestion of the yellow studs, because that way is incorrect. Start to the North-West of the marker for the mithril brick . Stand at the water, in the spot shown in the above screenshot. Switch to any of the elves and jump over to the first rope, hanging above the water. You need to jump towards the successive ropes now - first the horizontal, and then the slanting ones. If you have performed everything correctly, you will reach the upper platform.

I recommend that you now spend some time to smash ALL of the interactive objects in this area, because this will make solving the puzzle much easier. The plan is that you smash ten mithril statues, which can be done only by Saruman. Right after you smash the first statue, the game starts counting down time. That is why I recommended that you smash all of the remaining elements of the surroundings, because this will spare you several seconds, while targeting the statues.

In total, you need to smash ten statues. Nine of them are on the main level. The last one is hidden on the rooftop of the building here (the above screenshot) and to reach it, you need to take the ladder on the side. After you have completed the puzzle, collect the mithril brick.
Brick 25

Location: Rivendell
Description: The mithril brick is in the cave that the gate, on the lowest level, at the water, leads to. You need to "reveal" three heads here. In the case of the two, out of the three, it is very easy, because you need to use the flail and the bow. As for the last one, you need to switch to a character with slingshot (e.g. Ori) and shoot the pebbles at the target. The solution has been presented in the above screenshot - above the target on the left, there needs to be a red circle and above the one on the right, a blue one. Finally, use a wizard's staff on the blue sphere. You can now smash the chest and collect the brick.
Brick 26

Location: Mountain Pass
Description: The mithril brick is in the cave behind the waterfall, which you pass on the Mountain Pass. After you enter the cave, jump over from platform to platform, carefully, and avoid the spikes at all costs (it is a good idea to play as an elf here). The obstacle course will take you to the place where the brick is.
Brick 27

Location: Mountain Pass
Description: You need to find a small gate inside the stone giant. You need to solve a puzzle here, which consists in pushing over the stone block correctly, as a character with warhammer (e.g. Dwalin). The correct path for the block has been shown in the above screenshot.
Brick 28

Location: The Pass of Caradhras
Description: Reach small ruins in the mountains. I recommend that you switch to any elf and start bouncing off the green plants. This will allow you to reach to the upper level of the ruins and approach the mithril brick.
Brick 29

Location: The Pass of Caradhras
Description: Start on the ledge, where there is the brick, which is inaccessible for now. Switch to the character with flail (e.g. Dori) and reach out for the first interactive catch. You need to start swinging on the chain and let go at the right moment. In mid air-grab the next catch. Thanks to this, you will start another time trial, where the key to success is quick performance of a string of activities.

Jump towards the successive catches on the left side. After you fly through a smaller ring, you need to turn your character, in mid-air, and grab a catch on the right again. Continue taking the jumps. Towards the end, you will have to change directions again so, you need to be prepared for that and react quickly enough (any misstep will make you start over).
Brick 30

Location: Moria
Description: Stop near the pond that is surrounded by seven dwarven statues. First of all, locate a small target and shoot an arrow at it. Thanks to this, several platforms will emerge from the water (you will appreciate that, in a moment).

You now need to start smashing the dwarven statues, best with the bow. There are two important limitations here. First of all, each statue needs to be hit several times. Secondly, after you destroy the first statue, a countdown will start so, you need to hurry. You can smash the statues in any order and from any position - I recommend that you stand at the water edge, or on the square floating platforms, which do not submerge after you stand on them. After you destroy all of the statues, within the allotted time, reach the floating platform with the brick on it.