From Day to Night | Campaign - Long Live the King Heroes III HD Edition Guide
Last update: 11 May 2016
Key points of Heroes of Might & Magic III: HD Edition - From Day to Night mission - Long Live the King
Cities, which belong to the player from the very beginning of the mission.
An enemy garrison building - to get to the other side, you must first defeat the units garrisoned there.
Guard - "a" stands for the Guard Tent, while "b" indicates the Guard Tower, which can be passed after visiting the Guard Tent.
The entrance to the underground - "a" stands for the entrance itself, while "b" indicates the exit leading to the surface.
A mirror entrance - "a" stands for the entrance, while "b" indicates the exit.
Points of interest - visiting, or capturing it can make the mission a lot easier.
This icon represents the place, in which the player can complete the main goal of the mission - it can either be the task to seize an artifact, defeat a certain enemy, or simply capture a city.
This icon represents key mines, which should be captured in order to complete the mission.
Neutral cities, which can be captured.
Cities, which belong to the enemy player.

The last mission from this campaign gives you access to: Scroll of Death Ripple, Dead Man's Boots or 3 Ghost Dragons. Dragons will benefit you the most, so it definitely should be your choice. Your task is to defeat all the enemies.
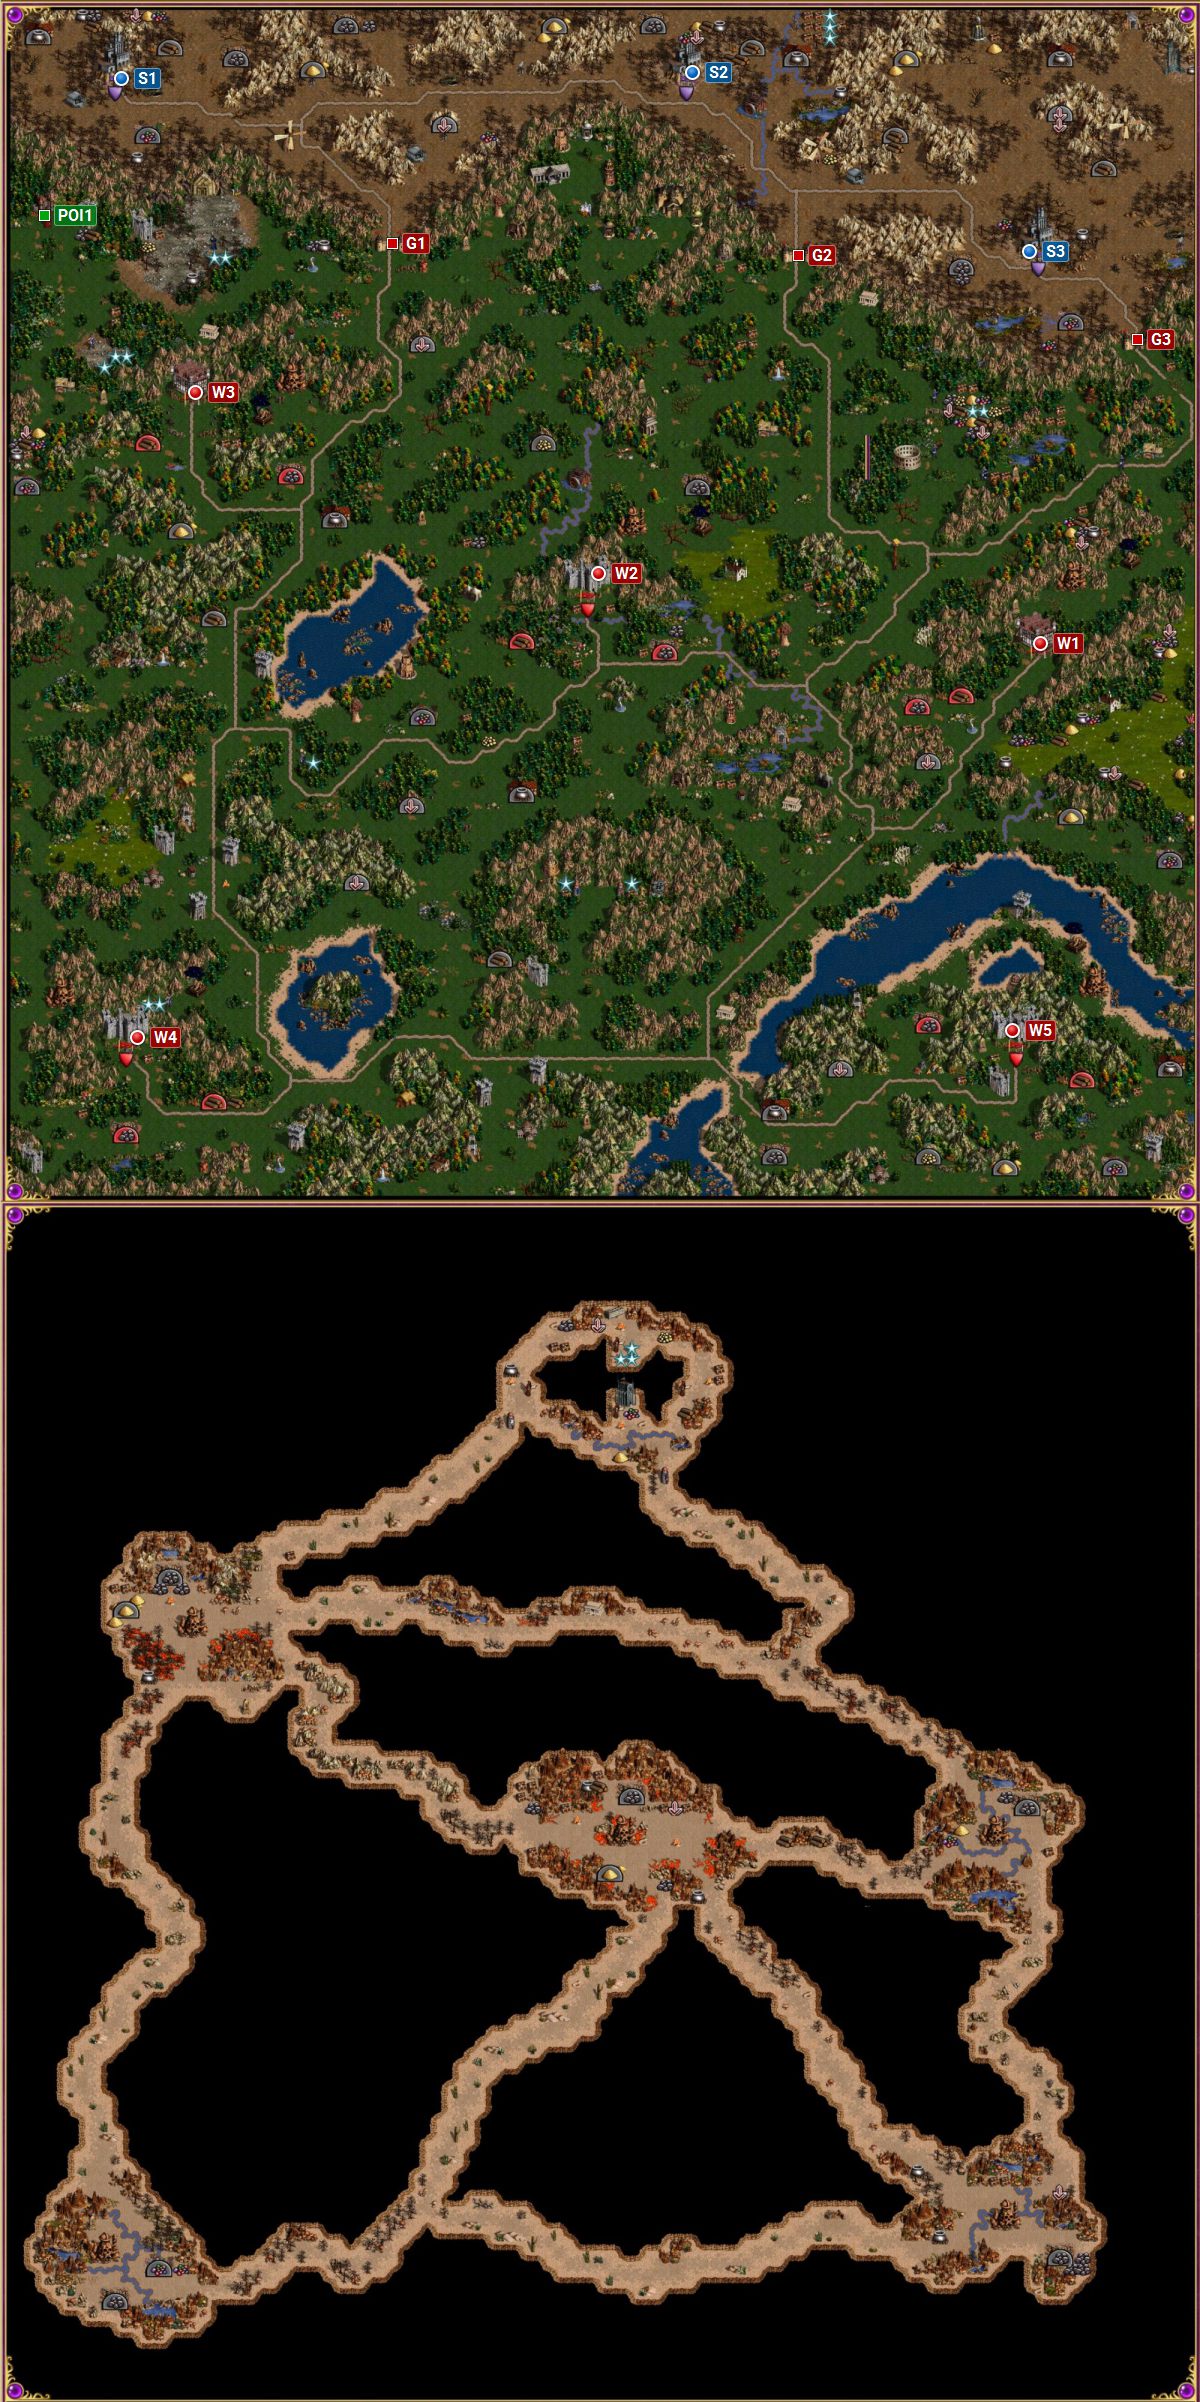
The enemy, as always, has a big lead in the number of cities (5 to 3), and to make things worse, the map this mission takes place on is really large. That is precisely why it's beneficial to play really aggressively here and why I recommended to take Ghost Dragons as your starting bonus. The Dragons will be given to Vokial, a hero located near your central Necropolis (point S2 on the map) - enter the city, build Tomb of Souls, recruit all the troops, leave the city and head along the road, leading South. After you reach the crossroads, continue along the Southern route. Additionally, remember to hire a hero in the middle Necropolis (S2) and use him to collect nearby treasures and flag mines.
After a short while you should arrive at a garrison (G2) - thanks to your Ghost Dragons you will rip the enemy to shreds. It's worth to leave a little group of units at the garrison, so that an enemy scout, with almost no army, won't be able to slip by onto your terrain - drop all the Walking Deads, which only slow your hero down, as well as a group of Skeletons (20 to 30 should suffice). With that the passage to your domain should be relatively safe, at least from weak enemy scouts. Now head South, until you reach the crossroads with an Observatory next to it.

In the meantime, while you use Vokial to attack the enemy, you should build up your own cities. Due to the fact, that you will soon conquer a city located right in the middle of the map, you should focus on developing the Necropolis which is furthest to the West (point S1 on the map), because it will be easier to operate with that - the other two Necropolises should be used, at least for now, to generate income.
Western Necropolis (S1) development during the first week:
- Day 1 - Tomb of Souls
- Day 2 - Estate
- Day 3 - Mage Guild lv.1
- Day 4 - Mausoleum
- Day 5 - Hall of Darkness
- Day 6 - Citadel
- Day 7 - Castle
Central Necropolis (S2), that in which Vokial started, development during the first week:
- Day 2 - Town Hall
- Day 3 - Blacksmith
- Day 4 - Marketplace
- Day 5 - Mage Guild lv. 1
- Day 6 - City Hall
- Day 7 - Estate
And now it's turn for the Eastern Necropolis (S3) development during the first week:
- Day 1 - Town Hall
- Day 2 - Blacksmith
- Day 3 - Marketplace
- Day 4 - Mage Guild lv. 1
- Day 5 - City Hall
- Day 6 - Tomb of Souls
- Day 7 - Estate
The reason for building creature dwellings in your "economic" cities is because you want to have a way of defending them in case an enemy decided to visit you - you must have the ability to recruit troops, but you shouldn't do that beforehand, because at the moment you won't need any units from those cities. Further development of your Necropolises should look like this:
- Build a Capitol in any of them - there's really no difference which one will be given that building, but it's easier to do in the Western Necropolis, as you already have a Castle there.
- Try to build the Dragon Vault before the end of the second week at your Western Necropolis.
- You don't have to build any upgraded dwellings at the moment - to the South of your Western Necropolis, behind a range of mountains, you can find a Hill Fort (point POI1 on the map), which will allow you to upgrade your units a lot cheaper than in the city. To get there, you will have to break through the garrison located South-East from your Western Necropolis (point G1 on the map) and as soon as you are on the other side, go West - at the edge of the map you will find your desired building.
- In your other Necropolises, try to build at least the Mausoleum, Hall of Darkness, Citadel and Castle before the end of the second week. By the end of the third week you must have a Dragon Vault build in both of them.

As soon as Vokial reaches the Observatory, visit the building to reveal the surrounding area - near the hero position, South-East from it, you will notice the first enemy city (Point W1 on the map). Go there to conquer the city - you will have to venture a little further South to be able to reach it. Pay attention to the crossroads, linking three different routes. After you've conquered the city, immediately hire an additional hero and use it to collect nearby treasures and flag mines and build Blacksmith, Mage Guild lv. 1 and Town Hall in that city.
Send Vokial to the crossroads mentioned above and order him to heat along the Western route. After he passes by an Ore Mine (which, obviously, you should flag), continue along the road leading North, where you will find the second, more developed enemy city (point W2 on the map), which you must conquer. This city will be the source of Vokial's army in the future - you must build it up as fast as possible.
After capturing the second enemy city, send Vokial (and before that hire any troops at the Castle you've just conquered) North-West - this time not along the route, but through a "shortcut" (you will pass by a Guard Tent). Hire a hero in the newly acquired city and build Citadel, Castle, Stables and Training Grounds in there as well - try to construct those buildings before the end of the second week. If you have enough time, build Upg. Archer's Tower and Upg. Barracks as well.

After marching for a round-two, you should arrive at the Alchemist Lab (Mercury "mine") - from there head West and continue along the road to stumble upon the third enemy city (point W3 on the map). If you managed to capture those three cities before the end of the second week, the rest of the mission is going to be a lot easier.
At the beginning of the third week, recruit all the units at the second Castle you've captured - try to recruit Cavaliers, Swordsmen (or Crusaders, if you upgraded Barracks), Archers (or Marksmen) and Griffons (if you are able to, recruit Monks and Pikemen as well). Transfer those troops to a new, fresh hero - his / her only task will be to eliminate any heroes wandering in the area. Afterwards, recruit as many units as you can in your Western Necropolis - if you are short on gold, wait for 2-3 rounds to collect enough of it and recruit all your units. Give them to one of your Necropolis heroes you've been given at the beginning of the mission and send them through the garrison located South-East from the Necropolis (point G1 on the map), and give the troops to Vokial. Remember to visit the Hill Fort before that, so that you can upgrade your units for cheap.
If you managed to do everything mentioned above, you should have a huge city advantage over your enemy (6 to 2), and an appropriately large army to be able to defeat any enemy attack - the enemy himself shouldn't have any significant troops at his disposal, because he lost 3 of his cities extremely fast. You now have to conquer two remaining enemy cities, located in the South-Western (point W4 on the map) and South-Eastern (Point W5 on the map) sections of the map to achieve victory. Additionally, remember to follow those rules:
- Try to keep a hero with Castle army near the "middle" Castle city at all times. The reason for that is simple - this hero will have access to the stables, which will increase his moving distance, allowing him to quickly reach to enemy heroes' movements on the map.
- Focus on building up the "middle" Castle - upgrade all the unit, build and upgrade the Portal of Glory. Don't forget about developing your Necropolises - you should mainly focus on the Western one so that you can have access to every upgraded unit as soon as possible, but you shouldn't forget about the remaining ones as well.
- Remember, that near each city you've captured from your enemy, there's an underground entrance, from which an enemy can easily surprise and attack you. To prevent it from happening, send a through each and every entrance and reveal the surrounding area around the entrance (in the underworld). It will allow you to spot the enemy approaching from there a lot earlier, allowing you to adjust your strategy accordingly. The underworld itself does not hold any powerful artifacts, treasure or anything of value, so there's no point in wasting time to examine it completely.
- Build up Mage's Guild in every town to the highest level - there's a chance than in one of them you will find a City Portal. This spell allows your hero to teleport to any allied city, in which there's no hero stationed. By having access to this spell you no longer will have to worry about enemies suddenly wanting to attack you - all you will have to do is to cast the spell and appear near the endangered city.
Finish the mission by attacking the last two enemy cities.

