Walkthrough - To the White Forest p. I HL2 Episode Two Guide
Last update: 11 May 2016
Go down the wagon and wait until Alyx opens it with the Gravity Gun. After that take the Gun from her. |  |
Go right towards the gate. Use the Gravity Gun to open it (LMB). |  |
Walk through that gate and head towards the portal. After a while you will experience an electromagnetic discharge. It will destroy the bridge (B) and open, previously blocked, way to the underground (A). Go there and remember to turn on the flashlight. |  |
In a tunnel go straight. You will see a hole. Jump in. There will be a fence and a pass blocked with a wooden board. Use the gravity Gun to remove it. Crouch and go through. |  |
Go straight. You will get to a pretty big room and see zombies fighting with antlions. Don't interfere. When there's only one of the sides left, use Gravity Gun and barrels to destroy it. Use RMB to grab a barrel. Aim and hit LMB to throw it at the enemy. |  |
After dealing with the enemy go out and crash the box next to a white building. There are useful items in it. Go to the door and use action key (default E), to open it. Go inside and wait for Alyx to check out the communicator. It will turn out it's broken and you will have to help her. All you have to do is to plug the cord (A) into the outlet (B). To do so, grab the cord (with Gravity Gun or simply press the action key) and move it towards the very right outlet (the only one that is free). When you go to the outlet close enough, the plug will fit in. |  |
After you do it, Alyx will get back to the communicator and make contact with her father. You will learn that you have to get to the rebels' camp. The conversation will be interrupted by soldiers. When that happens turn around and walk out the door. Turn right and you will see an entrance to the underground. |  |
Go inside (Don't miss the crate on your way). Then turn right and go down the way. Soon you will see that the exit is blocked. Fortunately you will be able to deal with it. Turn left and go to the trolley up ahead. |  |
Going up you will notice that the trolley is blocked behind the boards. Remove them with the Gravity Gun. The trolley will go down the rails and get rid of the obstacle. Remember to move away from the rails! |  |
Go down and head up the hill on the right (A), then get behind the fence (B). | 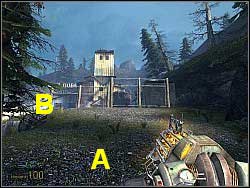 |
You'll get on a track-way. Unfortunately, besides you and Alyx there'll be someone else. Go between the wagons on the right and up the ladder (A). |  |
Then you should head right until you find a hole in the roof , which will be covered with a metal plate. Remove it with the Gravity Gun and jump inside. |  |
You will get to the control room. Get to the button and press it with an action key. |  |
Turn around and light up the floor. There you'll find a hatch blocked with a rusty iron bar. Pull it out. The hatch is now open so go under the building. Remember to collect the items from the crate when getting under the building. When you're there, go straight and then right towards the light. You'll find Alyx there. Unfortunately she'll get attacked by a Hunter and nearly killed. You will get hit too and you will pass out. When you come round there will be antlion by the Alyx. However, the Vort will show up. He'll kill the antlion and heal Alyx partially. |  |
Vort will tell you that he can't heal Alyx fully by himself and that is why he has to get help from his kin. They are in the mines. That will be your destination. You won't be able to get there together and that is why you'll have to find another way down. Go right and then straight to the end of the corridor. Remove any obstacles with the Gravity Gun(LMB). When you reach the end of the corridor, turn left. Again, go to the end of the corridor and turn left. You'll get to the room with an open roof. To the left there will be a lift. When you get closer you'll see that the lift is out of order. Inside you'll notice a crowbar (A) stuck between the cogwheels. Get rid of it (action key or Gravity Gun). The lift will move down. |  |
When you are down, the Vort will tell you that you're on your own now. Look for the door blocked with a white board and remove it. |  |
Go inside and head towards the red door. Open it and get on the lift. It goes up as long as you turn the orange valve. To turn it, just point at it and press the action key. |  |
Try to go as high as possible. Above the platform, you have to jump on, there are some goods (A). You can get them with the Gravity Gun. |  |