Void | Walkthrough Legend of Grimrock II Guide
Last update: 01 June 2016
Key points of Legend of Grimrock 2 - Void
20 - Puzzle/quest element
[12] - Item
Power Gem
Buried Treasure
I � To Test Chamber
II � To Castle Roof
II � Teleporter to Castle Nex
20 - Puzzle/quest element
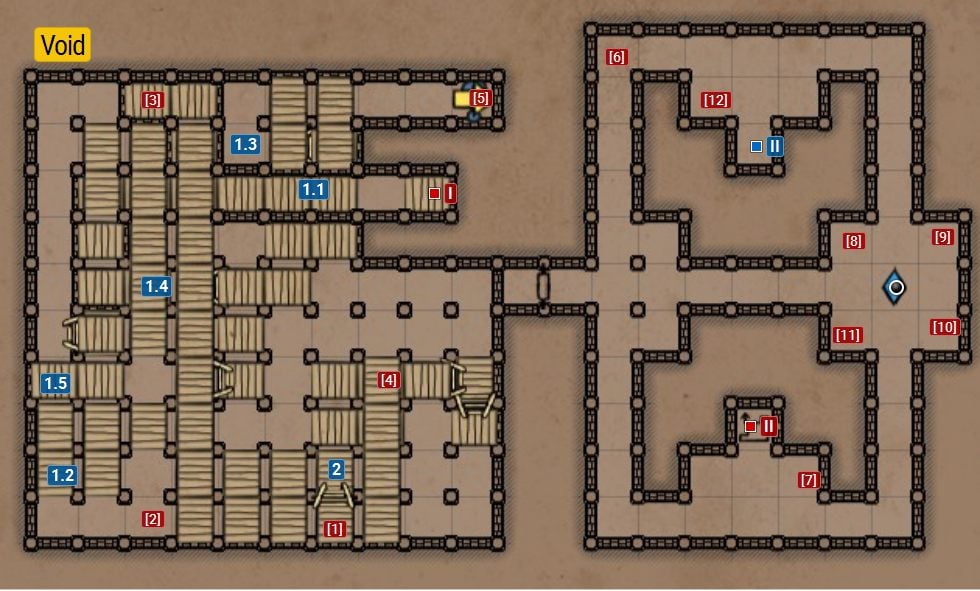
1.1 � The puzzle here consists in pressing two switches so that a bridge leading to the roof appears. One of the switches is located on the first level (1.1) and the second is located higher (1.3).
1.2 � A switch that activates a magical bridge (1.3) allowing you to access higher levels of the location.
1.3 � A magical bridge that appears after you press a switch (1.2) located on the first level.
1.4 � When you're on the third level, jump down here (to the left when looking at the map) to find the second switch (1.5).
1.5 � Switch that activates the main bridge. You have to jump down here from 1.4.
2 � Jump down here (towards the north) to land neat a chest.
[1] � Cannon ball x5 - on the ground floor.
[2] � Pellets - on the ground floor
[3] � Sack: Food x3 - on the level of the entrance to this location.
[4] � Frost Bomb x4, Fire Bomb x4
[5] � Sack: Blooddrop Cap x4, Etherweeed x7, Falconskyre x2
[6] � Crossbow Quarrel x3
[7] � Greater Energy Potion
[8] � Poison bomb x3, Sickle Sword
[9] � Potion of Ressurection x2
[10] � Scaled Cloak
[11] � Pellets
[12] � Cannon ball x5
Void is last but one floor of the Castle. You will encounter here more of the enemies such as the slimes, spiders or the suicide fire elementals who appear only after pressing particular buttons. The quest is rather simple. Go on the ladder to the higher floor of levitating catwalks and press a blue button on the wall (1.2). This will cause a little bridge to appear. Go higher through it, on the third floor. Stand in the spot (1.4) and from here, jump down. By doing that, you will gain access to the next button (1.5) which opens a big bridge over your head. It will lead you to the roof of the Castle. To get on the bridge, simply climb to the very top of the ladder. Prepare yourself before going up, heal yourself with a crystal of life, as on the roof, a boss awaits you.

