Test Chamber | Walkthrough Legend of Grimrock II Guide
Last update: 01 June 2016
Key points of Legend of Grimrock 2 - Test Chamber
1 - Puzzle 2 element
1 - Puzzle 2 element
20 - Puzzle/quest element
[12] - Item
Healing Crystal
Power Gem
Buried Treasure
I � To Twisted Passage
II � To Void
20 - Puzzle/quest element
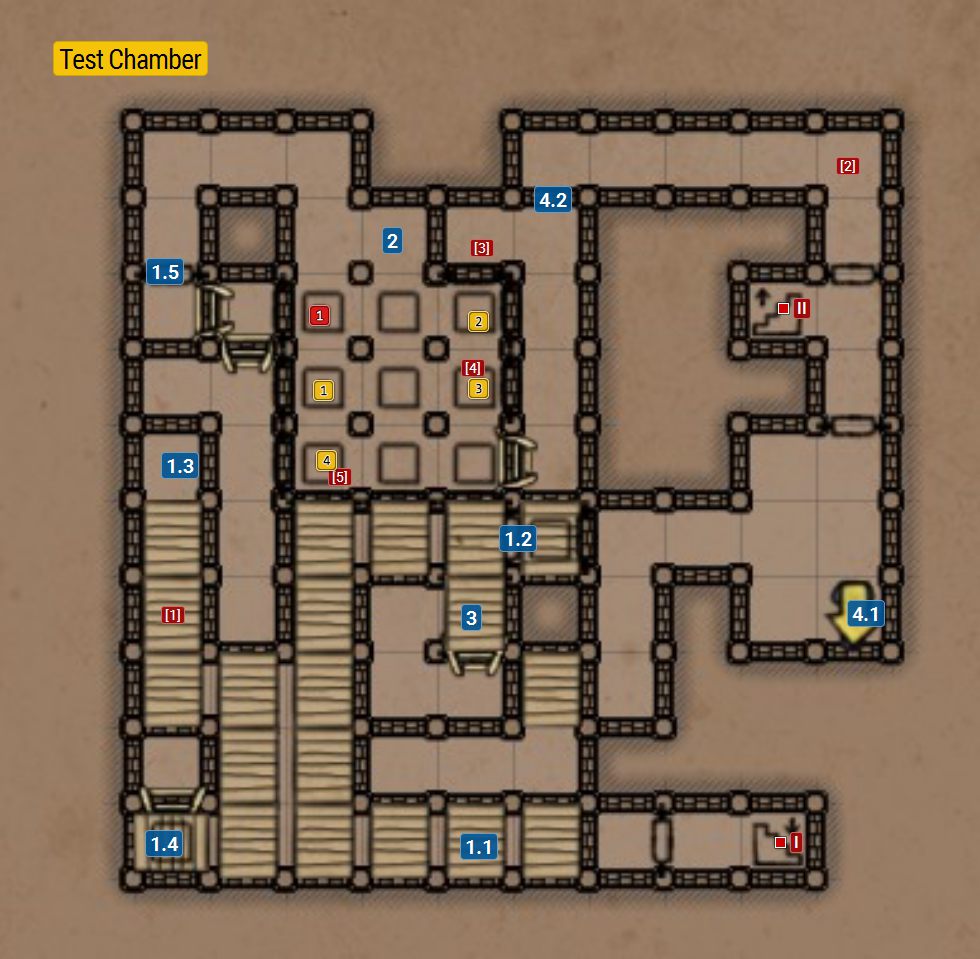
1.1 � A puzzle in which you have to press down two plates (1.2 and 1.4), to open the passage leading up.
1.2 � Throw something through the gate onto the plate below and the magic floor will disappear (1.3).
1.3 � Magic floor - it disappears after you throw something onto the plate (1.2).
1.4 � After you complete the steps described earlier, jump down in the place where the magic floor was (1.3) and after defeating the monster, place something on the plate so that the door (1.5) would open.
1.5 � The door will open after pressing down two plates located below (1.2 and 1.4).
2 � You stand before a lot of plates with portals on them. First, you have to place something on a few of them (yellow squares 1-4. There will already be something on 3 and 4). Next, move back to the switch and press it - a missile will fly through the portals. Now you have to quickly place something on another plate (red square "1") before the missile disappears. If you do it right, the missile will start to circle around the portals (rest of descripction you can find below the map).
3 � After you complete the portal puzzle, a disappearing bridge will activate. You have to make i across the bridge before it's no longer there.
4.1 � The lever opening the passage to the secret chamber (4.2).
4.2 � The wall opened with the lever 4.1
[1] � Potion of Dexterity, located on a high shelf. You can obtain it when solving the puzzle (3), by jumping on to the shelf from the disappearing bridge.
[2] � Potion of Ressurection x2
[3] � Cannon ball x3
[4] � Venomfang Pick
[5] � Pellets
Test Chamber is placed on the third floor of the Castle. Firstly, you will have to open the crates on the north side of the map (1.5). It is rather easy, you only need to know where the first pressure plate is. On the first floor, find the area where you can't go any further because of the crates. Then, take any of your items and drop it behind the crates to make the magical crate disappear. After that, jump to the lower level and put another item on the crate to open the door. You will find a riddle inside. There will be nine plates with portals changing the directions. Pressing each plate causes turning the portal on. You will have to place items on it in a particular way (yellow squares 1-4 and, after releasing a projectile, red 1) which will make the projectile go around through the portals (the map shows the solution). In the end you will have to remove one item (yellow 1) in order to release a beam which will go through the hole, enabling you a further passage. Be careful, so that the beam won't hit you and to stand by the door which this beam opens.

