Tomb of Rites | Walkthrough Legend of Grimrock II Guide
Last update: 01 June 2016
Key points of Legend of Grimrock 2 - Tomb of Rites
1 - Puzzle 2.1 element
1 - Puzzle 1 element
20 - Puzzle/quest element
[12] - Item
Healing Crystal
Power Gem
Buried Treasure
I � To Pyramid of Umas.
I � A hole leading to the lower level (onto the Pyramid of Umas map (11.1)).
I � A hole leading to the lower level (onto the map: Pyramid of Umas (10.1)).
I � A hole leading to the lower level (onto the map: Pyramid of Umas (12)).
II � Entrance onto the last level.
20 - Puzzle/quest element
[1] � Chest: Sickle Sword
[2] � Food
[3] � Scroll
[4] � Poison Bomb x2
[5] � Food x5, Potion of Vitality
[6] � Blooddrop Cap
[7] � Healing Potion
[8] � Cannon ball x4
[9] � Torch - you can use it in the puzzle 4.1.
[10] � Pearl Shield
[11] � Pellets
[12] � Food
[13] � Pellets
[14] � Blackmoss
[15] � Archmage's Scapular's
[16] � Scroll
[17] � Lock Picks, Food
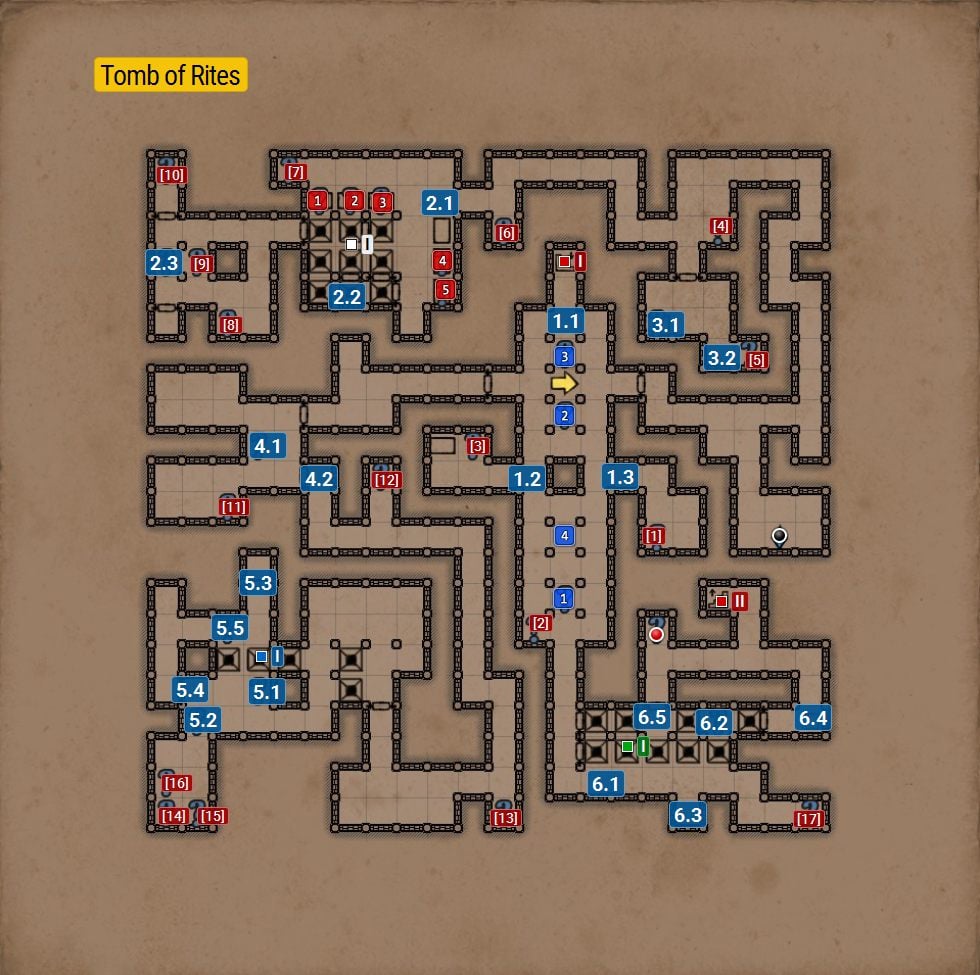
1.1 � The first puzzle on this level. You have to put out four lights by stepping onto appropriate fields in the right order. When you step onto the correct field, you will here a characteristic sound. If you fail to do so, you have to start again. The correct order is shown by the blue squares 1-4.
When you're done, walls 1.2 and 1.3 will move - the second one is a secret.
1.2 � Entrance to a chamber. Unlocks after completing step 1.1.
1.3 � Secret - the wall will move after completing 1.1.
2.1 � To open the door leading to the Tomb Key (located on the other side), you have to place whatever items on the approriate tables.
Place items on the tables marked with red squares 1-5. When you step onto the bridges, pick up the item left on the table marked no. 2 and the way to a lever (2.2), which opens the door, will unlock.
2.2 � Lever that opens the door.
2.3 � Tomb Key - save it, as you will need it in the next level.
3.1 � Place Mirror Gauntlet on the sarcophagus and the passage to a secret will open (3.2).
3.2 � Entrance to a secret room. Opened by placing Mirror Gauntlet on the sarcophagus (3.1).
4.1 � A puzzle in which you have to light three torches on the left side (sun) and put out all the torches on the right side (moon). On the right side, there's only one torch so you can just move it to the left side. For the third torchm you have to go to the location with the puzzle marked 2.1, where you can find it on a wall (item: [9]). When three torchest are lit on the left side, the door (4.2) will open
4.2 � The door that you can open by solving the puzzle.
5.1 � A puzzle in which you first have to press the switch (5.2) and then the fire should be directed at the door (5.3). Wait for the pause between missiles and use Serpent Staff ability on the door. The door should open and you should move to the side, allowing the missile to fly inside. When you do that, the gate (5.4) will open and you will be able to access the Tomb Key (5.5).
5.2 � A switch that directs the missile at the door.
5.3 � The door that you have to open with Serpent Staff so that the missiles would fly through them.
5.4 � The gate that will open after solving the puzzle (5.1).
5.5 � Tomb Key - save it for the next level.
6.1 � The kast puzzle on this level. You have to wait until the teleporter stops on the field marked (6.2) and enter your portal 6.3. You should be teleported onto field 6.2. Turn right and use Serpent Staff (the one which you've used open the entrance to the Piramid). THe gate should open - shoot at it immediately so that the missile would land on the bridge (6.4). The door to Power Gem will open. Wait until the portal transports you back to starting position and when the moving teleporter is on field 6.5, enter the portal and go to get the Power Gem, and then straight to the next level.
6.2 � The field from which you can open the door on the right and late the gate leading to the Power Gem, by shooting something onto the plate behind the door.
6.3 � The portal which teleports you to the place where the second portal is. Enter it when it's on field 6.2.
6.4 � The plate that you need to press down so that the gate would open (6.5), allowing you to access the Power Gem. Shoot at the door when it's open.
6.5 � After completing the previous tasks, the gate should be open so wait until the moving portal is on this field. Enter your portal (6.3) and go get the Power Gem.
Tomb of Rites is the last level above the Pyramids. It is a bit smaller from the previous one, but by jumping through the holes you can get to the lower level (Pyramids map). You can access the closed areas there. You will encounter the same types of enemies as they were on the lower level. There will be simply more of them. Your quest will be finding two Tomb Keys (2.3) and (5.5), which will be needed later, on the upper floor. You can put Mirror Gauntlets here, on one of the sarcophagus. (3.1) to open a passage to the secret with a piece of pie which is the only item that fully replenishes your need for eating.

