Mission 3 - The Quarry | The Beta campaign Grey Goo Guide
Last update: 11 May 2016
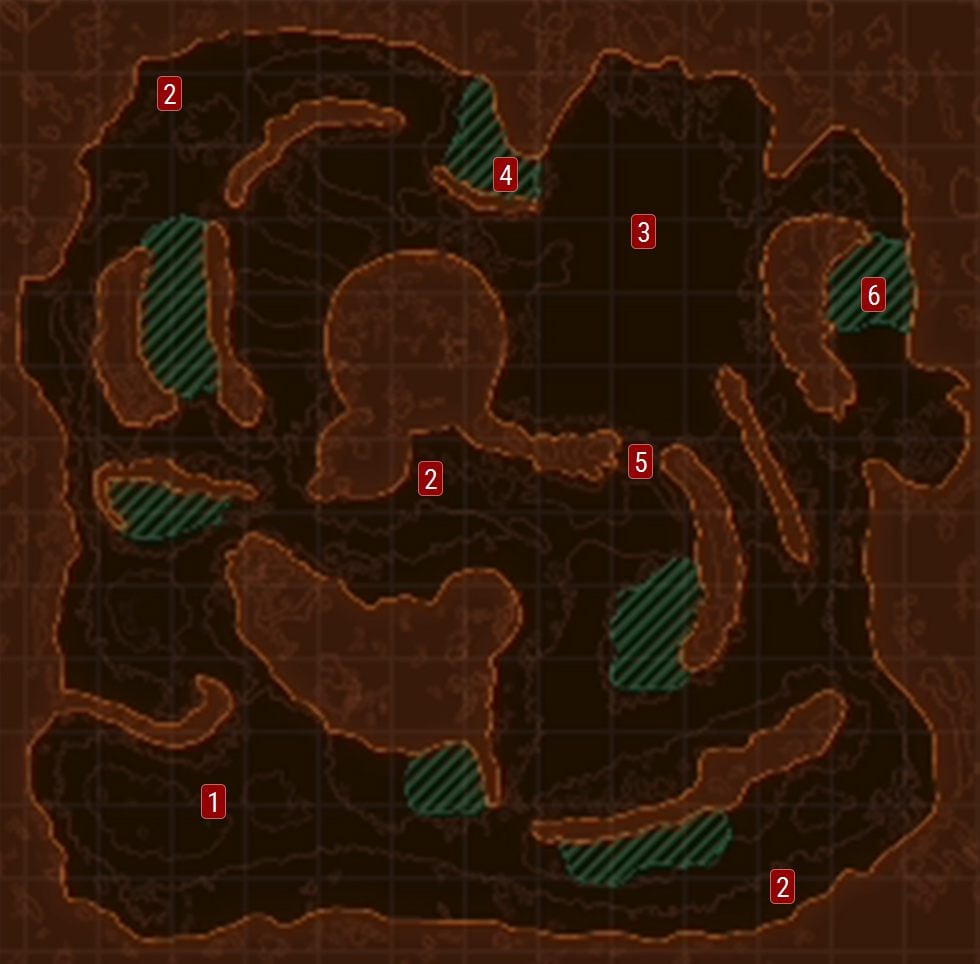
1 � Starting position.
2 � Mining platform.
3 � The enemy base.
4 � The best route to the enemy base.
5 � Heap of rubble.
6 � The Eastern approach to the enemy base.
Primary objectives:
- Collect 45 Catalyst crates.
Secondary objectives:
- Prevent the enemy from gathering 25000 units of resources.
- Destroy the enemy base (this way, you also complete the primary objective).
This is an exceptionally easy mission. You start in the South-Western part of the map [1]. Additionally, you have three poorly guarded mining posts for Catalyst [2]. After you add three mining sources to these, you will have a total of five mining outposts, where you can mine for resources. Try to start exploiting them all, as soon as possible. Thanks to this, not only will you complete the primary objective of the mission, but also you will have a surplus of resources. Additionally, some deposits can be doubly exploited, which only makes the end of the mission more imminent.

Every several minutes, there will be an earthquake, which damages the majority of buildings As soon as this happens, have them all repaired. The magnitude of the earthquakes varies so, the buildings that you do not repair, may "suddenly" be destroyed, even though they have been damaged to a slight extent.
There are two ways to complete the mission. The easiest one requires building mines, in marked areas, and fortifying them. The enemy attacks are weak, but they occur on a regular basis, and of varying intensity. Still, it suffices to build several turrets to protect all Depot Hub, and man them with Predators, and to remember to fix them regularly. The main base will be attacked sporadically, with weak forces and, thanks to the resource income, defending it will only be a formality. It should not take more than half an hour to send all of the crates. You can kill the time with air raids on the enemy refineries, which allows you to complete the secondary objective. If you start building your mines at the beginning of the mission, and you will be regularly dispatching crates, the enemy will not manage to gather the required amount of resources.
The second way consists in destroying the enemy base [3] and it is much more difficult than defending your base. First of all, forget air raids. The enemy's AA defenses are too strong and destroys all of your aircraft, before thy manage to cause any damage. Ground attack is going to be more successful, but only if it is launched properly. You can get into the enemy base from the West or from the South. All of the access routes are protected with walls, artillery and turrets, as well as single units, concealed in bushes. This goes for all of the bushes on the map so, you should progress with care. You can try to cut through the enemy defenses, but you are going to need lots of units and time. It is highly possible that the mission will end, before you manage to do that. To get inside, you to do that in a certain way.
There are several ways to do that, but the easiest one is to enter the enemy base from the West [4]. Fly up there with Stratos and position it outside of the reach of the turrets. You will note that the wall is only blocking off the lower access, whereas the upper one is free. There are several enemy units in the bushes there, but there are few of them.

To launch the attack, you require lots of Predators, Avalanches and Hellraids, as well as several Raptors with stealth. Deploy your armies Westwards of the bushes and enter them with scouts. Have artillery destroy all of the enemy units hidden there. If there is any approaching too close to your main forces, destroy it with Predators. After you have cleared the bushes, enter them and destroy the nearest enemy units.

Direct Avalanches and Hellraids against the enemy turrets. Have Predators cover them. Next to the Core there are Anti-Heavy Sentinels and Artillery Sentinels, several units of each type. Destroy them with mass fire and deal with the Core. It is devoid of protection from the North and from the East, it is protected by several turrets only. Therefore, with the right deployment, none of your units will be damaged. Destroying the building deactivates the remaining installations of the base. From now on, the only threat are the enemy units that remain active. Eliminate them before you take to the enemy's key structures.
![You can also infiltrate the enemy base from the South, after you remove the debris [5], or from the east, which requires you to keep to the edge of the map and enter the back of the enemy base carefully [6] - Mission 3 - The Quarry - The Beta campaign - Grey Goo - Game Guide and Walkthrough](/greygoo/gfx/word/525674073.jpg)
You can also infiltrate the enemy base from the South, after you remove the debris [5], or from the east, which requires you to keep to the edge of the map and enter the back of the enemy base carefully [6]. The first method boils down to launching a direct attack and its only upside is that you walk around the artillery and walls. The second method, on the other hand, requires you to fight your way through the enemy artillery, and allows you to walk around the enemy turrets.

