Level 6: Lost Island - part 2 Ghostbusters Guide
Last update: 11 May 2016
 |  |
Eventually you should be able to reach a large chamber filled with black slime. Your objective is to get to the other side of the room and this can be accomplished by staying close to the left wall. Stop once you're close to a wooden bridge and choose the PKE meter from your inventory. Scan one of the objects to find weird markings.
 |  |
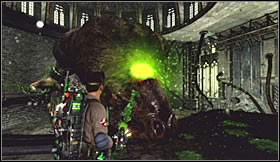
The object you've just scanned must be lowered and this of course means using the capture stream of your Proton Gun. Don't aim directly at the metal object, but at a small mechanism located next to it. Notice that new enemies have arrived in the meantime and a new Black Slime Monster will be among them. Take a scan of this beast before the fight starts.
 |  |
The new monster you've just encountered is very similar to the golems you've fought before. The good news is that it's less resistant, because it'll die soon after you start using your Slime Gun. Just make sure that you don't let it get too close and you'll be fine. You can now start shooting at smaller creatures. Don't forget to close the portals, so they won't keep appearing endlessly. Locate a new tunnel entrance when it's safe.
 |  |
Start running forward. You won't be making any unwanted stops here, because you'll encounter only one small group of spiders along the way. Once the spiders have been eliminated explore the corridor to your right and use the PKE meter to find the fifth artifact - Ghostbusters DVD.
 |  |
Continue exploring the sewers. Thankfully you won't have to worry about getting lost, because there's going to be only one passageway leading to your current destination. You'll encounter several groups of monsters along the way, but killing them is going to be easy. Get to a larger area and approach a nearby sarcophagus to rescue one of your allies.
 |  |
Use the stairs to reach an upper balcony and find a passageway leading to the next big room. Remain on the ground floor and keep heading forward. Turn left once you've gone past the first large tank and use your PKE meter to find the last sixth artifact - Singing Slime.
 |  |
You may proceed to the upper balconies. Find a new portal located on a nearby wall and approach it. Obviously you'll have to be ready to defend yourself against new monsters, including flying ghosts. I would recommend closing all the portals before you engage phantoms in an open combat. Once it's safe follow your colleague to the next room of the facility.
 |  |
Start off by opening a second sarcophagus which is going to be located to your right. You can continue exploring the area once a new member has been added to your team. Just as before, focus on closing the portals. Prevent the beasts from surrounding you and it shouldn't be too difficult to win. You'll only have to watch out while going against a large slime monster.
 |  |
Proceed towards the elevator when you're ready to move on and use it to reach the upper balconies. You must now choose a narrow passageway leading towards the stairs and you'll end up standing inside a chamber with a huge machine. Approach the round object and scan it with your PKE meter.
 |  |
Solving this riddle is going to be easy. Notice three yellow spheres moving in two directions. Stop your character near the lowest point of the first sphere. You'll have to destroy this object by attaching a rope to it. Attach the other end of the rope to the ground. If you've done everything according to the plan the sphere will come crashing down. Repeat these actions with two other spheres, because one of these objects was already destroyed when you got here.
 |  |
Listen to a short conversation and notice that this chamber is being flooded with black slime. As a result you'll have to use the nearest staircase to get to an upper balcony. Wait for this entire room to be flooded and that's when the main boss of this level will appear. Obviously you should take a quick scan of the Imprisoned Juvenile Slor.
 |  |
The first phase of this battle is by far going to be the easier one. All you have to do here is to use your Slime Gun to destroy all floating eyeballs located near the creature. You'll then witness bright light and you'll also advance to the second phase.
 |  |
You'll now have to start running while you remain on the balcony. This will allow your colleagues to attack the beast without having to worry about it fighting back. Don't forget to dodge often by pressing a special key, however you can also be using pillars for cover. Eliminate new eyeballs whenever you see them on the balcony.
 |  |
Watch out for new stains on the ground and neutralize black slime if you have a free moment. You'll also be given a chance to inflict extra injuries to the boss, because the creature will lose balance from time to time. Aim for the glowing eye while using the Slime Gun. Keep repeating all these locations until the boss loses all health units.