
Crestholm Channels | Optional dungeons Final Fantasy XV Guide
Last update: 02 February 2017
Crestholm Channels is probably the most complex location in the entire game (aside from the secret dungeon described in the next chapter). There are multiple floors here, connected in weird ways and places. To make matters worse, the player has to locate and activate 4 control panels here - doing so unlocks the passage to the boss of the dungeon. Fortunately, with this chapter you should have no problems locating the mentioned switches. The recommended level for this dungeon is 50.
Location

Crestholm Channels can be found in the eastern part of the map, to the east of Hammerhead. The exact location can be seen on the above screenshot.
Enemies
Name | Hints |
Bussemand | Vulnerable to Greatswords, Machinery, Light and Fire, resistant to Lightning. |
Gelatin | Vulnerable to Lightning and Light, resistant to all other types of weapons, absorbs Fire and Ice. |
Yojimbo | Vulnerable to Polearms, Firearms, Lightning and Light, resistant to Fire. Capable of causing Instant Death to several characters at once. |
Nagarani | Vulnerable to Swords, Shields, Lightning and Light, resistant to Fire. |
Ereshkigal | Vulnerable to Swords, Shields, Fire and Light, resistant to Lightning. |
Black Flan | Vulnerable to Light, resistant to all other types of weapons and elements (aside from Royal Arms). |
Jormungand | Vulnerable to Swords, Daggers and Ice, resistant to Fire. |
All of the enemies you encounter here are vulnerable to Light - weapons imbued with that attribute are perfect for this dungeon. The boss is vulnerable to Swords and Daggers and the damage can be further enhanced by Ignis' Enchant.
Walkthrough
Once you're near the place shown on the screenshot at the beginning of this chapter, you have to look for a gap in the fence - it's located to the right of the control point. Use the stairs to get to the lower floor and use the ladder to get inside the dungeon. Your task here is to find four control panels, which, once activated, will unlock a passage to the boss of the dungeon.

Once inside the dungeon, head into the tunnel going to the right and climb the stairs near the wall on the left side. You should now be standing near the first of the four switches. Activate it, jump down, run a little forward, turn right and slide down the canal. The first real encounter awaits you here.

Once the encounter is over, run straight ahead (south), go upstairs and head along the wall. Run up along another stairs and turn into the passage on the left side (ignore the one going forward). You should reach a more spacious room now, with the second control panel inside of it. Activate the mechanism, get back into the corridor and follow the path.

Run downstairs and jump down into a small hole in the wall. Collect the item located on the other side and jump down into a narrow passage. Continue to the east through the tunnel. Once you're inside of a more spacious room, turn right, continue straight ahead and slide down a tunnel located on the left side (going north-east). Prepare yourself, as you will be facing Nagarani in the next room and you will start the encounter with your health reduced by the fall. The enemy doesn't differ from the Naga you've encounter in Glacial Grotto several chapters earlier - the enemy deals high damage and can cause Toad and Petrified statues. You can use Remedy to get rid of those effects or equip specific items to prevent it from affecting your character(s).
Once the encounter is over, run into the passage located to the north, turn left, run up the stairs and turn left again. Climb two more pairs of stairs until you reach another spacious room. Take out the enemies, climb the ladder leading to the tunnel, go to the other side of the said tunnel and climb another ladder. Continue along the narrow passage and get to the other side of the room by using the makeshift bridge. Go to the other side of the tunnel, jump down and climb another ladder (located in the northern part of the room).

Go through four pairs of stairs and you should reach another room. Climb up the ladder, go through another tunnel and climb another ladder located at the end of it. At the top of the second ladder there will be the third switch.

Activate it, go through the nearby passage and run along the tunnel. Continue forward once you reach the crossroads. Once railings appear on your right side, jump down and run into the second (middle) tunnel. Continue along it until you reach the fourth and the last switch. Activate it and get back to the tunnel you came from. Turn right at the end of it and run into the next tunnel (turning right again).

Run upstairs, jump down and run up another pair of stairs. Continue your march until you reach another crossing - take a turn to the left and continue until you reach the room with the third control panel. You now have to jump down - try to jump down to a level located directly below you and run into the tunnel. Jump down into the spacious room, run up the stairs located on the right side and go through the tunnel to reach another room. Jump down, turn right and slide down the tunnel to finally a room with the boss.
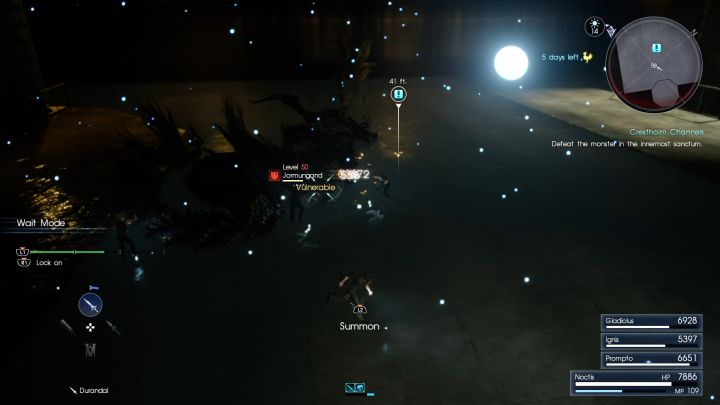
Jormungand is a fast enemy, capable of dealing high damage. It's best to use Daggers against the foe, as it will deal increased damage to the beast and will allow you to easily counter most of its attacks. Additionally, your damage output can be further increased with Ignis' Enchant ability - your attacks will be imbued with Ice, dealing extra damage. Furthermore, there's a chance that during the encounter one of the Astrals, Ramuh, will come to your aid. The intervention of the wizard should be enough to end the whole encounter.
Once the encounter ends, you will be able to explore the channels thoroughly or head to the optional Menace Beneath Crestholm Channels dungeon. In order to do so, head to the north-western edge of the arena, get down via the ladder and continue along the tunnel to reach the entrance.