
Daurell Caverns | Optional dungeons Final Fantasy XV Guide
Last update: 18 January 2017
Daurell Caverns is one of the smallest locations in the game when it comes to optional dungeons. Despite the fact that the recommended level to enter the dungeon is 28, there's no point in going there before you reach at least 40. 28th level corresponds to the level of the final boss of the dungeon (Iron Giant), but you will stumble upon significantly stronger foes (such as, for instance, the Necromancer) on your way there. There isn't a Royal Arm to collect here, although you can find an entrance to one of the high-level dungeons of the game (Menace).
Location


Daurell Caverns can be found in the southern part of Duscae. In order to get there, you have to drive through the tunnel in Schier Heights and find the stairs located near the road - the place on the map, as well as the stairs can be seen on the above screenshots. Run down the stairs, enter the route and run along it until you reach the entrance to the cave. This is the Daurel Caverns dungeon.
Enemies
Name | Tips |
Necromancer | Vulnerable to Greatswords, Shields, Ice and Light, resistant to Lightning; the enemy is capable of causing the Stop effect, as well as the Instant Death with his grip - to avoid the latter you can equip items preventing "Instant Death" and/or simply mash the buttons as fast as you can when the grab attack happens. |
Ronin | Vulnerable to Swords, Daggers, Lightning and Light, resistant to Fire. |
Hecteyes | Vulnerable to Polearms, Shields and Light; the enemy can attack from a distance by using laser-like beams and is capable of inflicting the Confused status. |
Iron Giant | Vulnerable to Light, Shields and Greatswords, resistant to Fire. |
Walkthrough

Enter the cave and run straight ahead, until you reach a fork. You can use both of the routes from here, but in this chapter we will be focusing on the route going to the right - take it and move through a narrow passage. There will be an enemy awaiting you on the other side - a Ronin. Those foes are fast and can deal significant damage, but there's a simple tactic that can be used when dealing with them - just wait for them to attack, counter them and launch your counteroffensive. Those enemies have small health pools - defeating them shouldn't be much of a problem.
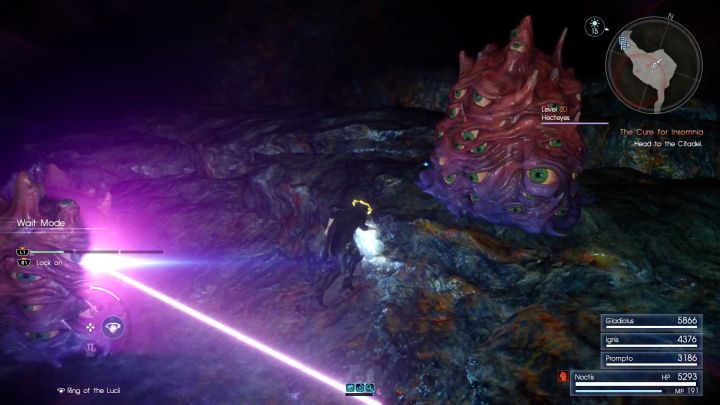
You should soon reach an ice deposit - replenish your ice reservoir and jump down from two stone ledges to reach the lower floor. An encounter with a group of Hecteyes and a pair of Ronins await you here. The enemies won't be able to deal any significant damage, but they are capable of inflicting the confused status. When that happens, your controls will be reversed and your companions will sometimes miss their attacks, slashing through the air. Take advantage of their weaknesses (listed in the table at the beginning of this chapter), take them out as quickly as possible and then focus on the pair of Ronins.

Afterwards, continue with your march along a puddle filled with toxic water - entering this reservoir will inflict the "poison" effect on your character, which is why you should avoid any contact with it. You should soon reach a more open space, with routes leading to both left and right. However, before you go anywhere you should jump on top of a small island located directly in front of you. There's a Moogle Charm located there - this item increases the EXP gain of a character wearing it by 20%.

After collecting the Moogle Charm turn right and run to the end of the corridor (ignore the passage on the left side). You can find a fishing spot here. Now, turn around and go to the passage you've just ignored. One of the most dangerous enemies - a Necromancer - awaits you here. The enemy isn't a threat because of its high damage output, but because of its special abilities. An energy beam can that can turn a character into stone, a poison cloud capable of causing the confused effect and the deathly grip. The last attack will give you a few seconds to react, forcing you to press a button as quickly as possible. If you fail, the attack will cause an Instant Death, requiring you to use a Phoenix Down. You should be prepared for that attack and be ready to react, or equip and item that makes a character invulnerable to the Instant Death effect.

Once you've dealt with the enemies, continue with your march until you reach an open area. Another encounter - with two Necromancers and two Ronins - await you here. Focus your attention on the Ronins to eliminate them quickly and then take out the undead. Once you're done, continue your journey to reach another fork. Start by going right, take out the three Ronins that should appear here and collect the Oracle Ascension Coin located at the end of the corridor.

Get back to the fork, turn right and continue walking straight ahead. You should soon reach a large reservoir of toxic water - you won't be able to bypass it, so just hop into the water to initiate an encounter with a group of Hecteyes, Ronins and a Necromancer. Start by eliminating Hecteyes, then take out Ronins and finish the encounter with the undead foe. Jump on top of the stone ledge and continue the march until you reach scaffolding.

Run to the end of the scaffolding and lower the ladder - this will allow you to get back to this place from the lower ground. Get down via the ladder and head north, until you reach another pool of toxic water. You have to jump into it to initiate another encounter, this time with Hecteyes and a Necromancer. Eliminate the enemies and continue the march - you should soon reach the fork where the Moogle Charm was located. Now get back to the place where you've lowered the ladder.

Climb the ladder, move a little forward and cross to the other side through a narrow passage. Continue your march, collecting items along the way, until you reach the end of the tunnel. Jump down to initiate a final battle, during which you will face an Iron Giant, a Necromancer, a Ronin and a group of Hecteyes. The Iron Giant isn't much of a threat, but defeating him will take some time, as the foe has a lot of health points - this is why you should focus your attention on the Necromancer, Ronin and Hecteyes.

Before you deal the finishing blow, look around the area - there's a point which you can perform a blade-warp to above your head. This maneuver is required if you want to reach the secret doors leading to the high-level Menace Sleeps in Daurell dungeon. The warp point is active only during combat - if you won't be able to reach it before the final encounter ends, you will need to replay the whole dungeon, as the point becomes inactive when out of combat. Wait for a single enemy to remain on the battlefield and perform a blade-warp to the warp point. Wait for your allies to take out the enemy and go through a narrow passage to reach an area with the secret doors. More on that topic can be found in the "Menace Beneath Lucis" chapter.
Afterwards, you can get back to the beginning of the dungeon and head left on the first fork - there will be several Necromancers and Hecteyes located there. Eliminating them is not required to complete the dungeon, as killing the Iron Giant is your main objective here. You can now leave the dungeon, as the location has been cleared.