

Chapter 13 - Redemption | Main storyline Final Fantasy XV Guide
Last update: 22 December 2016
Key points of Final Fantasy XV - Chapter 13
Items and treasures
Important items/places
Accessories
Important items/places
1 � Security Card
2 � Terminal/Switch
3 � Terminal/Switch
4 � Terminal/Switch
5 � Elevator Card
6 � Panel B Keycard
7 � Terminal/Switch
Accessories
1 � Tempered Shield
2 � Chobham Armor
3 � Bulletproof Suit
Items and treasures
1 � Elixir
2 � Flesh Fortifier
3 � Hi-Elixir
4 � Ether
5 � Megaelixir
6 � Flesh Fortifier
7 � Hi-Elixir
8 � Muscle Stimulant
9 � Reflex Enhancer
10 � Flesh Fortifier
11 � Muscle Stimulant
12 � H-Elixir
13 � Mega Elixir
14 � Mega Potion
15 � Elixir
16 � Hi-Elixir
17 � Reflex Enhancer
18 � Mega Elixir
19 � Muscle Stimulant
20 � Rare Coin
21 � Beautiful Bottle
22 � Rare Coin
23 � Laser Sensor
24 � Chrome Bit
25 � Old Book
26 � Mythril Shaft
27 � Potion
28 � Shattered Timepiece
29 � Debased Banknote
30 � Mythril Shaft
31 � Magnetron
32 � Laser Sensor
33 � Dynamo
34 � Chrome Bit
35 � Imperial Medal of Honor
36 � Magitek Booster
37 � Chrome Bit
38 � Metal Scrap
39 � Gralean Medal of Distinction
40 � Mythril Shaft
41 � Panel C Keycard
42 � Broken Harmonica
43 � Muscle Stimulant
44 � Mythril Shaft
45 � Muscle Stimulant
46 � Mega Potion
47 � Hydraulic Cylinder
48 � Gralean Medal of Distinction
49 � Mega Phoenix
50 � Magitek Booster
51 � Chrome Bit
52 � Megaelixir
53 � Flesh Fortifier
54 � Hi-Elixir
55 � Muscle Stimulant
56 � Muscle Stimulant
57 � Megaelixir
58 � Imperial Medal of Honor
59 � Reflex Enhancer
60 � Hi-Elixir
61 � Muscle stimulant & Hi-Potion
62 � Shattered Timepiece & Muscle Stimulant
63 � Flesh Fortifier
64 � Old Book
65 � Hi-Elixir
66 � Rare Coin
67 � Mega Phoenix
68 � Iron Shavings
69 � Debased Silverpiece
70 � Laser Sensor
71 � Debased Banknote
Noctis finally reaches the capital city of the kingdom. An immensely difficult passage awaits him, most of which he will travel alone. This is without a doubt the longest and for most players an arduous chapter in the entire game.
The Imperial Capital
Recommended level: 37
Client: -
Exp: 3000
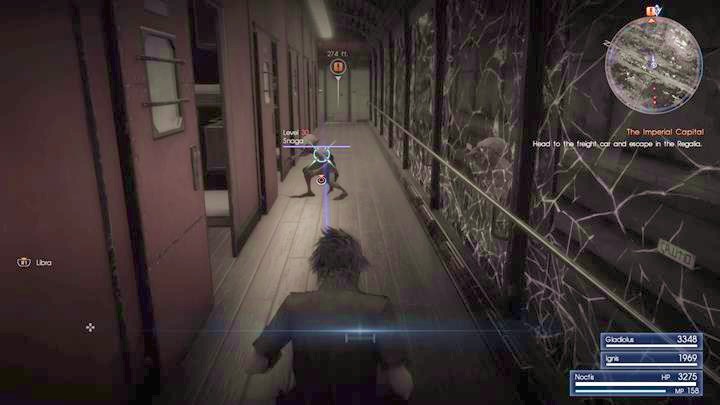
Once the daemons attack, Noctis will realize that he can't use his abilities and is unable to fight. Jump above the monsters and run to the back of the train until you reach Regalia.

Your task is to reach the city of Gralea before the gate is closed. You have two minutes for the task, which should be more than enough. Avoid contact with the wagons and dodge explosions and you should reach the destination before the time runs out. Once the team leaves Regalia, turn around and run to the back of the train. There's an Ascension Coin there - pick it up.

Run towards the marker on the map. The train car will crash down once you run under it, forcing Noctis to travel alone from now on. Daemons will appear again - get inside the train car and run straight ahead to reach the other side. Afterwards, run up the stairs where Noctis will finally decide to put on the Ring of Lucii.
A King's Struggle
Recommended level: 37
Client: -
Exp: 3000

It's time for a change in the combat mechanics. After donning the ring Noctis will finally be able to face the enemies, although the mechanic works entirely different than before. Available options are as follows:
- Death - a new basic attack, in which the prince accumulates energy for a few seconds. Afterwards, the enemy is completely destroyed and Noctis restores a huge portion of his health.
- Holy - it works as a typical block/dodge, but with some differences. Holding the button consumes MP, which is why you should do it only a moment before the enemy attack connects. Additionally, every successful dodge will restore some of Noctis' MP and will deal damage to the enemy.
- Alterna - Noctis charges an attack that instantly kills up to four enemies in a room. The attack is extremely powerful, although it uses almost all MP. More powerful enemies are immune to this effect.
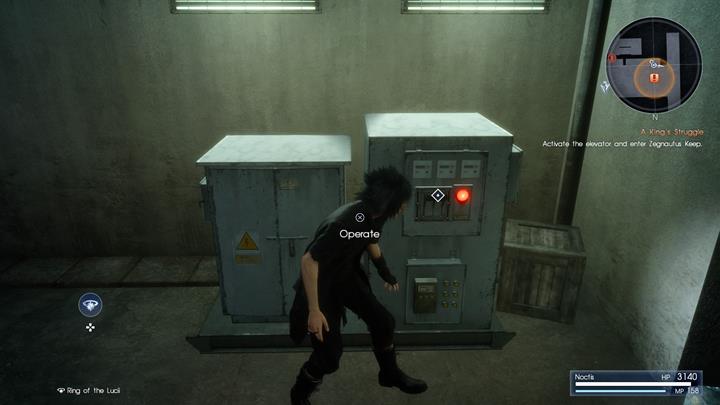
Train with your newly acquired abilities and run straight ahead until you reach a power switch. Flipping it will open a door at the beginning of the location. Use this passage to reach a new switch. Defeat a small group of enemies and head towards the next unlocked door. Repeat the process and head to the panel that unlocks the elevator. While traveling there you will stumble upon a small room with beds inside - you can rest there and save the game.
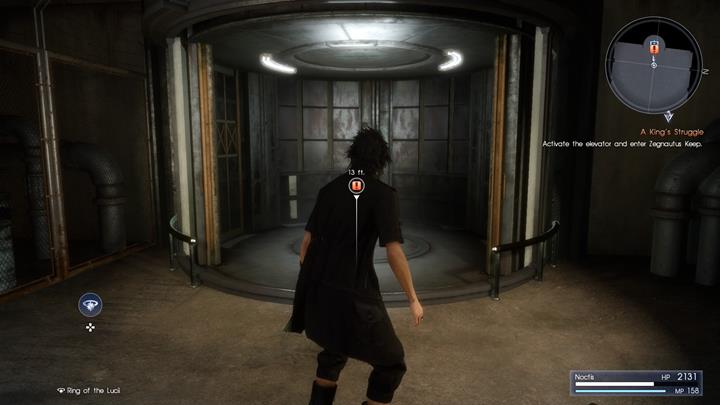
After a short walk you will reach an elevator from which a group of enemies will emerge. Defeat them and use the elevator to reach the upper floor. Continue moving straight ahead and you will stumble upon a Rogue Axeman, a peculiar type of enemy. This foe is powerful and fast - the game will suggest you to avoid any contact and simply sneak behind its back.
You can hide in small holes in the wall and avoid combat, picking the right moment to sneak behind the enemy back. However, an easier method is to simply use Alterna to eliminate enemies and freely explore the area. The room near the save room contains an access key - picking it up will cause another Axeman to appear. Take the enemy out, open the door and continue traveling towards the marker.

Ardyn will continue playing tricks on you and more enemies will appear. You will also reach a panel that will increase the clearance level of your access card. This will give you access to more areas. Sooner or later you will reach a floor where Prompto is located.
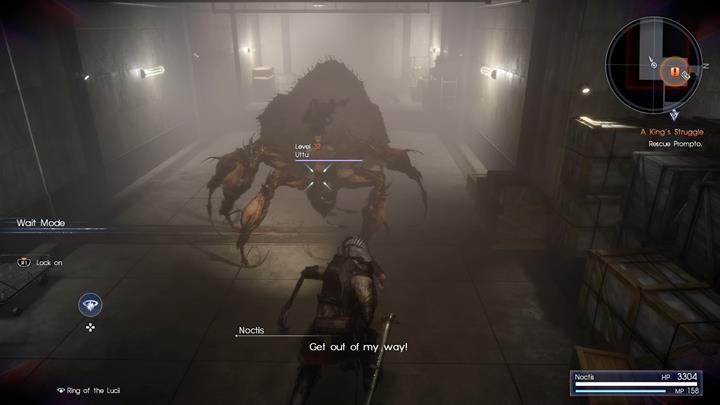
However, a new type of daemon - Uttu - guards the path to your teammate. Again, the best strategy for the encounter will be to use Alterna. After reaching your "companion" use the access card on a terminal to increase the clearance level to level three. Now you have to get back to the room with the elevator and use another path.

Once you're there, head straight ahead to reach a warehouse patrolled by a swarm of daemons. You have to travel towards markers on the map while avoiding contact/fighting with the enemies. Grab the elevator access key and head towards the elevator control panel... although you won't be able to use it.
Zegnautus Keep
Recommended level: 39
Client: -
Exp: 3000

Once you regain control over the character Noctis will pick up a sword - Sword of the Father. You will now be able to fight the daemons using the weapon. This increases your repertoire and should make encounters a lot easier. Continue through the corridors and you will reach a place filled with poisonous gas - it reduces Noctis' health points each second when the prince is in the gas. Additionally, some weaker enemies will spawn in the area. Reach the room with the control panel and cut off the gas.

A long walk awaits you now, until you reach a room where you can increase the clearance level of your access key to level four. Additionally, you can resupply your items at the vending machine-like object.

You will stumble upon more enemies along the way. A new and powerful enemy - Foras - will await you at the elevator. You can't defeat the enemy right now. Instead, wait for the elevator and quickly get inside once it's open. Head towards the marked location and restore power to the facility.
 ?
?
Restore the power to the facility.
Foras will appear again, attacking you when you're inside the corridors. Avoid contact with the enemy, run upstairs, defeat Uttu and head towards another generator. Restore the power again, head into another elevator and reach a room with a schematic of neighboring rooms.

Don't interact with the panels yet. Instead, head to the north-eastern room and pick up Panel B Key Card. It will unlock another room that you have to explore. Inside you will find Panel C Key Card and can be used to unlock more rooms. However, you can have only two access cards active at the same time. Panel A and C will allow you to reach a room with an item, while B and C unlocks passage to the exit.

You will stumble upon another object where you can resupply. Afterwards, you will reach a panel that will allow you to increase the clearance level of your card to level 5. You can now travel to the large elevator and activate it.

A group of enemies await you here. Once you've dealt with them, head to the neighboring room and upgrade the access card to level 6. Get back to the elevator where a large group of powerful enemies await you. You can use Alterna to deal with the Wraith.

Go through the unlocked door until you reach an electrical trap. Fight your way through multiple Shock Troopers and run towards the other side of the corridor. Ignis and Gladio will await you there.
Reunion and Recovery
Recommended level: 40
Client: -
Exp: 5000

Run to the room with the screens and press the button to unlock the passage. Run along it until you reach a cell with Prompto. The team will once again be complete. Head to the elevator and locate the device that disrupts Noctis' power. Destroy the generator and the prince will regain his power. You can finally access all of your weapons - equip the ones you like to fight with the most.
 ?
?
Time for a rematch with Foras - this time with the rest of the team and full equipment.
You have to fight your way to the room with multiple monitors, although it shouldn't be too difficult with your equipment and the rest of the party. Sooner or later you will stumble upon Foras again. The enemy isn't as dangerous as he was before, although you shouldn't underestimate him. The enemy is vulnerable to lightning, allowing you to quickly defeat him by using spells of that element. Continue your travel and use another elevator. A challenging boss fight awaits you once you enter the hangar.
Boss fight - Raven

One of the most powerful bosses in the game. Raven has a gigantic pool of health and is resistant to all types of attacks. His only weakness is Light, although Sword of the Father is effective as well. The boss is quite sluggish, although he has some sudden bursts of speed and can catch you by surprise. Most of his attacks are easy to read and dodge (like, for instance, when he rises his sword above his head - you can easily block and counter this attack).

However, when the enemy starts accumulating dark energy you have to quickly run away from him - after a short moment a burst of energy will damage everyone near Raven. Additionally, the enemy will try to immobilize you - when a pool of dark energy appears under Noctis you have to roll away from the spot. At the end of the encounter the enemy will start attacking with a powerful slash attack, followed by a shockwave (this will replace the standard, downward sword attack he performed up to this point). Prepare for a long battle, during which you won't be able to count on your teammates as they will be dying all the time.

After the encounter is over the hangar will be flooded with daemons. Unfortunately, the enemies will be respawning infinitely. Run towards a small elevator and use it to get to the lower floor, avoiding enemies along the way. You have to reach and get through a large gate before it gets closed. Jump above enemies and avoid their attacks as there's no time to fight them. A short travel awaits you behind the gate, but you will soon reach your destination. A long series of important cut-scenes and interactive scenes await you here. Afterwards, the longest chapter in the game will finally be over.