QUEST 1: Aiding the Outcasts - part 1 | Prologue F3: OA Guide
Last update: 11 May 2016
Received from: automatically during the exploration of Capitol Wasteland [Capitol Wasteland]
Solution: Make sure you've read the message and now you'll have to go to the area where it's being transmitted from. This new location is going to be automatically marked on your personal map and the easiest way to get there is to fast travel to Red Racer Factory. If you haven't discovered the factory yet, you should consider beginning your journey near Megaton. Go through the ruins when you get to your destination and locate a building with a small door [#2]. Open the door and confirm that you want to travel to Bailey's Crossroads Metro.
![[#2] - QUEST 1: Aiding the Outcasts - part 1 - Prologue - Fallout 3: Operation Anchorage - Game Guide and Walkthrough](/fallout3operationanchorage/gfx/word/574062078.jpg)
[#2]
MAP OF THE METRO TUNNELS:
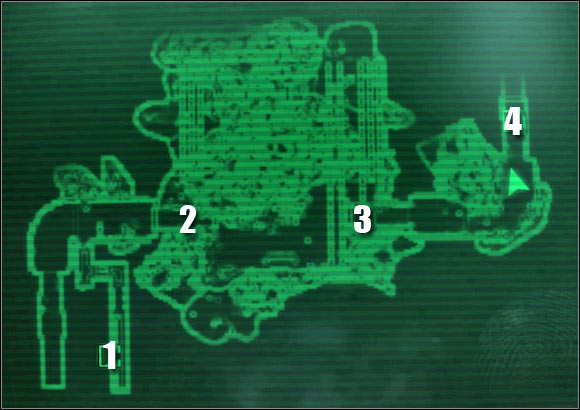
Map legend: 1 - entrance to the metro tunnels; 2 - area where you encounter two feral ghouls; 3 - tunnel leading to the exit; 4 - exit to: Bailey's Crossroads Station
Thankfully the metro tunnels aren't too large and you'll only encounter two monsters while trying to explore the area. Start off by moving north and you'll find a Nuka-Cola machine along the way. Turn east and eventually you'll get to a larger area which is being occupied by two feral ghouls [#3]. Killing the beasts shouldn't be a major problem, even if you're using a 10mm pistol taken from Vault 101.
![[#3] - QUEST 1: Aiding the Outcasts - part 1 - Prologue - Fallout 3: Operation Anchorage - Game Guide and Walkthrough](/fallout3operationanchorage/gfx/word/574062109.jpg)
[#3]
Kill all the beasts. You can now decide to spend some time exploring the metro tunnels or you can proceed to the eastern corridor, leading to the exit. If you decide to explore the tunnels, you should get to the north-western corner of the biggest room. You'll find a lot of useful items here, including drugs (jet and buffout), 5.56 ammo, Rad-X and a stimpak. Additionally - if you manage to get through the debris you'll get to a small stash with a BB gun. When you think you've spent enough time here, proceed to the eastern tunnel [#4] and after a short walk you'll get to a metal gate leading to Bailey's Crossroads Station.
![[#4] - QUEST 1: Aiding the Outcasts - part 1 - Prologue - Fallout 3: Operation Anchorage - Game Guide and Walkthrough](/fallout3operationanchorage/gfx/word/574062125.jpg)
[#4]
When you get to the surface you won't have to spend additional time trying to explore this area, because you'll be surrounded by invisible walls (debris) from almost all directions. Use the stairs to get to the upper level. Notice a few outcasts in front of you. They will be fighting centaurs and supermutants as we speak [#5] and frankly you won't have to do a thing to help them. The only exception is when you're already playing as a more advanced character and you want to gain additional experience points. Otherwise remain in the back and wait for this battle to end. You can now spend some time looting supermutant bodies and you'll gain possession of a few hunting rifles, as well as .32 calliber rounds.
![[#5] - QUEST 1: Aiding the Outcasts - part 1 - Prologue - Fallout 3: Operation Anchorage - Game Guide and Walkthrough](/fallout3operationanchorage/gfx/word/574062140.jpg)
[#5]
Like I've already said, ignore your surroundings and focus only on getting to your current destination. Start off by moving south-west and eventually you'll get to the outcasts. You should now begin following them. Each time a new battle has started move to the back and allow the outcasts to deal with hostile units. This is especially important when you get to a much larger area [#6], because some of the supermutants are going to be using miniguns. Obviously you should be on a look out for items of great value. You should also check bodies of fallen outcasts, because they'll be wearing power armors and they'll be using energy weapons, including laser pistols. Be careful not to fall down in the big room, because there's a lot of radiation around the barrels.
![[#6] - QUEST 1: Aiding the Outcasts - part 1 - Prologue - Fallout 3: Operation Anchorage - Game Guide and Walkthrough](/fallout3operationanchorage/gfx/word/574062156.jpg)
[#6]
There are also going to be smaller gifts waiting for you in the surrounding area, including first aid posts on the walls. Eventually you'll have to get to an area where you'll be allowed to talk to Defender Morrill [#7]. This outcast will take special attention in your Pip-Boy and you'll be informed that his colleagues will be interested in using it. If this is an early stage of the game, you can ask Morrill about your father's whereabouts, but he won't have an answer for you. Instead he'll tell you to go and talk to his superior - Protector McGraw.
![[#7] - QUEST 1: Aiding the Outcasts - part 1 - Prologue - Fallout 3: Operation Anchorage - Game Guide and Walkthrough](/fallout3operationanchorage/gfx/word/574062171.jpg)
[#7]
Notice that new battles have begun behind you. Some of the outcasts are attacking a new wave of supermutants. I wouldn't recommend staying here or trying to help them, because you would only lose health and ammunition. Instead proceed to the lower level and turn right. There's an elevator here [#8] and you'll have to use it by pressing one of the buttons. Wait for the elevator to take you to an Outcast Outpost.
![[#8] - QUEST 1: Aiding the Outcasts - part 1 - Prologue - Fallout 3: Operation Anchorage - Game Guide and Walkthrough](/fallout3operationanchorage/gfx/word/574062187.jpg)
[#8]