Main quests - QUEST 3: This Galaxy Ain't Big Enough... - part 3 | Main quests F3: MZ Guide
Last update: 11 May 2016
![[#94] - Main quests - QUEST 3: This Galaxy Aint Big Enough... - part 3 - Main quests - Fallout 3: Mothership Zeta - Game Guide and Walkthrough](/fallout3mothershipzeta/gfx/word/-1012780312.jpg)
[#94]
Thankfully this was the only unpleasant surprise you had to deal with, because you won't be interrupted by the creatures again (at least not here). Destroy two of the remaining generators and the Death Ray will lose all of its power. You may now proceed towards a small room. Find a teleportation matrix there [#94] and use it to transport yourself to the Living Quarters.
MAP OF THE LIVING QUARTERS:

Map legend: 1 - teleportation matrix to: Death Ray Control; 2 - healing archways; 3 - recording; 4 - teleportation matrix to: Bridge
![[#95] - Main quests - QUEST 3: This Galaxy Aint Big Enough... - part 3 - Main quests - Fallout 3: Mothership Zeta - Game Guide and Walkthrough](/fallout3mothershipzeta/gfx/word/-1012780281.jpg)
[#95]
A new force field is located just around the corner [#95] and there are a few ways to get rid of it. You can throw a grenade to the other side, you can destroy a nearby turret in hopes that the explosion will shut it off or you can start firing at the barrier using your most powerful guns. Don't forget to maintain a safe distance if you're going for a more dangerous solution. Either way you'll have to be ready to defeat at least one abomination once the force field is down.
![[#96] - Main quests - QUEST 3: This Galaxy Aint Big Enough... - part 3 - Main quests - Fallout 3: Mothership Zeta - Game Guide and Walkthrough](/fallout3mothershipzeta/gfx/word/-1012780265.jpg)
[#96]
The next room is very large and it shouldn't come as a surprise that it's going to be well defended. Get ready to eliminate standard alien units, as well as to destroy several security turrets. Retreat to the previous corridor each time you've suffered major injuries. You may proceed to the lower level, however you wouldn't find anything of interest in the area. Once you've won choose one of two passageways leading south [#96].
![[#97] - Main quests - QUEST 3: This Galaxy Aint Big Enough... - part 3 - Main quests - Fallout 3: Mothership Zeta - Game Guide and Walkthrough](/fallout3mothershipzeta/gfx/word/-1012780250.jpg)
[#97]
Get ready, because you'll encounter more alien units while you're on your way to the ship's bridge. You'll soon reach a junction. If you decide to explore the eastern passageway you would have to destroy one additional force field and you would find Toshiro Kago [#97]. This is the same person you've rescued from one of the capsules and once again you should keep the samurai alive, because this isn't the last time you've crossed paths. If you want to proceed with the mission choose the western passageway.
![[#98] - Main quests - QUEST 3: This Galaxy Aint Big Enough... - part 3 - Main quests - Fallout 3: Mothership Zeta - Game Guide and Walkthrough](/fallout3mothershipzeta/gfx/word/-1012780234.jpg)
[#98]
Sadly the western section of the Living Quarters is going to be heavily defended by alien forces and as a result you'll have to defeat a lot of creatures before you'll reach your destination. Don't forget to activate one of the drones found along the way, however you'll be mostly on your own. After you reach the corridor leading to the north consider securing a room located to your left in the first place. Watch out for aliens here and for the security turrets. Once the battle has ended check the wall to your right to find a recording (#23) [#98]. This should be your last collectible from this group, so if you don't have all 25 recordings use my guide to find the missing rest BEFORE heading to the bridge.
![[#99] - Main quests - QUEST 3: This Galaxy Aint Big Enough... - part 3 - Main quests - Fallout 3: Mothership Zeta - Game Guide and Walkthrough](/fallout3mothershipzeta/gfx/word/-1012780218.jpg)
[#99]
Notice that you can also hack into a security terminal, however it's a waste of time. Instead keep pushing to the north and then turn west. Be careful, because there are a lot of security turrets in the area and most of them are concealed. There's a group of abominations in the last room [#99] and you'll have to get rid of the monsters to get to the teleportation matrix safely. Use this device to transport yourself to the Bridge.
MAP OF THE BRIDGE:
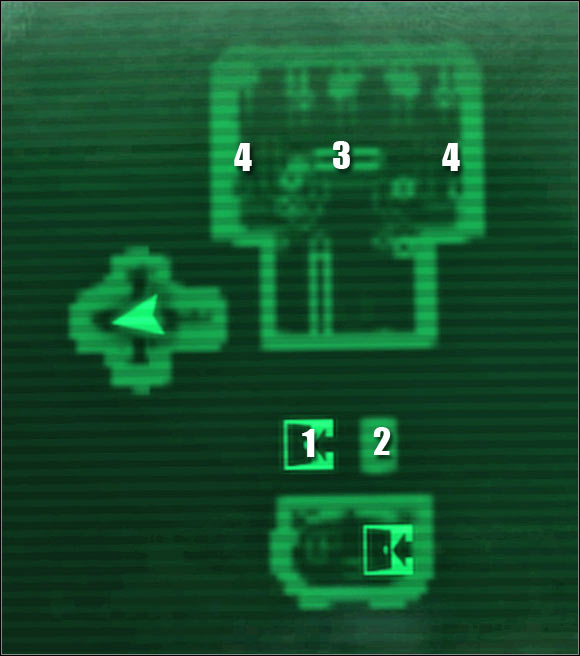
Map legend: 1 - teleportation matrix to: Living Quarters; 2 - healing archway; 3 - main control panels; 4 - control panels for the generators
![[#100] - Main quests - QUEST 3: This Galaxy Aint Big Enough... - part 3 - Main quests - Fallout 3: Mothership Zeta - Game Guide and Walkthrough](/fallout3mothershipzeta/gfx/word/-1012780187.jpg)
[#100]
Make sure that you're armed and ready for the final battle with the alien troops. Head through the northern door and you'll end up standing inside a large room. You'll now have to defeat the alien captain [#100] as well as some of the alien guards. Thankfully once you've eliminated the captain the rest of the survivors from the Observation Deck will show up, helping you out during the rest of the battle. Once you've won approach the main control console of the ship. This is the exact same spot where you first saw the alien captain.
![[#101] - Main quests - QUEST 3: This Galaxy Aint Big Enough... - part 3 - Main quests - Fallout 3: Mothership Zeta - Game Guide and Walkthrough](/fallout3mothershipzeta/gfx/word/-1012780171.jpg)
[#101]
You'll now have to take part in a simple space ship battle with an alien vessel seen through the windows. Notice that there are two panels here and that the left panel has three buttons [#101]. Your task will be to use them properly. Pressing each button transfers power and you can choose between the shields and the alien cannon. You'll want to use only two buttons on both sides, because the middle one is for achieving a compromise and you won't be interested in that.
![[#102] - Main quests - QUEST 3: This Galaxy Aint Big Enough... - part 3 - Main quests - Fallout 3: Mothership Zeta - Game Guide and Walkthrough](/fallout3mothershipzeta/gfx/word/-1012780156.jpg)
[#102]
Keep repeating all the actions described below:
Step one - Transfer all power to the shields (left switch, left panel).
Step two - Wait for an alien ship to fire and then transfer all power to the cannon (right switch, left panel).
Step three - Fire at the alien ship using the main cannon (single large switch, right panel [#102]).
Step four - Transfer all power to the shields BEFORE alien vessel fires back (left switch, left panel).
![[#103] - Main quests - QUEST 3: This Galaxy Aint Big Enough... - part 3 - Main quests - Fallout 3: Mothership Zeta - Game Guide and Walkthrough](/fallout3mothershipzeta/gfx/word/-1012780140.jpg)
[#103]
Aside from attacking the alien vessel you'll also have to deal with two dangerous situations during the course of this battle. After the first round of attacks new aliens will arrive at the Bridge. Thankfully you won't have to defeat all of them on your own, because your allies will take care of that problem. You can make this even easier and place landmines before engaging the alien vessel in direct combat. The other problem will require you to interact with four control panels located on both sides of the room [#103] in order to regain power.
![[#104] - Main quests - QUEST 3: This Galaxy Aint Big Enough... - part 3 - Main quests - Fallout 3: Mothership Zeta - Game Guide and Walkthrough](/fallout3mothershipzeta/gfx/word/-1012780125.jpg)
[#104]
Assuming you won't make any major mistakes whole operating the ship you shouldn't have any problems blowing up the alien vessel [#104]. That's it. Congratulations!!